Detecting USB hard drive
After you plug in your USB device to your USB port, linux will add new block device into /dev/ directory. At this stage you are not able to use this device as the USB filesystem needs to be mouted before you are able to retrieve any data. To find out what name your block device file have you can run fdisk command:
# fdisk -l
You will get output similar to this:
Disk /dev/sdb: 60.0 GB, 60060155904 bytes
255 heads, 63 sectors/track, 7301 cylinders
Units = cylinders of 16065 * 512 = 8225280 bytes
Disk identifier: 0x000b2b03
Device Boot Start End Blocks Id System
/dev/sdb1 1 7301 58645251 b W95 FAT32
3. Creating mount point
Create directory where you want to mount your device:
mkdir /mnt/sdb1
4. Edit /etc/fstab
To automate this process you can edit /etc/fstab file and add line similar to this:
/dev/sdb1 /mnt/sdb1 vfat defaults 0 0
Run mount command to mount all not yet mounted devices. Keep in mind that if you have more different USB devices in you system, device name can vary!!!
# mount -a
摘自:http://www.linuxconfig.org/Howto_mount_USB_drive_in_Linux
2009年12月24日 星期四
Big許功蓋文字一覽
ASCII(5C) == "\"
A45C么  AE5C娉  B85C稞  C25C擺  A55C功
AF5C珮  B95C鈾  C35C黠  A65C吒  B05C豹
BA5C暝  C45C孀  A75C吭  B15C崤  BB5C蓋
C55C髏  A85C沔  B25C淚  BC5C墦  C65C躡
A95C坼  B35C許  BD5C穀  AA5C歿  B45C廄
BE5C閱  AB5C俞  B55C琵  BF5C璞  AC5C枯
B65C跚  C05C餐  AD5C苒  B75C愧  C15C縷

ASCII(7C) == "|"
AA7C泜  B47C揉  A87C育  BE7C魯  B27C琍
BC7C慝  C67C鸛  A97C尚  B37C逖  BD7C罵
A77C坑  B17C悴  BB7C誡  C57C疊  A67C帆
B07C院  BA7C漏  C47C辮  AB7C咽  B57C稅
BF7C糕  AC7C洱  B67C閏  C07C嚐  AD7C迢
B77C會  C17C舉  A47C弋  AE7C徑  B87C腮
C27C甕  A57C四  AF7C砝  B97C頌  C37C牘
2009年12月21日 星期一
RHEL Linux安裝phpMyAdmin
到phpMyAdmin網頁下載最新的套件http://www.phpmyadmin.net/home_page/index.php
將下載回來的tar檔解開
#tar zxvf phpMyAdmin-2.11.8.1-all-languages.tar.gz
再將解壓縮的資料夾改名並移動到網頁的根目錄
(預設為/var/www/html)
#mv ./phpMyAdmin-2.11.8.1-all-languages /var/www/html/phpMyAdmin
#cd /var/www/html/phpMyAdmin
產生config.inc.php設定檔
預設是沒有這個檔案的,要先將config.sample.inc.php複製成config.inc.php
#cp ./config.sample.inc.php ./config.inc.php
將認證方式改為http或是cookie還有修改hostname
如果你要以http認證只要修改2個地方
#vi ./config.inc.php
$cfg['Servers'][$i]['auth_type'] = 'http'; <==改為http
$cfg['Servers'][$i]['host'] = '127.0.0.1'; <==改成你127.0.0.1
如果你要以cookie認證方式那你還要多設一個地方
#vi ./config.inc.php
$cfg['blowfish_secret'] = 'gtry356dfgejdkv42jnl5'; <==隨便輸入亂數的字讓cookie做密碼加密演算,最多46個字
$cfg['Servers'][$i]['auth_type'] = 'cookie'; <==改為cookie
$cfg['Servers'][$i]['host'] = 'example.com.tw'; <==改成你的電腦名稱
做完以上2個設定就完成了
因為之前有安裝一些php的套件,所以要重起httpd
#service httpd restart
網路上很多舊文章都說要改
$cfg['Servers'][$i]['user'] = 'root';
$cfg['Servers'][$i]['password'] = '*****';
那是舊的認證方法了,現在為了安全考量已不這麼做了.
You don't have permission to access/phpMyAdmin/ on this server.
關閉SELinux即可
shell>vi /etc/sysconfig/selinux
selinux=disable
shell>vi /etc/grub.conf
kernel /vmlinuz-2.6.18-8.el5 ro root=/dev/VolGroup00/LogVol00 rhgb quiet selinux=0
在quiet后面加上selinux=0
shell>vi /etc/sysconfig/selinux
selinux=disable
shell>vi /etc/grub.conf
kernel /vmlinuz-2.6.18-8.el5 ro root=/dev/VolGroup00/LogVol00 rhgb quiet selinux=0
在quiet后面加上selinux=0
2009年12月20日 星期日
XenServer 在RHEL5下實作LVM
需求:
-新增三個LVM的partition,各100M
-新增三個PV
-新增一個VG,size=100M
-新增一個LV,size=50M
-動態放大VG,size+200M
-動態放大LV,size+50M
-新增三個LVM的partition,各100M
root@new-host-6:~^G[root@new-host-6 ~]# fdisk /dev/hda
The number of cylinders for this disk is set to 1044.
There is nothing wrong with that, but this is larger than 1024,
and could in certain setups cause problems with:
1) software that runs at boot time (e.g., old versions of LILO)
2) booting and partitioning software from other OSs
(e.g., DOS FDISK, OS/2 FDISK)
Command (m for help): n
First cylinder (908-1044, default 908):
Using default value 908
Last cylinder or +size or +sizeM or +sizeK (908-1044, default 1044): +100M
Command (m for help): n
First cylinder (921-1044, default 921):
Using default value 921
Last cylinder or +size or +sizeM or +sizeK (921-1044, default 1044): +100M
Command (m for help): n
First cylinder (934-1044, default 934):
Using default value 934
Last cylinder or +size or +sizeM or +sizeK (934-1044, default 1044): +100M
Command (m for help): p
Disk /dev/hda: 8589 MB, 8589934592 bytes
255 heads, 63 sectors/track, 1044 cylinders
Units = cylinders of 16065 * 512 = 8225280 bytes
Device Boot Start End Blocks Id System
/dev/hda1 * 1 13 104391 83 Linux
/dev/hda2 14 778 6144862+ 83 Linux
/dev/hda3 779 843 522112+ 82 Linux swap / Solaris
/dev/hda4 844 1044 1614532+ 5 Extended
/dev/hda5 844 907 514048+ 83 Linux
/dev/hda6 908 920 104391 83 Linux
/dev/hda7 921 933 104391 83 Linux
/dev/hda8 934 946 104391 83 Linux
Command (m for help): t
Partition number (1-8): 6
Hex code (type L to list codes): 8e
Changed system type of partition 6 to 8e (Linux LVM)
Command (m for help): t
Partition number (1-8): 7
Hex code (type L to list codes): 8e
Changed system type of partition 7 to 8e (Linux LVM)
Command (m for help): t
Partition number (1-8): 8
Hex code (type L to list codes): 8e
Changed system type of partition 8 to 8e (Linux LVM)
Command (m for help): p
Disk /dev/hda: 8589 MB, 8589934592 bytes
255 heads, 63 sectors/track, 1044 cylinders
Units = cylinders of 16065 * 512 = 8225280 bytes
Device Boot Start End Blocks Id System
/dev/hda1 * 1 13 104391 83 Linux
/dev/hda2 14 778 6144862+ 83 Linux
/dev/hda3 779 843 522112+ 82 Linux swap / Solaris
/dev/hda4 844 1044 1614532+ 5 Extended
/dev/hda5 844 907 514048+ 83 Linux
/dev/hda6 908 920 104391 8e Linux LVM
/dev/hda7 921 933 104391 8e Linux LVM
/dev/hda8 934 946 104391 8e Linux LVM
Command (m for help): w
The partition table has been altered!
Calling ioctl() to re-read partition table.
WARNING: Re-reading the partition table failed with error 16: Device or resource busy.
The kernel still uses the old table.
The new table will be used at the next reboot.
Syncing disks.
重新開機,讓它生效!
[root@new-host-6 ~]# reboot
-新增三個PV
[root@new-host-6 ~]# pvcreate /dev/hda6
Physical volume "/dev/hda6" successfully created
[root@new-host-6 ~]# pvcreate /dev/hda7
Physical volume "/dev/hda7" successfully created
[root@new-host-6 ~]# pvcreate /dev/hda8
Physical volume "/dev/hda8" successfully created
驗證一下
[root@new-host-6 ~]# pvdisplay
--- NEW Physical volume ---
PV Name /dev/hda6
VG Name
PV Size 101.94 MB
Allocatable NO
PE Size (KByte) 0
Total PE 0
Free PE 0
Allocated PE 0
PV UUID NPXgcU-Pad8-EsG7-gFtI-hK66-8ua8-H0c78U
--- NEW Physical volume ---
PV Name /dev/hda7
VG Name
PV Size 101.94 MB
Allocatable NO
PE Size (KByte) 0
Total PE 0
Free PE 0
Allocated PE 0
PV UUID NeXk3q-RKtl-Ias2-TIO0-0gbq-IdU9-XuL5DC
--- NEW Physical volume ---
PV Name /dev/hda8
VG Name
PV Size 101.94 MB
Allocatable NO
PE Size (KByte) 0
Total PE 0
Free PE 0
Allocated PE 0
PV UUID Y9ERKn-oo61-mWj3-IOIZ-ba2p-QJID-UGzi4Q
-新增一個VG,size=100M
[root@new-host-6 ~]# vgcreate rootvg /dev/hda6
Volume group "rootvg" successfully created
驗證一下
[root@new-host-6 ~]# vgdisplay
--- Volume group ---
VG Name rootvg
System ID
Format lvm2
Metadata Areas 1
Metadata Sequence No 1
VG Access read/write
VG Status resizable
MAX LV 0
Cur LV 0
Open LV 0
Max PV 0
Cur PV 1
Act PV 1
VG Size 100.00 MB
PE Size 4.00 MB
Total PE 25
Alloc PE / Size 0 / 0
Free PE / Size 25 / 100.00 MB
VG UUID 2XpLIi-L1Cp-IbbB-cJ38-id6b-U6Qh-K4j3Gu
-新增一個LV,size=50M
[root@new-host-6 ~]# lvcreate -L +50M -n lv01 rootvg
Rounding up size to full physical extent 52.00 MB
Logical volume "lv01" created
驗證一下
[root@new-host-6 ~]# lvdisplay
--- Logical volume ---
LV Name /dev/rootvg/lv01
VG Name rootvg
LV UUID zWA1PJ-iy4L-PZcG-NgNw-eSue-7xmP-Tw2HNs
LV Write Access read/write
LV Status available
# open 0
LV Size 52.00 MB
Current LE 13
Segments 1
Allocation inherit
Read ahead sectors 0
Block device 253:0
建立一個mount point: /mnt/lvm,並將其格式化成ext3檔案格式,掛載於/mnt/lvm下
[root@new-host-6 ~]# mkdir /mnt/lvm
[root@new-host-6 ~]# mke2fs -j /dev/rootvg/lv01
mke2fs 1.39 (29-May-2006)
Filesystem label=
OS type: Linux
Block size=1024 (log=0)
Fragment size=1024 (log=0)
13328 inodes, 53248 blocks
2662 blocks (5.00%) reserved for the super user
First data block=1
Maximum filesystem blocks=54525952
7 block groups
8192 blocks per group, 8192 fragments per group
1904 inodes per group
Superblock backups stored on blocks:
8193, 24577, 40961
Writing inode tables: done
Creating journal (4096 blocks): done
Writing superblocks and filesystem accounting information: done
This filesystem will be automatically checked every 20 mounts or
180 days, whichever comes first. Use tune2fs -c or -i to override.
[root@new-host-6 ~]# mount /dev/rootvg/lv01 /mnt/lvm/
[root@new-host-6 ~]# df -h
Filesystem Size Used Avail Use% Mounted on
/dev/hda2 5.7G 2.9G 2.6G 53% /
/dev/hda1 99M 9.8M 84M 11% /boot
tmpfs 125M 0 125M 0% /dev/shm
/dev/hda5 487M 11M 451M 3% /home
/dev/mapper/rootvg-lv01
51M 4.9M 43M 11% /mnt/lvm
Copy一些檔案到此目錄下,以供等會驗證動態放大檔案系統時,資料不會消失
[root@new-host-6 ~]# cp -r /boot/ /mnt/lvm/
[root@new-host-6 ~]# cd /mnt/lvm/
[root@new-host-6 lvm]# ll
total 13
drwxr-xr-x 4 root root 1024 Apr 10 20:17 boot
drwx------ 2 root root 12288 Apr 10 20:15 lost+found
[root@new-host-6 lvm]#
-動態放大VG,size+200M
[root@new-host-6 lvm]# vgextend rootvg /dev/hda7 /dev/hda8
Volume group "rootvg" successfully extended
驗證一下
[root@new-host-6 lvm]# vgdisplay
--- Volume group ---
VG Name rootvg
System ID
Format lvm2
Metadata Areas 3
Metadata Sequence No 3
VG Access read/write
VG Status resizable
MAX LV 0
Cur LV 1
Open LV 1
Max PV 0
Cur PV 3
Act PV 3
VG Size 300.00 MB
PE Size 4.00 MB
Total PE 75
Alloc PE / Size 13 / 52.00 MB
Free PE / Size 62 / 248.00 MB
VG UUID 2XpLIi-L1Cp-IbbB-cJ38-id6b-U6Qh-K4j3Gu
-動態放大LV,size+50M
[root@new-host-6 lvm]# lvextend -L +50M /dev/rootvg/lv01
Rounding up size to full physical extent 52.00 MB
Extending logical volume lv01 to 104.00 MB
Logical volume lv01 successfully resized
驗證一下
[root@new-host-6 lvm]# lvdisplay
--- Logical volume ---
LV Name /dev/rootvg/lv01
VG Name rootvg
LV UUID zWA1PJ-iy4L-PZcG-NgNw-eSue-7xmP-Tw2HNs
LV Write Access read/write
LV Status available
# open 1
LV Size 104.00 MB
Current LE 26
Segments 2
Allocation inherit
Read ahead sectors 0
Block device 253:0
[root@new-host-6 lvm]# df -h
Filesystem Size Used Avail Use% Mounted on
/dev/hda2 5.7G 2.9G 2.6G 53% /
/dev/hda1 99M 9.8M 84M 11% /boot
tmpfs 125M 0 125M 0% /dev/shm
/dev/hda5 487M 11M 451M 3% /home
/dev/mapper/rootvg-lv01
51M 9.1M 39M 20% /mnt/lvm
此時因為還沒執行線上更新大小的動作,所以磁區大小還不會放大喔!
這裡跟RHEL4不同,改用resize2fs 來線上更新
[root@new-host-6 lvm]# resize2fs /dev/rootvg/lv01
resize2fs 1.39 (29-May-2006)
Filesystem at /dev/rootvg/lv01 is mounted on /mnt/lvm; on-line resizing required
Performing an on-line resize of /dev/rootvg/lv01 to 106496 (1k) blocks.
The filesystem on /dev/rootvg/lv01 is now 106496 blocks long.
[root@new-host-6 lvm]# df -h
Filesystem Size Used Avail Use% Mounted on
/dev/hda2 5.7G 2.9G 2.6G 53% /
/dev/hda1 99M 9.8M 84M 11% /boot
tmpfs 125M 0 125M 0% /dev/shm
/dev/hda5 487M 11M 451M 3% /home
/dev/mapper/rootvg-lv01
101M 9.5M 87M 10% /mnt/lvm
[root@new-host-6 lvm]# cd /mnt/lvm/
[root@new-host-6 lvm]# ll
total 13
drwxr-xr-x 4 root root 1024 Apr 10 20:17 boot
drwx------ 2 root root 12288 Apr 10 20:15 lost+found
資料沒有遺失,磁區確成功放大了!
摘自:http://hi.baidu.com/yep0213/blog/item/42445eedb50bbcd72e2e215b.html
上面為完成文章,我想要在Xenserver中新增空間,我的完整做法如下(註:我新增了一顆HDD - hdb):
以下是我在原本10G的VM加入100G的步驟:
1.shutdown VM
2.Add Storage 100G
3.start VM
4.fdisk /dev/hdb
5.sync;sync;sync;reboot
6.pvcreate /dev/hdb1
7.vgextend VolGroup00 /dev/hdb1
8.vgextend VolGroup00 /dev/hdb1
9.lvextend -L +99G /dev/mapper/VolGroup00-LogVol00
10.lvdisplay
11.resize2fs /dev/VolGroup00/LogVol00
完成~
-新增三個LVM的partition,各100M
-新增三個PV
-新增一個VG,size=100M
-新增一個LV,size=50M
-動態放大VG,size+200M
-動態放大LV,size+50M
-新增三個LVM的partition,各100M
root@new-host-6:~^G[root@new-host-6 ~]# fdisk /dev/hda
The number of cylinders for this disk is set to 1044.
There is nothing wrong with that, but this is larger than 1024,
and could in certain setups cause problems with:
1) software that runs at boot time (e.g., old versions of LILO)
2) booting and partitioning software from other OSs
(e.g., DOS FDISK, OS/2 FDISK)
Command (m for help): n
First cylinder (908-1044, default 908):
Using default value 908
Last cylinder or +size or +sizeM or +sizeK (908-1044, default 1044): +100M
Command (m for help): n
First cylinder (921-1044, default 921):
Using default value 921
Last cylinder or +size or +sizeM or +sizeK (921-1044, default 1044): +100M
Command (m for help): n
First cylinder (934-1044, default 934):
Using default value 934
Last cylinder or +size or +sizeM or +sizeK (934-1044, default 1044): +100M
Command (m for help): p
Disk /dev/hda: 8589 MB, 8589934592 bytes
255 heads, 63 sectors/track, 1044 cylinders
Units = cylinders of 16065 * 512 = 8225280 bytes
Device Boot Start End Blocks Id System
/dev/hda1 * 1 13 104391 83 Linux
/dev/hda2 14 778 6144862+ 83 Linux
/dev/hda3 779 843 522112+ 82 Linux swap / Solaris
/dev/hda4 844 1044 1614532+ 5 Extended
/dev/hda5 844 907 514048+ 83 Linux
/dev/hda6 908 920 104391 83 Linux
/dev/hda7 921 933 104391 83 Linux
/dev/hda8 934 946 104391 83 Linux
Command (m for help): t
Partition number (1-8): 6
Hex code (type L to list codes): 8e
Changed system type of partition 6 to 8e (Linux LVM)
Command (m for help): t
Partition number (1-8): 7
Hex code (type L to list codes): 8e
Changed system type of partition 7 to 8e (Linux LVM)
Command (m for help): t
Partition number (1-8): 8
Hex code (type L to list codes): 8e
Changed system type of partition 8 to 8e (Linux LVM)
Command (m for help): p
Disk /dev/hda: 8589 MB, 8589934592 bytes
255 heads, 63 sectors/track, 1044 cylinders
Units = cylinders of 16065 * 512 = 8225280 bytes
Device Boot Start End Blocks Id System
/dev/hda1 * 1 13 104391 83 Linux
/dev/hda2 14 778 6144862+ 83 Linux
/dev/hda3 779 843 522112+ 82 Linux swap / Solaris
/dev/hda4 844 1044 1614532+ 5 Extended
/dev/hda5 844 907 514048+ 83 Linux
/dev/hda6 908 920 104391 8e Linux LVM
/dev/hda7 921 933 104391 8e Linux LVM
/dev/hda8 934 946 104391 8e Linux LVM
Command (m for help): w
The partition table has been altered!
Calling ioctl() to re-read partition table.
WARNING: Re-reading the partition table failed with error 16: Device or resource busy.
The kernel still uses the old table.
The new table will be used at the next reboot.
Syncing disks.
重新開機,讓它生效!
[root@new-host-6 ~]# reboot
-新增三個PV
[root@new-host-6 ~]# pvcreate /dev/hda6
Physical volume "/dev/hda6" successfully created
[root@new-host-6 ~]# pvcreate /dev/hda7
Physical volume "/dev/hda7" successfully created
[root@new-host-6 ~]# pvcreate /dev/hda8
Physical volume "/dev/hda8" successfully created
驗證一下
[root@new-host-6 ~]# pvdisplay
--- NEW Physical volume ---
PV Name /dev/hda6
VG Name
PV Size 101.94 MB
Allocatable NO
PE Size (KByte) 0
Total PE 0
Free PE 0
Allocated PE 0
PV UUID NPXgcU-Pad8-EsG7-gFtI-hK66-8ua8-H0c78U
--- NEW Physical volume ---
PV Name /dev/hda7
VG Name
PV Size 101.94 MB
Allocatable NO
PE Size (KByte) 0
Total PE 0
Free PE 0
Allocated PE 0
PV UUID NeXk3q-RKtl-Ias2-TIO0-0gbq-IdU9-XuL5DC
--- NEW Physical volume ---
PV Name /dev/hda8
VG Name
PV Size 101.94 MB
Allocatable NO
PE Size (KByte) 0
Total PE 0
Free PE 0
Allocated PE 0
PV UUID Y9ERKn-oo61-mWj3-IOIZ-ba2p-QJID-UGzi4Q
-新增一個VG,size=100M
[root@new-host-6 ~]# vgcreate rootvg /dev/hda6
Volume group "rootvg" successfully created
驗證一下
[root@new-host-6 ~]# vgdisplay
--- Volume group ---
VG Name rootvg
System ID
Format lvm2
Metadata Areas 1
Metadata Sequence No 1
VG Access read/write
VG Status resizable
MAX LV 0
Cur LV 0
Open LV 0
Max PV 0
Cur PV 1
Act PV 1
VG Size 100.00 MB
PE Size 4.00 MB
Total PE 25
Alloc PE / Size 0 / 0
Free PE / Size 25 / 100.00 MB
VG UUID 2XpLIi-L1Cp-IbbB-cJ38-id6b-U6Qh-K4j3Gu
-新增一個LV,size=50M
[root@new-host-6 ~]# lvcreate -L +50M -n lv01 rootvg
Rounding up size to full physical extent 52.00 MB
Logical volume "lv01" created
驗證一下
[root@new-host-6 ~]# lvdisplay
--- Logical volume ---
LV Name /dev/rootvg/lv01
VG Name rootvg
LV UUID zWA1PJ-iy4L-PZcG-NgNw-eSue-7xmP-Tw2HNs
LV Write Access read/write
LV Status available
# open 0
LV Size 52.00 MB
Current LE 13
Segments 1
Allocation inherit
Read ahead sectors 0
Block device 253:0
建立一個mount point: /mnt/lvm,並將其格式化成ext3檔案格式,掛載於/mnt/lvm下
[root@new-host-6 ~]# mkdir /mnt/lvm
[root@new-host-6 ~]# mke2fs -j /dev/rootvg/lv01
mke2fs 1.39 (29-May-2006)
Filesystem label=
OS type: Linux
Block size=1024 (log=0)
Fragment size=1024 (log=0)
13328 inodes, 53248 blocks
2662 blocks (5.00%) reserved for the super user
First data block=1
Maximum filesystem blocks=54525952
7 block groups
8192 blocks per group, 8192 fragments per group
1904 inodes per group
Superblock backups stored on blocks:
8193, 24577, 40961
Writing inode tables: done
Creating journal (4096 blocks): done
Writing superblocks and filesystem accounting information: done
This filesystem will be automatically checked every 20 mounts or
180 days, whichever comes first. Use tune2fs -c or -i to override.
[root@new-host-6 ~]# mount /dev/rootvg/lv01 /mnt/lvm/
[root@new-host-6 ~]# df -h
Filesystem Size Used Avail Use% Mounted on
/dev/hda2 5.7G 2.9G 2.6G 53% /
/dev/hda1 99M 9.8M 84M 11% /boot
tmpfs 125M 0 125M 0% /dev/shm
/dev/hda5 487M 11M 451M 3% /home
/dev/mapper/rootvg-lv01
51M 4.9M 43M 11% /mnt/lvm
Copy一些檔案到此目錄下,以供等會驗證動態放大檔案系統時,資料不會消失
[root@new-host-6 ~]# cp -r /boot/ /mnt/lvm/
[root@new-host-6 ~]# cd /mnt/lvm/
[root@new-host-6 lvm]# ll
total 13
drwxr-xr-x 4 root root 1024 Apr 10 20:17 boot
drwx------ 2 root root 12288 Apr 10 20:15 lost+found
[root@new-host-6 lvm]#
-動態放大VG,size+200M
[root@new-host-6 lvm]# vgextend rootvg /dev/hda7 /dev/hda8
Volume group "rootvg" successfully extended
驗證一下
[root@new-host-6 lvm]# vgdisplay
--- Volume group ---
VG Name rootvg
System ID
Format lvm2
Metadata Areas 3
Metadata Sequence No 3
VG Access read/write
VG Status resizable
MAX LV 0
Cur LV 1
Open LV 1
Max PV 0
Cur PV 3
Act PV 3
VG Size 300.00 MB
PE Size 4.00 MB
Total PE 75
Alloc PE / Size 13 / 52.00 MB
Free PE / Size 62 / 248.00 MB
VG UUID 2XpLIi-L1Cp-IbbB-cJ38-id6b-U6Qh-K4j3Gu
-動態放大LV,size+50M
[root@new-host-6 lvm]# lvextend -L +50M /dev/rootvg/lv01
Rounding up size to full physical extent 52.00 MB
Extending logical volume lv01 to 104.00 MB
Logical volume lv01 successfully resized
驗證一下
[root@new-host-6 lvm]# lvdisplay
--- Logical volume ---
LV Name /dev/rootvg/lv01
VG Name rootvg
LV UUID zWA1PJ-iy4L-PZcG-NgNw-eSue-7xmP-Tw2HNs
LV Write Access read/write
LV Status available
# open 1
LV Size 104.00 MB
Current LE 26
Segments 2
Allocation inherit
Read ahead sectors 0
Block device 253:0
[root@new-host-6 lvm]# df -h
Filesystem Size Used Avail Use% Mounted on
/dev/hda2 5.7G 2.9G 2.6G 53% /
/dev/hda1 99M 9.8M 84M 11% /boot
tmpfs 125M 0 125M 0% /dev/shm
/dev/hda5 487M 11M 451M 3% /home
/dev/mapper/rootvg-lv01
51M 9.1M 39M 20% /mnt/lvm
此時因為還沒執行線上更新大小的動作,所以磁區大小還不會放大喔!
這裡跟RHEL4不同,改用resize2fs 來線上更新
[root@new-host-6 lvm]# resize2fs /dev/rootvg/lv01
resize2fs 1.39 (29-May-2006)
Filesystem at /dev/rootvg/lv01 is mounted on /mnt/lvm; on-line resizing required
Performing an on-line resize of /dev/rootvg/lv01 to 106496 (1k) blocks.
The filesystem on /dev/rootvg/lv01 is now 106496 blocks long.
[root@new-host-6 lvm]# df -h
Filesystem Size Used Avail Use% Mounted on
/dev/hda2 5.7G 2.9G 2.6G 53% /
/dev/hda1 99M 9.8M 84M 11% /boot
tmpfs 125M 0 125M 0% /dev/shm
/dev/hda5 487M 11M 451M 3% /home
/dev/mapper/rootvg-lv01
101M 9.5M 87M 10% /mnt/lvm
[root@new-host-6 lvm]# cd /mnt/lvm/
[root@new-host-6 lvm]# ll
total 13
drwxr-xr-x 4 root root 1024 Apr 10 20:17 boot
drwx------ 2 root root 12288 Apr 10 20:15 lost+found
資料沒有遺失,磁區確成功放大了!
摘自:http://hi.baidu.com/yep0213/blog/item/42445eedb50bbcd72e2e215b.html
上面為完成文章,我想要在Xenserver中新增空間,我的完整做法如下(註:我新增了一顆HDD - hdb):
#fdisk -l
#fdisk /dev/hdb
The number of cylinders for this disk is set to 1044.
There is nothing wrong with that, but this is larger than 1024,
and could in certain setups cause problems with:
1) software that runs at boot time (e.g., old versions of LILO)
2) booting and partitioning software from other OSs
(e.g., DOS FDISK, OS/2 FDISK)

Command (m for help): n
First cylinder (908-1044, default 908):
Using default value 908
Last cylinder or +size or +sizeM or +sizeK (908-1044, default 1044): +100000M

Command (m for help): t
Partition number (1-8): 6
Hex code (type L to list codes): 8e
Changed system type of partition 6 to 8e (Linux LVM)

Command (m for help): w
The partition table has been altered!

#reboot

#lvextend -L +100G /dev/mapper/VolGroup00-LogVol00
#resize2fs /dev/VolGroup00/LogVol00
# sync;sync;sync;shutdown -r now

PS : Delete Physical / Logical Volumes
#lvremove /dev/VolGroup00/LogVol03
以下是我在原本10G的VM加入100G的步驟:
1.shutdown VM
2.Add Storage 100G
3.start VM
4.fdisk /dev/hdb
Command (m for help): n
First cylinder (934-1044, default 934):
Using default value 934
Last cylinder or +size or +sizeM or +sizeK (934-1044, default 1044): +100000M

Command (m for help): p #看cylinder狀況

Command (m for help): t
Partition number (1): 1
Hex code (type L to list codes): 8e
Changed system type of partition 1 to 8e (Linux LVM)

Command (m for help): w
The partition table has been altered!
5.sync;sync;sync;reboot
6.pvcreate /dev/hdb1
7.vgextend VolGroup00 /dev/hdb1
8.vgextend VolGroup00 /dev/hdb1
9.lvextend -L +99G /dev/mapper/VolGroup00-LogVol00
10.lvdisplay
11.resize2fs /dev/VolGroup00/LogVol00
完成~
[Debug] XenServer vgscan Couldn't find device with uuid
indigo:~# vgscan
Reading all physical volumes. This may take a while...
Couldn't find device with uuid 'p4YzIv-Ntiq-NxPo-J4tw-UDXF-4w4V-FiXqLl'.
Couldn't find all physical volumes for volume group storage.
Volume group "storage" not found
solve : vgreduce --removemissing vg00
Reading all physical volumes. This may take a while...
Couldn't find device with uuid 'p4YzIv-Ntiq-NxPo-J4tw-UDXF-4w4V-FiXqLl'.
Couldn't find all physical volumes for volume group storage.
Volume group "storage" not found
solve : vgreduce --removemissing vg00
XenServer - 新增儲存裝置 - 硬碟
基本上在 XenServer 要新增硬碟要用手動命令列的方式來進行,這裡的硬碟表示為本地端的硬碟,如系統上的 SATA 或是 SAS 的硬碟,而且還要重新開機從能完成. XenServer 採用的是 LVM 的方式來管裡硬碟空間,所以它可以很簡單的方式把硬碟空間放大縮小,LVM(Logical Volume Manager)是一種可以動態變更 partition 大小的方式,可以讓你能更容易利用管理你的硬碟.有興趣的可以參考 LVM-簡介 - http://benjr.tw/?q=node/55 不說廢話方法如下:
第一步:
關機後將新的硬碟加入到系統中,並設定好,確定在系統的 BIOS 可以正確無誤的看到你的硬碟.
第二步:
進入到 XenServer 並進入命令列模式 (Configuration / Local Command Shell) 並使用 Fdisk 確定可以看到你的硬碟
[root@benjr ~]# fdisk -l
Disk /dev/sda: 146.8 GB, 146814976000 bytes
255 heads, 63 sectors/track, 17849 cylinders
Units = cylinders of 16065 * 512 = 8225280 bytes
Device Boot Start End Blocks Id System
/dev/sda1 * 1 499 4008186 83 Linux
/dev/sda2 500 998 4008217+ 83 Linux
/dev/sda3 999 17849 135355657+ 83 Linux
Disk /dev/sdb: 73.4 GB, 73407488000 bytes
255 heads, 63 sectors/track, 8924 cylinders
Units = cylinders of 16065 * 512 = 8225280 bytes
Disk /dev/sdb doesn't contain a valid partition table
/dev/sdb 將是我要新增的硬碟.
第三步:
產生 physical volume
[root@benhr ~]#pvcreate /dev/sdb
第四步:
將 XenSource volume group 加入新的硬碟:
[root@benjr ~]# vgextend VG_XenSource /dev/sdb
其中的 VG_XenSource 會不太一樣你可以透過 tab 鍵來直接完成他的全名.你也可以透過 vgscan 的指令來看 VG_XenSource 的全名.pvcreate 和 vgextend 是做什麼用的有興趣請參考. http://benjr.tw/?q=node/56
第五步:
重新開機吧!你會在 UI (Configuration / Disks and Storage Repositories / Current Storage Repositories / Local storage)看到硬碟空間變大了.
2009年12月18日 星期五
MySQL big5轉utf8編碼
mysqldump -uroot -p --default-character-set=latin1 nfspc >nfspc.sql
mysqldump -uroot -p --default-character-set=latin1 pigfather >pigfather.sql
piconv -f big5 -t utf8 nfspc.sql >nfspc_utf8.sql
piconv -f big5 -t utf8 pigfather.sql >pigfather_utf8.sql
vi nfspc_utf8.sql
SET NAMES utf8;
SET CHARACTER_SET_CLIENT=utf8;
SET CHARACTER_SET_RESULTS=utf8;
:1,$s/DEFAULT CHARSET=latin1/DEFAULT CHARSET=utf8/g
:1,$s/latin1/utf8/gc
:1,$s/許\\/許/g
:1,$s/功\\/功/g
:1,$s/蓋\\/蓋/g
:1,$s/餐\\/餐/g
:1,$s/愧\\/愧/g
:1,$s/擺\\/擺/g
:1,$s/穀\\/穀/g
:1,$s/淚\\/淚/g
:1,$s/豹\\/豹/g
:1,$s/珮\\/珮/g
mysql -uroot -p nfspc < nfspc_utf8.sql
mysql -uroot -p pigfather < pigfather_utf8.sql
摘自:http://tw.myblog.yahoo.com/d89413125/article?mid=70&prev=74&next=62
SQL Join語法
SQL Join語法
Join有兩種屬性:
INNER
OUTER
1.INNER
只顯示匹配的行.
2.OUTER
不論是否匹配,都顯示行.
LEFT, RIGHT, FULL 都帶有OUTER屬性
Join共有六種:
Inner Join
Natural Join
Left Outer Join
Right Outer Join
Full Outer Join
Cross Join
1.Inner Join
Inner Join其實等同於多個Where條件式的連結,
像
FROM a, b WHERE a.id = b.id AND b.val > 5
FROM a INNER JOIN b ON (a.id = b.id) WHERE b.val > 5
是一樣的
2.Natural Join
Natural Join只是自動的匹配兩個表之間相同的欄位,
像
FROM a, b WHERE a.id = b.id AND b.val > 5
FROM a NATURAL JOIN b WHERE b.val > 5
是一樣的.
可用在任何一種Inner 或 Outer Join.
Natural 與 USING 也是很相像的,只是Natural
只會讓兩個表的相同欄位出現一次.
3.Left Outer Join
4.Right Outer Join
其實這兩個幾乎是一樣的,只是方向性的不同.
以Left Outer Join來說,左邊顯示所有左表的值,而右邊顯示右表匹配的值.
如果沒有匹配的右表表,則放空值.
Right Outer Join則左右方向相反.
5.Full Outer Join
左右表都顯示,匹配的則顯示,沒有匹配的放空值.
好比把 Left Outer Join 和 Right Outer Join作聯集.
6.Cross Join
交叉連結,會得到兩個表的所有乘積組合.
資料來源:http://www.wretch.cc/blog/sky4s/2250385
MySQL Tarball Source 安裝備忘
下載 MySQL 4.1.x Source (Compressed GNU TAR archive)
建立 mysql 帳號 (刻意讓 uid / gid 同 FC3 RPM 安裝)
groupadd -g 27 mysql
useradd -u 27 -g mysql -d /var/lib/mysql mysql
安裝 MySQL
tar zxf mysql-4.1.22.tar.gz
cd mysql-4.1.22
./configure --prefix=/usr/local/mysql
make && make install
cp support-files/my-medium.cnf /etc/my.cnf
cp support-files/mysql-log-rotate /etc/logrotate.d/mysql
cp support-files/mysql.server /etc/init.d/mysql
chmod +x /etc/init.d/mysql
chkconfig --add mysql
初始化資料庫與系統環境
export PATH=$PATH:/usr/local/mysql/bin
mysql_install_db --user=mysql
cd /usr/local/mysql
chown -R root .
chown -R mysql var
chgrp -R mysql .
設置管理員帳號密碼 (首次啟動 MySQL)
Script 方式
/etc/init.d/mysql start
mysqladmin -u root password 'your_password'
停止 MySQL: /etc/init.d/mysql stop
手動方式
mysqld_safe --user=mysql &
mysqladmin -u root password 'your_password'
停止 MySQL: mysqladmin -u root -p shutdown
設定系統環境
設定 Log File
vi /etc/my.cnf
[safe_mysqld]
err-log = /usr/local/mysql/var/mysqld.log
設定 mysqladmin 參數檔
vi /root/.my.cnf
[mysqladmin]
password=your_password
user=root
加入路徑 (PATH)
vi ~/.bash_profile
PATH=$PATH:$HOME/bin:/usr/local/mysql/bin
#source ~/.bash_profile
設定 shared library
vi /etc/ld.so.conf
/usr/local/mysql/lib/mysql
ldconfig
讓 Perl 支援 MySQL
cpan (或 perl -MCPAN -e shell)
install DBI::DBD
install DBD::mysql
若 DBD::mysql 安裝失敗
到 http://search.cpan.org 找 DBD::mysql, 下載 tarball source
perl Makefile.PL --mysql_config=/usr/local/mysql/bin/mysql_config
make && make install
附錄: 其他備忘
mirror tips
rsync -a --compress --progress --bwlimit=10 root@master.host:/remote/path /local/path
MySQL Replication
每 5 分鐘執行 rsync 同步 /blog
mysqldump
mysqldump -u root -p db_name > dump_file.sql
mysql -u root -p -A db_name < dump_file.sql
摘自:http://cha.homeip.net/blog/archives/2007/09/mysql_tarball_s.html
Linux RHEL MySQL 5.1.41安裝教學
到http://dev.mysql.com/downloads/mysql/5.1.html下載
Source downloads -- Compressed GNU TAR archive (tar.gz)
shell> yum -y install gcc-c++
shell> yum -y install ncurses-devel
shell> tar -zxvf mysql-5.1.41.tar.gz
shell> cd mysql-5.1.41
shell> CFLAGS="-O3" CXX=gcc CXXFLAGS="-O3 -felide-constructors \
-fno-exceptions -fno-rtti" ./configure \
--prefix=/usr/local/mysql --enable-assembler \
--with-mysqld-ldflags=-all-static --with-charset=utf8 --with-collation=utf8_general_ci --with-extra-charsets=all
shell> make
shell> make install
shell> groupadd mysql
shell> useradd -g mysql mysql
shell> gunzip < mysql-VERSION.tar.gz | tar -xvf -
shell> cd mysql-VERSION
shell> ./configure --prefix=/usr/local/mysql
shell> make
shell> make install
shell> cp support-files/my-medium.cnf /etc/my.cnf
shell> cd /usr/local/mysql
shell> chown -R mysql .
shell> chgrp -R mysql .
shell> bin/mysql_install_db --user=mysql
shell> chown -R root .
shell> chown -R mysql var
shell> bin/mysqld_safe --user=mysql &
shell> cp support-files/mysql.server /etc/init.d
shell> /etc/init.d
shell> chmod +x mysql.server
shell> /etc/init.d/mysql.server start|stop|restart
[Debug] MySQL Error
Q1.rpm 安裝 MySQL-5.0.77-0.src.rpm 失敗?
Error Meaage:
利用 rpm 指令來手動安裝 MySQL-5.0.77-0.src.rpm 失敗,並出現如下錯誤訊息。
# rpm -ivh MySQL-5.0.77-0.src.rpm
1:MySQL warning: user mysqldev does not exist - using root
warning: user mysqldev does not exist - using root
warning: user mysqldev does not exist - using root
########################################### [100%]
Ans:
代表目前用來安裝 MySQL-5.0.77-0.src.rpm 使用者為 root 機於安全性的考量,系統您建立一個用來安裝 mysql 的使用者帳號 (mysqldev),在新增 mysqldev 使用者之後便可順利執行 rpm 指令來安裝 MySQL-5.0.77-0.src.rpm。
#useradd mysqldev
#rpm -ivh MySQL-5.0.77-0.src.rpm
1:MySQL ########################################### [100%]
Q2.configure: error: no acceptable C compiler found in $PATH?
Error Meaage:
順利解開 MySQL-5.0.77-0.src.rpm 後執行 ./configure 指令來進行環境配置時失敗,並出現如下錯誤訊息。
#cd mysql-5.0.77
#./configure
checking build system type... i686-pc-linux-gnu
checking host system type... i686-pc-linux-gnu
checking target system type... i686-pc-linux-gnu
checking for a BSD-compatible install... /usr/bin/install -c
checking whether build environment is sane... yes
checking for a thread-safe mkdir -p... /bin/mkdir -p
checking for gawk... gawk
checking whether make sets $(MAKE)... yes
checking "character sets"... default: latin1, collation: latin1_swedish_ci; compiled in: latin1 latin1 utf8
checking whether to compile national Unicode collations... yes
checking whether build environment is sane... yes
checking whether make sets $(MAKE)... (cached) yes
checking for gawk... (cached) gawk
checking for gcc... no
checking for cc... no
checking for cl.exe... no
configure: error: in `/usr/src/redhat/SOURCES/mysql-5.0.77':
configure: error: no acceptable C compiler found in $PATH //系統沒有安裝 gcc 套件 (無法編譯)
Ans:
原因在於目前系統並沒有安裝 gcc 套件所以進行環境設定 (./configure) 時並出現錯誤訊息,安裝好 gcc 套件後即可順利執行。
#yum -y install gcc-c++
Q3.checking for termcap functions library... configure: error: No curses/termcap library found?
Error Meaage:
順利解開 MySQL-5.0.77-0.src.rpm 後執行 ./configure 指令來進行環境配置時失敗,並出現如下錯誤訊息。
#cd mysql-5.0.77
#./configure
...略...
checking for termcap functions library... configure: error: No curses/termcap library found
Ans:
請使用如下參數來配合 ./configure 指令即可
./configure --with-named-curses-libs=/usr/lib/libncursesw.so.5
Q4.mysqladmin: connect to server at 'localhost' failed?
Error Meaage:
剛安裝好 MySQL 並啟動 MySQL 服務成功之後,使用 mysqladmin 設定 MySQL 管理者 (root) 密碼時失敗,並出現如下錯誤訊息。且也無法使用 mysql -u root -p 來登入 MySQL?
#mysqladmin -u root password 123456
mysqladmin: connect to server at 'localhost' failed
error: 'Access denied for user 'root'@'localhost' (using password: NO)'
Ans:
請依如下步驟來重新設定 MySQL 管理者密碼 (也適用於密碼忘記時,前提是擁有主機系統管理權限),完成如下步驟後即可使用 mysql -u root -p 來登入 MySQL。
停止 MySQL 服務
#/etc/rc.d/init.d/mysql stop
Shutting down MySQL.. [ OK ]
執行指令 mysqld_safe 啟動 MySQL 服務於安全模式
#mysqld_safe --user=mysql --skip-grant-tables --skip-networking &
[1] 28107
執行 mysql 指令來登入 MySQL
#mysql -u root mysql
Reading table information for completion of table and column names
You can turn off this feature to get a quicker startup with -A
Welcome to the MySQL monitor. Commands end with ; or \g.
Your MySQL connection id is 1
Server version: 5.0.77-community MySQL Community Edition (GPL)
Type 'help;' or '\h' for help. Type '\c' to clear the buffer.
mysql>
執行 UPDATE 指令重新設定 MySQL 管理者密碼為 123456
mysql> UPDATE user SET Password=PASSWORD('123456') where USER='root';
Query OK, 3 rows affected (0.00 sec)
Rows matched: 3 Changed: 3 Warnings: 0
執行 FLUSH 指令更新 MySQL 設定
mysql> FLUSH PRIVILEGES;
Query OK, 0 rows affected (0.00 sec)
執行 quit 指令離開 MySQL
mysql> quit
Bye
執行指令重新啟動 MySQL 服務
#/etc/rc.d/init.d/mysql restart
Shutting down MySQL.. [ OK ]
Starting MySQL [ OK ]
Q5.ERROR 1064 (42000) at line 1: You have an error in your SQL syntax near '嚜?
Error Meaage:
匯入 Dump Files 至指定的資料庫時失敗並出現如下錯誤訊息。
#mysql -u root -p databases_name < backup1.sql
Enter password:
ERROR 1064 (42000) at line 1: You have an error in your SQL syntax; check the manual that corresponds to your MySQL server version for the right syntax to use near '嚜?
SET SQL_MODE="NO_AUTO_VALUE_ON_ZERO"' at line 1
使用 vi 來查看 backup1.sql 內容時為正常,若使用 less 指令來查看 backup1.sql 內容時則看到第一行有此字 嚜?
#less backup1.sql
嚜?- phpMyAdmin SQL Dump
-- version 2.11.3
-- http://www.phpmyadmin.net
--
-- Host: localhost
...略...
Ans:
主因 MySQL 資料庫編碼格式設定為 [UTF-8] 但匯入的 backup1.sql 檔案編碼格式不是 [UTF-8] 所導致的。
[資安論壇 • 檢視主題 - 求助 ~ FC3 MySQL 3.x匯入到F7 MySQL 5.x字元集問題]
Q6.如何移除預設的 mysql-5.0.45-7.el5.i386?
Error Meaage:
CentOS 5.2 安裝時有勾選 KDE 及 Server 選項,但當嘗試要安裝 MySQL-server-community-5.0.82-0.rhel5.i386.rpm 時出現如下錯誤訊息
#rpm -ivh MySQL-server-community-5.0.82-0.rhel5.i386.rpm
error: Failed dependencies:
MySQL conflicts with mysql-5.0.45-7.el5.i386
系統顯示與目前的 mysql-5.0.45-7.el5.i386 產生衝突,嘗試使用 rpm -e 指令來移除它但出現如下錯誤訊息 (相依套件關系)
#rpm -e mysql-5.0.45-7.el5
error: Failed dependencies:
libmysqlclient.so.15 is needed by (installed) dovecot-1.0.7-2.el5.i386
libmysqlclient.so.15(libmysqlclient_15) is needed by (installed) dovecot-1.0.7-2.el5.i386
Ans:
由於有套件相依性的關系因此必須加上 --nodeps 參數來強制移除 mysql-5.0.45-7.el5,移除後即可順利安裝 MySQL-server-community-5.0.82-0.rhel5.i386.rpm
#rpm -e mysql-5.0.45-7.el5 --nodeps
#rpm -ivh MySQL-server-community-5.0.82-0.rhel5.i386.rpm
Preparing... ########################################### [100%]
1:MySQL-server-community ########################################### [100%]
Q7.error: cannot create %sourcedir /usr/src/redhat/SOURCES
Error Meaage:
安裝 MySQL-5.0.82-0.src.rpm 套件時出現如下錯誤訊息
#rpm -ivh MySQL-5.0.82-0.src.rpm
error: cannot create %sourcedir /usr/src/redhat/SOURCES
Ans:
此訊息為系統找不到該資料夾 (/usr/src/redhat/SOURCES) 或資料夾權限錯誤所引起,此次狀況為系統不存在該資料夾,因此建立該資料夾後即可順利安裝 src rpm.
#mkdir -p /usr/src/redhat/SOURCES
#rpm -ivh MySQL-5.0.82-0.src.rpm
1:MySQL ########################################### [100%]
摘自:http://www.weithenn.org/cgi-bin/wiki.pl?lighttpd_php_mysql-LAMP_%E6%9E%B6%E8%A8%AD
Error Meaage:
利用 rpm 指令來手動安裝 MySQL-5.0.77-0.src.rpm 失敗,並出現如下錯誤訊息。
# rpm -ivh MySQL-5.0.77-0.src.rpm
1:MySQL warning: user mysqldev does not exist - using root
warning: user mysqldev does not exist - using root
warning: user mysqldev does not exist - using root
########################################### [100%]
Ans:
代表目前用來安裝 MySQL-5.0.77-0.src.rpm 使用者為 root 機於安全性的考量,系統您建立一個用來安裝 mysql 的使用者帳號 (mysqldev),在新增 mysqldev 使用者之後便可順利執行 rpm 指令來安裝 MySQL-5.0.77-0.src.rpm。
#useradd mysqldev
#rpm -ivh MySQL-5.0.77-0.src.rpm
1:MySQL ########################################### [100%]
Q2.configure: error: no acceptable C compiler found in $PATH?
Error Meaage:
順利解開 MySQL-5.0.77-0.src.rpm 後執行 ./configure 指令來進行環境配置時失敗,並出現如下錯誤訊息。
#cd mysql-5.0.77
#./configure
checking build system type... i686-pc-linux-gnu
checking host system type... i686-pc-linux-gnu
checking target system type... i686-pc-linux-gnu
checking for a BSD-compatible install... /usr/bin/install -c
checking whether build environment is sane... yes
checking for a thread-safe mkdir -p... /bin/mkdir -p
checking for gawk... gawk
checking whether make sets $(MAKE)... yes
checking "character sets"... default: latin1, collation: latin1_swedish_ci; compiled in: latin1 latin1 utf8
checking whether to compile national Unicode collations... yes
checking whether build environment is sane... yes
checking whether make sets $(MAKE)... (cached) yes
checking for gawk... (cached) gawk
checking for gcc... no
checking for cc... no
checking for cl.exe... no
configure: error: in `/usr/src/redhat/SOURCES/mysql-5.0.77':
configure: error: no acceptable C compiler found in $PATH //系統沒有安裝 gcc 套件 (無法編譯)
Ans:
原因在於目前系統並沒有安裝 gcc 套件所以進行環境設定 (./configure) 時並出現錯誤訊息,安裝好 gcc 套件後即可順利執行。
#yum -y install gcc-c++
Q3.checking for termcap functions library... configure: error: No curses/termcap library found?
Error Meaage:
順利解開 MySQL-5.0.77-0.src.rpm 後執行 ./configure 指令來進行環境配置時失敗,並出現如下錯誤訊息。
#cd mysql-5.0.77
#./configure
...略...
checking for termcap functions library... configure: error: No curses/termcap library found
Ans:
請使用如下參數來配合 ./configure 指令即可
./configure --with-named-curses-libs=/usr/lib/libncursesw.so.5
Q4.mysqladmin: connect to server at 'localhost' failed?
Error Meaage:
剛安裝好 MySQL 並啟動 MySQL 服務成功之後,使用 mysqladmin 設定 MySQL 管理者 (root) 密碼時失敗,並出現如下錯誤訊息。且也無法使用 mysql -u root -p 來登入 MySQL?
#mysqladmin -u root password 123456
mysqladmin: connect to server at 'localhost' failed
error: 'Access denied for user 'root'@'localhost' (using password: NO)'
Ans:
請依如下步驟來重新設定 MySQL 管理者密碼 (也適用於密碼忘記時,前提是擁有主機系統管理權限),完成如下步驟後即可使用 mysql -u root -p 來登入 MySQL。
停止 MySQL 服務
#/etc/rc.d/init.d/mysql stop
Shutting down MySQL.. [ OK ]
執行指令 mysqld_safe 啟動 MySQL 服務於安全模式
#mysqld_safe --user=mysql --skip-grant-tables --skip-networking &
[1] 28107
執行 mysql 指令來登入 MySQL
#mysql -u root mysql
Reading table information for completion of table and column names
You can turn off this feature to get a quicker startup with -A
Welcome to the MySQL monitor. Commands end with ; or \g.
Your MySQL connection id is 1
Server version: 5.0.77-community MySQL Community Edition (GPL)
Type 'help;' or '\h' for help. Type '\c' to clear the buffer.
mysql>
執行 UPDATE 指令重新設定 MySQL 管理者密碼為 123456
mysql> UPDATE user SET Password=PASSWORD('123456') where USER='root';
Query OK, 3 rows affected (0.00 sec)
Rows matched: 3 Changed: 3 Warnings: 0
執行 FLUSH 指令更新 MySQL 設定
mysql> FLUSH PRIVILEGES;
Query OK, 0 rows affected (0.00 sec)
執行 quit 指令離開 MySQL
mysql> quit
Bye
執行指令重新啟動 MySQL 服務
#/etc/rc.d/init.d/mysql restart
Shutting down MySQL.. [ OK ]
Starting MySQL [ OK ]
Q5.ERROR 1064 (42000) at line 1: You have an error in your SQL syntax near '嚜?
Error Meaage:
匯入 Dump Files 至指定的資料庫時失敗並出現如下錯誤訊息。
#mysql -u root -p databases_name < backup1.sql
Enter password:
ERROR 1064 (42000) at line 1: You have an error in your SQL syntax; check the manual that corresponds to your MySQL server version for the right syntax to use near '嚜?
SET SQL_MODE="NO_AUTO_VALUE_ON_ZERO"' at line 1
使用 vi 來查看 backup1.sql 內容時為正常,若使用 less 指令來查看 backup1.sql 內容時則看到第一行有此字 嚜?
#less backup1.sql
嚜?- phpMyAdmin SQL Dump
-- version 2.11.3
-- http://www.phpmyadmin.net
--
-- Host: localhost
...略...
Ans:
主因 MySQL 資料庫編碼格式設定為 [UTF-8] 但匯入的 backup1.sql 檔案編碼格式不是 [UTF-8] 所導致的。
[資安論壇 • 檢視主題 - 求助 ~ FC3 MySQL 3.x匯入到F7 MySQL 5.x字元集問題]
Q6.如何移除預設的 mysql-5.0.45-7.el5.i386?
Error Meaage:
CentOS 5.2 安裝時有勾選 KDE 及 Server 選項,但當嘗試要安裝 MySQL-server-community-5.0.82-0.rhel5.i386.rpm 時出現如下錯誤訊息
#rpm -ivh MySQL-server-community-5.0.82-0.rhel5.i386.rpm
error: Failed dependencies:
MySQL conflicts with mysql-5.0.45-7.el5.i386
系統顯示與目前的 mysql-5.0.45-7.el5.i386 產生衝突,嘗試使用 rpm -e 指令來移除它但出現如下錯誤訊息 (相依套件關系)
#rpm -e mysql-5.0.45-7.el5
error: Failed dependencies:
libmysqlclient.so.15 is needed by (installed) dovecot-1.0.7-2.el5.i386
libmysqlclient.so.15(libmysqlclient_15) is needed by (installed) dovecot-1.0.7-2.el5.i386
Ans:
由於有套件相依性的關系因此必須加上 --nodeps 參數來強制移除 mysql-5.0.45-7.el5,移除後即可順利安裝 MySQL-server-community-5.0.82-0.rhel5.i386.rpm
#rpm -e mysql-5.0.45-7.el5 --nodeps
#rpm -ivh MySQL-server-community-5.0.82-0.rhel5.i386.rpm
Preparing... ########################################### [100%]
1:MySQL-server-community ########################################### [100%]
Q7.error: cannot create %sourcedir /usr/src/redhat/SOURCES
Error Meaage:
安裝 MySQL-5.0.82-0.src.rpm 套件時出現如下錯誤訊息
#rpm -ivh MySQL-5.0.82-0.src.rpm
error: cannot create %sourcedir /usr/src/redhat/SOURCES
Ans:
此訊息為系統找不到該資料夾 (/usr/src/redhat/SOURCES) 或資料夾權限錯誤所引起,此次狀況為系統不存在該資料夾,因此建立該資料夾後即可順利安裝 src rpm.
#mkdir -p /usr/src/redhat/SOURCES
#rpm -ivh MySQL-5.0.82-0.src.rpm
1:MySQL ########################################### [100%]
摘自:http://www.weithenn.org/cgi-bin/wiki.pl?lighttpd_php_mysql-LAMP_%E6%9E%B6%E8%A8%AD
2009年12月17日 星期四
如何寫print.css ?
在html內連結css的時候要加上後面那句media的語法
自己另外建一個print.css的檔案
內容可以類似這樣:
body {color:#000000; background:#ffffff; font-family:"Times New Roman", Times, serif; font-size:12pt;}
a{text-decoration:underline; color:#0000ff;}
#left-box, #right-box, #top_text_ad {display:none;}
#main-box, #frm_apply, #content_index, #span_data{ overflow:visible; clear:both; display: block; }
display:none的部分,是把不要列印的部分給加進去
最後一行是顯示要顯示的東西,可以視情況加,也有不需要的時候
大致上body跟a都是一定要設定的,把背景設定白色,字設定黑色,讓人比較好列印
諸如此類的
2009年12月7日 星期一
2009年11月26日 星期四
擋掉(block) Baidu Spider
影響主機負載過重與頻寬傳輸量最有可能的原因就是 Robots 機器人作祟,而其中又以 百度(Baidu) Spider 為最。
.htaccess:
Or
httpd.conf
Module Identifier: setenvif_module
.htaccess:
RewriteEngine On
RewriteCond %{HTTP_USER_AGENT} ^Baiduspider [NC]
RewriteRule .* - [F]
Or
SetEnvIf User-Agent ^Baidu baidu
Deny from env=baidu
httpd.conf
SetEnvIfNoCase User-Agent "^Baidu" bad_bot

Order Allow,Deny
Allow from all
Deny from env=bad_bot
Module Identifier: setenvif_module
2009年11月25日 星期三
mysqldump教學
mysqldump ignore exclude table
mysqldump particular table
mysqldump -u username -p database --ignore-table=database.table1 --ignore-
table=database.table2 > database.sql
mysqldump particular table
mysqldump -u username -p database table1 > table1.sql
2009年11月23日 星期一
tar exclude
長久以來都是整個目錄tar起來,還沒有真的用過exclude功能,嘗試了一下之後發現exclude除了要帶路徑之外還要再加上個*,不然想exclude的路徑一樣會被tar起來。
這樣子是不會work2的:
tar czf auto_import.tar.gz --exclude="auto_import/csv_files/" --exclude="auto_import/tmp_csv/" auto_import
這樣子才對:
tar czf auto_import.tar.gz --exclude="auto_import/csv_files/*" --exclude="auto_import/tmp_csv/*" auto_import
這樣子是不會work2的:
tar czf auto_import.tar.gz --exclude="auto_import/csv_files/" --exclude="auto_import/tmp_csv/" auto_import
這樣子才對:
tar czf auto_import.tar.gz --exclude="auto_import/csv_files/*" --exclude="auto_import/tmp_csv/*" auto_import
Small hint for PDT, use autocomplete in /* @var */type hint.
@var variable type hint is very useful, but adding it a little bit complex: usually you need to type the class name or copy/paste it from somewhere:
/* @var $controller Zend_Controller_Front */
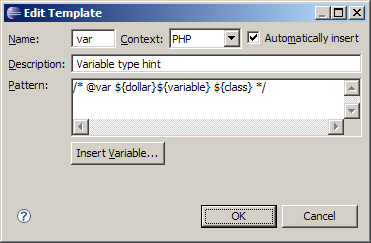
But with Eclipse PDT templates you can simplify this and add an autocomplete for variable name and class name:
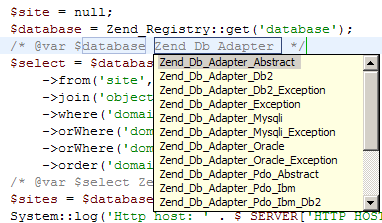
To add this template open Window menu, select Preferences and then navigate to PHP/Templates section in the tree. Then click "New..." button and fill the fields correspondingly:
After that, in the code view type "var" and press Ctrl+Space. Select "var - Variable type hint" in the list and continue by selecting or typing variable name and class name as shown on the video below:
摘自:http://www.alexatnet.com/node/179
/* @var $controller Zend_Controller_Front */
But with Eclipse PDT templates you can simplify this and add an autocomplete for variable name and class name:

To add this template open Window menu, select Preferences and then navigate to PHP/Templates section in the tree. Then click "New..." button and fill the fields correspondingly:

After that, in the code view type "var" and press Ctrl+Space. Select "var - Variable type hint" in the list and continue by selecting or typing variable name and class name as shown on the video below:
摘自:http://www.alexatnet.com/node/179
2009年11月19日 星期四
網頁縮圖教學
System Requirements:
Linux based OS, GTK 2, Internet connection, High color display mode.
Linux kernel - 2.2.14 or higher with the following libraries or packages:
glibc 2.3.2 or higher
XFree86-3.3.6 or higher
gtk+2.0 or higher
fontconfig (also known as xft)
libstdc++5
Tested on Red Hat Fedora 5 , Novell SuSE Linux 10.0, Red Hat Fedora 4, Red Hat Enterprise Linux 4 , Red Hat Enterprise Linux 3
If you system doesn't have libpangocairo, please try to install libpangocairo ( type "rpm -Uivh cairo-1.0.2-1.1.fc4.nr.i386.rpm glitz-0.4.3-1.1.fc4.nr.i386.rpm libpixman-0.1.5-1.1.fc4.nr.i386.rpm pango-1.10.3-1.1.fc4.nr.i386.rpm pango-devel-1.10.3-1.1.fc4.nr.i386.rpm" to install)
If you are using Fedora Linux, You can also to use the software installation tool Yum to install those dependencies.
Known Issues
Page content generated by plugins (such as Flash-based content) is not included in saved images. This problem should disappear after Mozilla bug 313462 is fixed. Instead, you can try our windows based component htmlsnapshot!
Usage:
1. Extract the install package to a folder. (for example, /html2image/)
2. Add the folder path to ld path for shared library. For example
export LD_LIBRARY_PATH=/html2image/
or
you can also add the path to html2image to /etc/ld.so.conf, then run ldconfig
3. Run html2image which is a command line tool to convert html to image. (bmp and png image format are supported currently). The following are some examples:
a. Convert url to bmp
html2image www.google.com a.bmp
b. Convert url to jpg
html2image www.google.com a.jpg
c. Convert local html file to png
html2image file://home/user/test.html a.png
4. For more help, type "html2image -h"
5. You can also run html2image with Xvfb on the text mode console. In the html2image folder, run the below command:
./Xvfb :1 -screen 0 640x480x24 -nolisten tcp -audit 4 -auth X1.cfg & export DISPLAY=:1 & ./html2image www.google.com /root/b.png
The command can be called in batch or web CGI script files to convert url or html to image files..
How to use html2image linux on CentOS 5
here is detailed example on how to use html2image linux on CentOS 5. This serves as a good example on how to use html2image. Other Linux distribution can be done similarly
1. Install CentOS.
2. Login into the server (you can use the text mode login here)
3. Enter a folder, download html2image
wget http://www.guangmingsoft.net/htmlsnapshot/html2image.i386.tar.gz
4. Extract html2image
tar xvzf html2image.i386.tar.gz
cd html2image
export LD_LIBRARY_PATH=./
5. Make a symbol link for X11
ln -s /usr/share/X11 /usr/X11R6/lib/X11
You should do this to avoid the X11 error "could not open default font 'fixed'"
6. Run Xvfb
./Xvfb :1 -screen 0 640x480x24 -nolisten tcp -audit 4 -auth X1.cfg & export DISPLAY=:1
7. Now you can run html2image, it should work
./html2image www.google.com a.jpg
How to use html2image linux on Ubuntu 64
Here is detailed example on how to use html2image linux on Ubuntu 64 bit (Ubuntu 7.10 - the Gutsy Gibbon)
This serves as a good example on how to use html2image. Other 64 bit Linux distribution can be done similarly.
1. Install Ubuntu 64
2. Login into the server (you can use the text mode login here. This is suitable for headless server as well)
If you are in GUI mode, Ctrl+Alt+F2 will switch you to text mode.
3. Enter a folder, download html2image
wget http://www.guangmingsoft.net/htmlsnapshot/html2image.i386.tar.gz
4. Extract html2image
tar xvzf html2image.i386.tar.gz
cd html2image
export LD_LIBRARY_PATH=./
4. Install 32bit application support libraries.
sudo apt-get install ia32-libs
sudo apt-get install lib32nss-mdns (Needed for Ubuntu9)
5. Install Xvfb coming with the Ubuntu
sudo apt-get install xvfb
6. Run Xvfb
Xvfb :1 -screen 0 640x480x24 -nolisten tcp -audit 4 -auth X1.cfg & export DISPLAY=:1
Of course, you could try high resolution like 1024x768x24
7. Now you can run html2image, it should work
./html2image www.google.com a.jpg
Check if the a.jpg is created successfully
How to use html2image linux on Fedora 8 x86_64
Here is detailed example on how to use html2image linux on Fedora 8 64 bit. This serves as a good example on how to use html2image. Other 64 bit Linux distribution can be done similarly.
1. Install Fedora 8 x86_64
2. Login into the server (you can use the text mode login here. This is suitable for headless server as well)
3. Enter a folder, download html2image
wget http://www.guangmingsoft.net/htmlsnapshot/html2image.i386.tar.gz
4. Extract html2image
tar xvzf html2image.i386.tar.gz
cd html2image
export LD_LIBRARY_PATH=./
5. Install Xvfb coming with the Fedora 8
su root
yum install Xvfb
6. Run Xvfb
Xvfb :1 -screen 0 640x480x24 -nolisten tcp -audit 4 -auth X1.cfg & export DISPLAY=:1
Of course, you could try high resolution like 1024x768x24
7. Now you can run html2image, it should work
./html2image www.google.com a.jpg
Check if the a.jpg is created successfully
Use html2image linux with CGI program like php:
How to use html2image Linux in php script:
1. Extract the new package to a folder (for exampe /html2image)
2. add the folder path (/html2image) to /etc/ld.so.conf
run ldconfig on command line to enable the changes.
3. run nweb
./nweb 8181 /html2image
the small web server for html to image is started.
4. You can call the web server in php script.
see html2imagetest.php for example. Please change the IP to your server IP.
License:
The Server License costs $299.95 per site. It can be used on one Linux server.
近来在做一个directory,搜集一些个人常用的站点。每个站点都需要一份截图。折腾了一番,选用了khtml2png。khtml2png从2.6.0开始需要Qt library的支持,以下是详细的Requirements:
Requirements For running and compiling you need some libraries and tools. You can find the Debian package names in braces
* g++
* KDE 3.x
* kdelibs for KDE 3.x (kdelibs4-dev)
* zlib (zlib1g-dev)
* cmake
服务器系统是redhat EL4,g++和zlib都是装过的了,尚缺kde&cmake。那就先装罢。
用apt-get安装KDE for redhat
添加几个kde的源,先创建一个新的list
vi /etc/apt/sources.list.d/kde.list
添加如下地址
rpm http://apt.kde-redhat.org/apt/kde-redhat redhat/el4/i386 stable
rpm http://apt.kde-redhat.org/apt/kde-redhat all stable
保存之后,先update一下,然后安装qt,arts,kdelibs,和kdebase
apt-get update
apt-get install qt arts kdelibs kdebase
apt-get dist-upgrade
安装kdelibs for KDE (kdelibs4-dev)
kdelibs4-dev这个包是debian用的,redhat适用的是kdelibs-devel。直接用apt-get安装即可。zlib(zlib1g-dev)也一样,redhat适用的是zlib-devel
安装cmake
wget http://www.cmake.org/files/v2.4/cmake-2.4.7.tar.gz
tar zxvf cmake-2.4.7.tar.gz
cd cmake-2.4.7
./bootstrap
make
make install
cmake的安装需在安装qt之后进行,否则会找不到qt_include_path。
安装khtml2png
wget http://nchc.dl.sourceforge.net/sourceforge/khtml2png/khtml2png-2.6.7a.tar.gz
tar zxvf khtml2png-2.6.7a.tar.gz
cd khtml2png-2.6.7a
./configure
make
make install
即可。
用法
khtml2png2 http://163.com 163_com.png
指定图片尺寸
khtml2png2 --height 1024 --width 768 http://163.com 163_com.png
执行上述指令后,桌面会打开一个浏览器窗口,载入目标页面,截图完成后自行关闭。在没有X或者是ssh连接服务器的情况下,需要再做点别的事情。 启动xfs daemon和X Server
/etc/init.d/xfs start
/usr/X11R6/bin/X :1 &
之后在khtml2png2的指令上加一条
--display :1
即可
批量截图
因为安全级的关系,没有使用PEF让php直接执行指令自动截图。转而加入了手动的因素。 即由php取得需要生成截图的网址列表,再生成一个批处理文件。然后由管理员手动执行。 PHP生成的批处理文件siteslist
#!/bin/sh
khtml2png2 --display :1 http://www.163.com 163_com.png
khtml2png2 --display :1 http://www.google.com google_com.png
每行一条,如有必要可以适当的sleep一下。需要采集截图时,执行如下指令即可
sh sitelist
在 Linux 環境使用 khtml2png 製作網頁縮圖
只要使用 khtml2png 這個小工具, 就能製作如同 HEMiDEMi、BlogMarks.net 所呈現的網頁縮圖.
在 Ubuntu 5.10 環境下 (GNOME) 的安裝過程
在 Fedora Core 3 文字模式 (init 3) 未安裝 X window 環境下的操作
需求套件
Ubuntu: g++, kdelibs4-dev, zlib1g-dev
Fedora Core: gcc-c++, kdelibs-devel, zlib-devel
在 Ubuntu 5.10 環境下 (GNOME) 的安裝過程
sudo su -
cd /usr/local/src
wget http://nchc.dl.sourceforge.net/sourceforge/khtml2png/khtml2png-1.0.3.tar.bz2
tar -jxf khtml2png-1.0.3.tar.bz2
cd khtml2png-1.0.3
./configure --prefix=/usr/local
make
make install
執行檔為: /usr/local/bin/khtml2png
使用範例
khtml2png --width 1024 --height 768 --scaled-width 320 --scaled-height 240 http://www.hinet.net/ hinet.png
以 1024 x 768 的虛擬視窗瀏覽 hinet 首頁, 並將虛擬視窗存成 320 x 240 的 hinet.png 檔
在 Fedora Core 3 文字模式 (init 3) 未安裝 X window 環境下的操作
除前述之需求套件外, 需另外加裝 xorg-x11 (皆以 yum 安裝)
安裝 khtml2png 時, configure 參數為: --prefix=/usr/local --with-qt-dir=/usr/lib/qt-3.3
啟動 xfs daemon: /etc/init.d/xfs start
啟動 X server: /usr/X11R6/bin/X :1 &
執行 khtml2png: 同前述範例, 加上 --display :1 參數即可
ps. 美化虛擬視窗內的中文字型請參考: 從 Fedora Core 3 最小安裝開始
khtml2png's User Agent ID
Mozilla/5.0 (compatible; Konqueror/3.4; Linux) KHTML/3.4.2 (like Gecko)
參考資料:
khtml2png - Make screenshots from webpages
Experts Exchange - HTML: Convert html file to image
http://www.guangmingsoft.net/htmlsnapshot/html2image.htm#Support
http://hi.baidu.com/imdao/blog/item/73906081665b1ddebc3e1ee3.html
http://www.guangmingsoft.net/htmlsnapshot/html2image.htm#Support
How to fix Internal Server Error in Wordpress Websites SoftException in Application cpp:256
Everything has been fine so far on my Wordpress websites until just yesterday. I opened one up and saw the following error on the screen:
Internal Server Error
he server encountered an internal error or misconfiguration and was unable to complete your request.
lease contact the server administrator, webmaster@##DOMAIN##.com and inform them of the time the error occurred, and anything you might have done that may have caused the error.
ore information about this error may be available in the server error log.
dditionally, a 404 Not Found error was encountered while trying to use an ErrorDocument to handle the request.
t had me stumped for a little while. I could log into the server ok, and all the files were there.
I checked the database, it seemed to be alright also.
I then did what the message suggested and checked the error logs.
I found multiple lines going back some hours with the following:
“SoftException in Application.cpp:601: Directory “**directory**” is writeable by group”
&
“SoftException in Application.cpp:256: File “**file**.php” is writeable by group”
Strange…
o, I thought back to what I had done the day before.
Yes, that’s it, I had installed a couple of new Wordpress plugins, perhaps that’s done it?
nce I had logged in to thorhammaraxx.com using FTP I almost instantly noticed the permission settings were not as I’d like them to be for several directories and files.
They were all set at 775 or above (ughh!) allowing group write access.
I changed them back to 755 for now to see what effect it would have and refreshed the page.
INGO the site is back up and running.
don’t have an answer to which plugin caused the changes, or even if it was a plugin. The only thing I do know is that it only happened to those sites, where I had added plugins. What has me stumped is that they all worked fine straight after being installed. I tested them!
nyway, the outcome was much better than I had thought it was going to be. I did expect to have to back up the database and files and spend the day tinkering with the server set up.
o, before you go wild on your own server trying to fix this error message. Check your permission settings in your directories and files first and see if that does it.
on’t forget to leave a comment here if it helped or even if you’ve had the same problem but with a different cause.
Or even if you know of a plugin that causes strange behaviour.
I’d love to here from you.
2009年11月16日 星期一
控制項不可見、未啟動或無法接受焦點,因此無法將焦點
can't move focus to the control because it is invisible
解決方法如下
解決方法如下
function getFocusFunc(objId) {
    function doFocus() {
        if (document.getElementById) {
            document.getElementById(objId).focus();
        }
    }
    return doFocus;
}

function set_focus() {
    // Do whatever until you get to the point where you need to set focus to the iframe
    if(jQuery.browser.msie){
        setTimeout(getFocusFunc('objId'), 10);
    }else{
        $("#objId").focus();
    }
}
2009年11月13日 星期五
2009年10月26日 星期一
[SEO]讓GOOGLE重新收錄被封的站
不知大家沒有用過google網站管理員工具,其實很好用的,功能也很強大。建議SEOer都要去熟悉的操作這個平臺,google網站管理員工具的確是給我們帶來了很多方便,在這裡風采依揚講一下被google封殺的網站怎麼樣去讓google重新收錄。
當發現被google封殺的站,在沒有建立google網站管理員工具時,建議大家馬上去註冊,添加被封殺的網站進去。
可以說目前google的反作弊小組的效率是很高的了,以上截圖中提示站長目前該站被K站並且告訴站長為什麼要封殺該站,點擊:消息中心,googe反作弊小組會把封殺網站的理由發到消息中心中。
仔細看gogle發給你的信,並瞭解Google 品質指南的內容,並處理掉你作弊的痕跡,以下是消息中心詳細內容:
仔細看gogle發給你的信,並瞭解Google 品質指南的內容,並處理掉你作弊的痕跡,以下是消息中心詳細內容:
Good!當我們瞭解為什麼被K站,並去掉了作弊痕跡,去google網站管理員工具提交“提交重新審核申請”,提交重新審核申請的內容要寫誠懇一點,並保證遵守 Google 品質指南。
這裡要提到的是,被K的站被google解封,之後又被封,那麼這站就別想讓google再解封的了,因為google只有給你一次機會的,所以要好好的珍惜這一次的機會。
再次表揚一下google作弊小組的效率,在怎麼短的時間內處理重新審核網站,目前來說處理好的話三天內可以重新被收錄,風采依揚試過提交一天后被重新收錄。
2009年10月23日 星期五
apache net helpmsg 3547
這個問題搞了我好久
apache一直不能啟動
最後發現
是因為80port被吃掉了
是誰吃掉勒
開始>執行>cmd
輸入netstat -nab
哈 有沒有找到一個:port 80
轉載至 http://orange21.pixnet.net/blog/post/17512253
原來有這麼方便的技巧
cmd指令真是太神奇了
apache一直不能啟動
最後發現
是因為80port被吃掉了
是誰吃掉勒
開始>執行>cmd
輸入netstat -nab
哈 有沒有找到一個:port 80
轉載至 http://orange21.pixnet.net/blog/post/17512253
原來有這麼方便的技巧
cmd指令真是太神奇了
2009年10月21日 星期三
希望你能喜歡這個故事並希望它能為你帶來好運。
一天,一個盲人帶著他的導盲犬過街時,一輛大卡車失去控制,直衝過來,盲人當場被撞死,他的導盲犬為了守衛主人,也一起慘死在車輪底下。
主人和狗一起到了天堂門前。
一個天使攔住他倆,為難地說:對不起!現在天堂只剩下一個名額,你們兩個中必須有一個去地獄。
主人一聽,連忙問:我的狗又不知道什麼是天堂、什麼是地獄,能不能讓我來決定誰去天堂呢?
天使鄙視地看了這個主人一樣,皺起了眉頭,她想了想說:很抱歉!先生,每一個靈魂都是平等的,你們要通過比賽決定由誰上天堂。
主人失望地問:哦!什麼比賽呢?
天使說:這個比賽很簡單,就是賽跑,從這裡跑到天堂的大門,誰先到達目的地,誰就可以上天堂。不過,你也別擔心,因為你已經死了,
所以不再是瞎子,而且靈魂的速度跟肉體無關,越單純善良的人速度越快。
主人想了想,同意了。
天使讓主人和狗準備好,就宣佈賽跑開始。她滿心以為主人為了進天堂,會拼命往前奔,誰知道主人一點也不忙,慢吞吞地往前走著。
更令天使吃驚的是,那條導盲犬也沒有奔跑,它配合著主人的步調在旁邊慢慢跟著,一步都不肯離開主人。
天使恍然大悟:原來,多年來這條導盲犬已經養成了習慣,永遠跟著主人行動,在主人的前方守護著他。
可惡的主人,正是利用了這一點,才胸有成竹、穩操勝券,他只要在天堂門口叫他的狗停下就可以了。
天使看著這條忠心耿耿的狗,心裡很難過,她大聲對狗說:你已經為主人獻出了生命,現在你這個主人不再是瞎子,你也不用領著他走路了,你快跑進天堂吧!
可是,無論是主人還是他的狗,都像是沒有聽到天使的話一樣,仍然慢吞吞地地往前走,好像在街上散步似的。
果然,離終點還有幾步的時候,主人發出一聲口令,狗聽話地坐下了,天使用鄙視的眼神看著主人。
這時,主人笑了,他扭過頭對天使說:我終於把我的狗送到天堂了,我最擔心的就是它根本不想上天堂,只想跟我在一起…所以我才想幫它決定,請你照顧好它。天使愣住了。
主人留戀地看著自己的狗,又說:能夠用比賽的方式決定真是太好了,只要我再讓它往前走幾步,它就可以上天堂了。
不過它陪伴了我那麼多年,這是我第一次可以用自己的眼睛看著它,所以我忍不住想要慢慢地走,多看它一會兒。
如果可以的話,我真希望永遠看著它走下去,不過天堂到了,那才是它該去的地方,請你照顧好它。
說完這些話,主人向狗發出了前進的命令,就在狗到達終點的一刹那,主人像一片羽毛似的落向了地獄的方向。
他的狗見了,急忙掉轉頭,追著主人狂奔。滿心懊悔的天使張開翅膀追過去,想要抓住導盲犬,不過那是世界上最純潔善良的靈魂,速度遠比天堂所有的天使都快。
所以導盲犬又跟主人在一起了,即使是在地獄,導盲犬也永遠守護著它的主人。
天使久久地站在那裡,喃喃說道:我一開始就錯了,這兩個靈魂是一體的,他們不能分開…
最後,我要說:這個世界上,真相只有一個,可是在不同人眼中,卻會看出不同的是非曲直。
這是為什麼呢?其實,道理很簡單。因為每個人看待事物,都不可能站在絕對客觀公正的立場上,而是或多或少地戴上有色眼鏡,用自己的經驗、好惡和道德標準來進行評判,結果就是——我們看到了假像。
友誼的幸福之一,是知道了可以向誰傾吐秘密。
如果你收到了這封信,是因為有人在默默的祝福你,因為你也愛你身邊的一些人。
如果你總說太忙,不能將這封信轉寄出去,老是說:改天再寄。你將永遠都不會去做這件事的。
所以,不要找藉口,靜心的看看這篇古老印度來的故事,然後決定為你的朋友們作一些事,從傳寄這封信開始。
當你說:你是我的好朋友時,請認真的說出來。
當你道歉時請看著對方的眼睛。
永遠不要嘲笑別人的夢想。
不要隨便給一個人定性。
說話時要慢,思想時要快。
打電話的時候請你微笑,對方一定感覺得到。
2009年10月15日 星期四
How do I use jQuery’s form.serialize but exclude empty fields
You could do it with a regex...
var orig = $('#myForm').serialize();
var withoutEmpties = orig.replace(/[^&]+=\.?(?:&|$)/g, '')
Test cases:

orig = "a=&b=.&c=&d=.&e=";
new => ""

orig = "a=&b=bbb&c=.&d=ddd&e=";
new => "b=bbb&d=ddd&"  // dunno if that trailing & is a problem or not

.replace(/[^&]+=\.?(&|$)/g, '') covers both cases. But I'd add .replace(/&$/, '') to remove the trailing &
2009年10月12日 星期一
Stop net-snmp log messages
I, along with many of my peers, complain that snmpd (from net-snmp) writes too many messages to the log file.
Jan 8 13:45:02 example snmpd[2048]: Connection from UDP: [10.0.0.1]:51890
Jan 8 13:45:02 example snmpd[2048]: Received SNMP packet(s) from UDP: [10.0.0.1]:51890
Jan 8 13:45:02 example last message repeated 2 times
Now imagine that repeated in every server, every time your monitoring server polls your host. This is a major mess and fills up the logs with crap. (If you can't imagine, it's 1,440 messages per host, and I monitor 18 hosts, which is 25,920 messages a day.)
The fault lies with tcpwrappers support. The firewalls are configured so that only the monitoring host can connect to the snmpd port. If you're not supposed to connect to snmpd, you can't. Thus, every connection is legitimate and doesn't need to be logged.
But how does one stop the logging?
The man page refers to a configuration option, dontLogTCPWrappersConnects, however this doesn't actually work and just gives an error. Let's ignore that then.
Reading the source (for 5.3.2) we find that the errors are written as follows: Skip code
--- net-snmp-5.3.2/agent/snmp_agent.c 2007-08-17 01:31:40.000000000 +1200
if ((log_addresses && (1 == rc)) ||
netsnmp_ds_get_boolean(NETSNMP_DS_APPLICATION_ID,
NETSNMP_DS_AGENT_VERBOSE)) {
snmp_log(LOG_INFO, "Received SNMP packet(s) from %s\n", addr);
}
...
if (hosts_ctl(name, STRING_UNKNOWN, sbuf, STRING_UNKNOWN)) {
snmp_log(allow_severity, "Connection from %s\n", addr_string);
} else {
snmp_log(deny_severity, "Connection from %s REFUSED\n",
addr_string);
As you can see, legitimate connections are logged at LOG_INFO and allow_severity (which is also set to LOG_INFO). Unfortunately, pretty much every other important message from snmpd is logged at this level, so if you're going to disable this silly chatter you have to disable almost every log message. If you're good at coding C, find the above blocks of code and comment out the snmp_log calls.
How? On Redhat Server 5 and Redhat Enterprise Linux 4 you simply create the file /etc/snmp/snmpd.options and put in there:
OPTIONS="-Lf /dev/null -p /var/run/snmpd.pid"
This is pretty much the default options (grep OPTIONS /etc/init.d/snmpd to compare) but with the removal of -Lsf, thus disabling logging.
For Fedora Core 10 and CentOS 5.2 the options file can be in /etc/sysconfig/snmpd.options, and if that file exists, use it instead.
Thank goodness for quiet log files!
摘自:http://www.stat.auckland.ac.nz/~kimihia/net-snmp
2009年10月11日 星期日
How To Count Inodes For Each Directory
Hostgator whom this website is hosted with limits you to 50,00o inodes per account. So it not unlimited as they claim but nonetheless its pretty good hosting ..
Here is a script that I wrote which helps you count each inodes in a directory
#!/bin/bash
# count inodes for each directory
LIST=`ls`
for i in $LIST; do
echo $i
find $i -printf "%i\n" | sort -u | wc -l
done
Also this line seems good for figuring out which directory is using up the most space
du -ks ./* | sort -n
2009年10月9日 星期五
Linux Ramdisk安裝教學2
我目前是使用這個方法
$ mkdir /path/to/ramdisk
$ echo "#partition of ramdisk
ramdiskTitle /path/to/ramdisk tmpfs defaults,size=2000M 0 0" >> /etc/fstab
$ mount -a
$ mkdir /path/to/ramdisk
$ echo "#partition of ramdisk
ramdiskTitle /path/to/ramdisk tmpfs defaults,size=2000M 0 0" >> /etc/fstab
$ mount -a
2009年10月8日 星期四
2009年10月7日 星期三
於CentOS 5將snmpd log從messages中獨立出來
由於snmpd記錄筆數相當多,造成在閱讀messages其他log的不便,因此將snmpd的log用另一個檔案獨立紀錄。
假設將snmpd的log記錄到syslog facility local0中:
首先在syslog中設定local0
/etc/syslog.conf
local0.* /var/log/snmpd.log
接著更改snmpd的參數
/etc/sysconfig/snmpd.option
OPTIONS="-Ls 0-4 0 -A -Lf /dev/null -p /var/run/snmpd.pid"
再來重新啟動syslogd與snmpd
service syslog restart
service snmpd restart
摘自:http://kaien.wikidot.com/linux:rhel-snmp-syslog
2009年10月6日 星期二
非mmcache!Memcached的應用:多網站伺服器 PHP 共享 Session
請注意是 Memcached 不是 mmcache,很多人搞不清楚他們兩個的不同!多半玩過 PHP 的人大概都聽過 mmcache,它是一個預編譯緩衝的 PHP 加速程式,能夠提升 PHP 的執行效能。但很少人聽過 Memcached ,因為大多人乍看之下都以為它是mmcache,使得它沒什麼機會介紹自己。事實上,若您正打算架構一個真正高負載的大型網站系統,你需要了解的並不是 mmcache,而是 memcached。
Memcached 是什麼?顧名思義,他是由記憶體(Memory)和暫存(cache)所組合起來的常駐程式(Daemon),你也可以稱它為『暫存伺服器』。 Memcached 能提供一個暫存資料的服務,透過網路供其他電腦使用。Memcached 有什麼用途?最常見的應用就是在網站伺服器的叢集,它能讓許多的網站伺服器 Session 互相流通使用。如果你正在傷透腦筋煩惱這一點,恭喜你找到解決方法了!
想要在網站伺服器的叢集中,多網站伺服器 Session 互相流通使用,首先你必須將 Memcached 架起來當 Session 分享伺服器,這邊建議你使用大的記憶體,最好是能多大就有多大,因為 Memcached 並不會以硬碟當資料暫存,而是會完全跑在記憶體上,所以若記憶被用完了,Memcached 就會無法再存放更多資料。
接著,你必須修改 PHP 的 Session Save Handler,讓 PHP 懂得利用 Memcached Server 存放 PHP 的 Session 資料並能從 Memcached Server 取出 Session 的資料。PHP提供了 session_set_save_handler() 函式讓我們能輕易修改 Session Save Handler ,以下是我修改後的 PHP 程式碼,你必須在呼叫 session_start() 之前使用:
define("SHARED_SESS_TIME", 3600); // Timeout
// Session Class by Fred
class Shared_Session
{
function init()
{
ini_set("session.use_trans_sid", 0);
ini_set("session.gc_maxlifetime", SHARED_SESS_TIME);
ini_set("session.use_cookies", 1);
ini_set("session.cookie_path", "/");
ini_set("session.cookie_domain", ".yourdomain.com.tw");
session_module_name("user");
session_set_save_handler(
array("Shared_Session", "open"),
array("Shared_Session", "close"),
array("Shared_Session", "read"),
array("Shared_Session", "write"),
array("Shared_Session", "destroy"),
array("Shared_Session", "gc")
);
}
function open($save_path, $session_name) {
return true;
}
function close() {
return true;
}
function read($sesskey) {
global $memcache;
return $memcache->get($sesskey);
}
function write($sesskey, $data) {
global $memcache;
$memcache->set($sesskey, $data, SHARED_SESS_TIME);
return true;
}
function destroy($sesskey) {
global $memcache;
$memcache->delete($sesskey);
$memcache->flush_all();
return true;
}
function gc($maxlifetime = null) {
return true;
}
}
$GLOBALS["memcache"] = memcache();
$GLOBALS["memcache"]->add_server("192.168.1.1", 11211);
$GLOBALS["memcache"]->add_server("192.168.1.2", 11211);
Shared_Session::init();
?>
其中粗字體的部分,是要特別修改的地方:
3600 是 Session 的生命周期﹝以秒為單位﹞,這應該不用再做太多解釋。
yourdomain.com.tw 是你的網域名稱:想像一個情況若是 Loadbalance 在用戶第一次連線分配用戶到A伺服器,第二次連線分配給同一用戶到B伺服器,會導致 B 伺服器無法透過 cookies 取得 A 伺服器分配給用戶的 session_id,因為 cookies 無法跨網域存取,解決方法是必須修改 cookies 的網域設定,讓 www1.yourdomain.com.tw、www2.yourdomain.com.tw、www3.yourdomain.com.tw...等等,都可以共同存取同一個 cookies ,以取得同一個 session_id,故此時你必須設定成為『.yourdomain.com.tw』。
192.168.1.1 這是你的 Memcached Server 的 IP 位置,這裡值得提的是 add_server() 方法,你可以有多行設定許多 IP 做 Loadbalance 負載分配,前面也講到 Memcached 是純粹使用記憶體,若其中一台機器記憶體滿了,本方法可以從中找到另一台可用的機器使用。故你可以建立一個 Memcached 的叢集來處理 Session。
因為我偷懶, Memcached 的安裝方法就沒寫了,去求助 google 大神,它應該會告訴你更多詳細的安裝資料。其實 Memcached 除了可應用在 Session 共享上,也可以應用在資料庫的資料暫存緩充,降低SQL Server負擔以提升速度。Memcached多好用?就看你怎麼用了!
摘自:http://fred-zone.blogspot.com/2006/08/mmcachememcached-php-session.html
2009年10月5日 星期一
pause in setTimeout
Hi, I have implemented a wrapper for "pausing a timed functional call using setTimeout" function in javascript. Here is the code ..
function Animator_Class(){
this.TID = null ;
this.funvar = null;
this.interval = null;
this.start_time = null;
}
Animator_Class.prototype.start_timer = function(){
this.TID = window.setTimeout(this.funvar , this.interval);
this.start_time = (new Date()).getTime();
}
Animator_Class.prototype.pause_timer = function(){
var curr_time = (new Date()).getTime();
var elapsed_time = curr_time - this.start_time ;
this.interval = this.interval - elapsed_time;
window.clearTimeout(this.TID);
}
Animator_Class.prototype.setTimeout = function(funvar, interval){
this.funvar = funvar;
this.interval = interval;
this.TID = window.setTimeout(funvar,interval);
this.start_time = (new Date()).getTime();
}
Animator_Class.prototype.clearTimeout = function(){
window.clearTimeout(this.TID);
}
Now if you want to use it in your code, use like this,,
TOB = new Animator_Class();
TOB.setTimeout('alert("OK")', 5000);
and in html forms use like,,
simple but important hack,,,,,,,,, :)
摘自:http://techfandu.blogspot.com/2009/02/pause-in-settimeout.html
2009年10月2日 星期五
Optimize your URLs , Best practices for crawling & indexing
Agenda
Why do you care?
The Internet from > 10^6feet
How do search engines deal with this?
Avoid maverick coding practices
Discourage alternative encodings
shop.example.com/items/Periods-Styles__end-table_W0QQ_catrefZ1QQ_dmptZAntiquesQ5fFurnitureQQ_flnZ1QQ_npmvZ3QQ_sacatZ100927QQ_trksidZp3286Q2ec0Q2em282
Where [W0 = ?] and [QQ= &]
Eliminate expand/collapse "parameters"
www.example.com/ABN/GPC.nsf/MCList?OpenAgent&expand=1,3,15
Remove user-specific details from URLs
Remove from the URL path
www.example.com/cancun+hotel+zone-hotels-1-23-a7a14a13a4a23.html
www.example.com/ikhgqzf20amswbqg1srbrh55/index.aspx?tpr=4&act=ela
Creates infinite URLs to crawl
Difficult to understand algorithmically
Keywords in name/value pairs are just as good as in the path
www.example.com/skates/riedell/carrera/
www.example.com/skates.php?brand=riedell&model=carrera
Optimize dynamic URLs
Dynamic URLs contain name/value pairs
skates.php?size=6&brand=riedell
Create patterns for crawlers to understand
www.example.com/article.php?category=1&article=3&sid=123
www.example.com/article.php?category=1&article=3&sid=456
www.example.com/article.php?category=2&article=3&sid=789
Use cookies to hide user-specific details
www.example.com/skates.php?query=riedell+she+devil&id=9823576
www.example.com/skates.php?ref=www.fastgirlskates.com&color=red
Rein in infinite spaces
Uncover issues in CMS
www.example.com/wiki/index.php?title=Special:Ipblocklist&limit=250&offset=423780&ip=
Disallow actions Googlebot can’t perform
Googlebot is too cheap to ‘Add to cart’
Disallow shopping carts
http://www.example.com/index.php?page=EComm.AddToCart&Pid=3301674647606&returnTo=L2luZGV4LnBocD9wYWdlPUVDb21tLlByb2QmUGlkPTMzMDE2NzQ2NDc2OTI=
Googlebot is too shy to ‘Contact us’
Disallow contact forms, especially if they have unique URLs
http://www.example.com/bb/posting.zsp?mode=newtopic&f=2&subject=Seeking%20information%20about%20roller%20derby%20training
Googlebot forgets his password a lot
Disallow login pages
https://www.example.com/login.asp?er=43d9257de47d8b08a91069cccb584ab83ff21140bd46e81656dab3507f45d1ab079cd77244231e557d724dc1df1a641
Get your preferred URLs indexed
Set your preferred domain in Webmaster Tools
www.example.com vs. example.com
Put canonical URLs in your Sitemap
Use the new rel=“canonical” on any duplicate URLs
Get feedback in Webmaster Tools
摘自:http://docs.google.com/present/view?id=dgk2ft62_18cvjx4nk4
1.Context: Why do you care?

2.Reduce inefficient crawling of your site

 1.Avoid maverick coding practices

 2.Remove user-specific details from URLs

 3.Optimize dynamic URLs

 4.Rein in infinite spaces

 5.Disallow actions Googlebot can’t perform

2.Get your preferred URLs indexed

3.Resources
Why do you care?
The Internet from > 10^6feet
How do search engines deal with this?
Focus on efficiency in below steps:

1.Discover unique content

2.Prioritize crawling

 1.Crawl new content

 2.Refresh old content

 3.Crawl fewer duplicates

3.Keep all the good stuff in the index

4.Return relevant search results


Funnel your crawling “budget” toward your most important content
Avoid maverick coding practices
Discourage alternative encodings
shop.example.com/items/Periods-Styles__end-table_W0QQ_catrefZ1QQ_dmptZAntiquesQ5fFurnitureQQ_flnZ1QQ_npmvZ3QQ_sacatZ100927QQ_trksidZp3286Q2ec0Q2em282
Where [W0 = ?] and [QQ= &]
Eliminate expand/collapse "parameters"
www.example.com/ABN/GPC.nsf/MCList?OpenAgent&expand=1,3,15
Remove user-specific details from URLs
Remove from the URL path
www.example.com/cancun+hotel+zone-hotels-1-23-a7a14a13a4a23.html
www.example.com/ikhgqzf20amswbqg1srbrh55/index.aspx?tpr=4&act=ela
Creates infinite URLs to crawl
Difficult to understand algorithmically
Keywords in name/value pairs are just as good as in the path
www.example.com/skates/riedell/carrera/
www.example.com/skates.php?brand=riedell&model=carrera
Optimize dynamic URLs
Dynamic URLs contain name/value pairs
skates.php?size=6&brand=riedell
Create patterns for crawlers to understand
www.example.com/article.php?category=1&article=3&sid=123
www.example.com/article.php?category=1&article=3&sid=456
www.example.com/article.php?category=2&article=3&sid=789
Use cookies to hide user-specific details
www.example.com/skates.php?query=riedell+she+devil&id=9823576
www.example.com/skates.php?ref=www.fastgirlskates.com&color=red
Rein in infinite spaces
Uncover issues in CMS
www.example.com/wiki/index.php?title=Special:Ipblocklist&limit=250&offset=423780&ip=
Disallow actions Googlebot can’t perform
Googlebot is too cheap to ‘Add to cart’
Disallow shopping carts
http://www.example.com/index.php?page=EComm.AddToCart&Pid=3301674647606&returnTo=L2luZGV4LnBocD9wYWdlPUVDb21tLlByb2QmUGlkPTMzMDE2NzQ2NDc2OTI=
Googlebot is too shy to ‘Contact us’
Disallow contact forms, especially if they have unique URLs
http://www.example.com/bb/posting.zsp?mode=newtopic&f=2&subject=Seeking%20information%20about%20roller%20derby%20training
Googlebot forgets his password a lot
Disallow login pages
https://www.example.com/login.asp?er=43d9257de47d8b08a91069cccb584ab83ff21140bd46e81656dab3507f45d1ab079cd77244231e557d724dc1df1a641
Get your preferred URLs indexed
Set your preferred domain in Webmaster Tools
www.example.com vs. example.com
Put canonical URLs in your Sitemap
Use the new rel=“canonical” on any duplicate URLs
Get feedback in Webmaster Tools
摘自:http://docs.google.com/present/view?id=dgk2ft62_18cvjx4nk4
2009年9月29日 星期二
xhprof安裝
升級php5.2.11
更新yum
#yum update php
#cd /usr/local/src
#wget http://pecl.php.net/get/xhprof-0.9.1.tgz
#tar -zxvf xhprof-0.9.1.tgz
#cd xhprof-0.9.1/extension
#phpize
#./configure --with-php-config=/usr/bin/php-config
#make
#make install
#make test
#vi /etc/php.ini
#vi graphviz-rhel.repo
#rpm -e graphviz-php
#yum update graphviz
更新yum
#additional packages that extend functionality of existing packages
[c5plus]
name=CentOS-$releasever - Plus
mirrorlist=http://mirrorlist.centos.org/?release=5&arch=$basearch&repo=centosplus
gpgcheck=1
enabled=1
gpgkey=http://mirror.centos.org/centos/RPM-GPG-KEY-CentOS-5
#yum update php
#cd /usr/local/src
#wget http://pecl.php.net/get/xhprof-0.9.1.tgz
#tar -zxvf xhprof-0.9.1.tgz
#cd xhprof-0.9.1/extension
#phpize
#./configure --with-php-config=/usr/bin/php-config
#make
#make install
#make test
#vi /etc/php.ini
[xhprof]
extension=xhprof.so
;
; directory used by default implementation of the iXHProfRuns
; interface (namely, the XHProfRuns_Default class) for storing
; XHProf runs.
;
xhprof.output_dir=
#vi graphviz-rhel.repo
//http://graphviz.org/graphviz-rhel.repo
[graphviz-stable]
name=Graphviz - RHEL $releasever - $basearch
baseurl=http://www.graphviz.org/pub/graphviz/stable/redhat/el$releasever/$basearch/os/
enabled=1
gpgcheck=0

[graphviz-stable-source]
name=Graphviz - RHEL $releasever - Source
baseurl=http://www.graphviz.org/pub/graphviz/stable/SRPMS/
enabled=0
gpgcheck=0

[graphviz-stable-debuginfo]
name=Graphviz - RHEL - Debug
baseurl=http://www.graphviz.org/pub/graphviz/stable/redhat/el$releasever/$basearch/debug/
enabled=0
gpgcheck=0

[graphviz-snapshot]
name=Graphviz - RHEL $releasever - $basearch
baseurl=http://www.graphviz.org/pub/graphviz/development/redhat/el$releasever/$basearch/os/
enabled=0
gpgcheck=0

[graphviz-snapshot-source]
name=Graphviz - RHEL $releasever - Source
baseurl=http://www.graphviz.org/pub/graphviz/development/SRPMS/
enabled=0
gpgcheck=0

[graphviz-snapshot-debuginfo]
name=Graphviz - RHEL - Debug
baseurl=http://www.graphviz.org/pub/graphviz/development/redhat/el$releasever/$basearch/debug/
enabled=0
gpgcheck=0
#rpm -e graphviz-php
#yum update graphviz
2009年9月24日 星期四
【JavaScript】slice()、substring()、substr()的區別
stringObject.slice(startIndex,endIndex)
返回字串 stringObject 從 startIndex 開始(包括 startIndex )到 endIndex 結束(不包括 endIndex )為止的所有字元。
1)參數 endIndex 可選,如果沒有指定,則預設為字串的長度 stringObject.length 。
var stringObject = "hello world!";
alert(stringObject.slice(3)); // lo world!
alert(stringObject.slice(3,stringObject.length)); // lo world!
【注1】字串中第一個字元的位置是從【0】開始的,最後一個字元的位置為【stringObject.length-1】,所以slice()方法返回的字串不包括endIndex位置的字元。
2)startIndex 、endIndex 可以是負數。如果為負,則表示從字串尾部開始算起。即-1表示字串最後一個字元。
var stringObject = "hello world!";
alert(stringObject.slice(-3)); // ld!
alert(stringObject.slice(-3,stringObject.length)); // ld!
alert(stringObject.slice(-3,-1)); // ld
【注2】合理運用負數可以簡化代碼
3)startIndex、endIndex 都是可選的,如果都不填則返回字串 stringObject 的全部,等同於slice(0)
var stringObject = "hello world!";
alert(stringObject.slice()); // hello world!
alert(stringObject.slice(0)); // hello world!
4)如果startIndex、endIndex 相等,則返回空串
【注3】String.slice() 與 Array.slice() 相似
stringObject.substring(startIndex、endIndex)
返回字串 stringObject 從 startIndex 開始(包括 startIndex )到 endIndex 結束(不包括 endIndex )為止的所有字元。
1)startIndex 是一個非負的整數,必須填寫。endIndex 是一個非負整數,可選。如果沒有,則預設為字串的長度stringObject.length 。
var stringObject = "hello world!";
alert(stringObject.substring(3)); // lo world!
alert(stringObject.substring(3,stringObject.length)); // lo world!
alert(stringObject.substring(3,7)); // lo w,空格也算在內[l][o][ ][w]
2)如果startIndex、endIndex 相等,則返回空串。如果startIndex 比 endIndex 大,則提取子串之前,調換兩個參數。即stringObject.substring(startIndex,endIndex)等同於stringObject.substring(endIndex,startIndex)
var stringObject = "hello world!";
alert(stringObject.substring(3,3)); // 空串
alert(stringObject.substring(3,7)); // lo w
alert(stringObject.substring(7,3)); // lo w
【注4】與substring()相比,slice()更靈活,可以接收負參數。
stringObject.substr(startIndex,length)
返回字串 stringObject 從 startIndex 開始(包括 startIndex )指定數目(length)的字元字元。
1)startIndex 必須填寫,可以是負數。如果為負,則表示從字串尾部開始算起。即-1表示字串最後一個字元。
2)參數 length 可選,如果沒有指定,則預設為字串的長度 stringObject.length 。
var stringObject = "hello world!";
alert(stringObject.substr(3)); // lo world!
alert(stringObject.substr(3,stringObject.length)); // lo world!
alert(stringObject.substr(3,4)); // lo w
3)substr()可以代替slice()和substring()來使用,從上面代碼看出 stringObject.substr(3,4) 等同於stringObject.substring(3,7)
【注5】ECMAscript 沒有對該方法進行標準化,因此儘量少使用該方法。
返回字串 stringObject 從 startIndex 開始(包括 startIndex )到 endIndex 結束(不包括 endIndex )為止的所有字元。
1)參數 endIndex 可選,如果沒有指定,則預設為字串的長度 stringObject.length 。
var stringObject = "hello world!";
alert(stringObject.slice(3)); // lo world!
alert(stringObject.slice(3,stringObject.length)); // lo world!
【注1】字串中第一個字元的位置是從【0】開始的,最後一個字元的位置為【stringObject.length-1】,所以slice()方法返回的字串不包括endIndex位置的字元。
2)startIndex 、endIndex 可以是負數。如果為負,則表示從字串尾部開始算起。即-1表示字串最後一個字元。
var stringObject = "hello world!";
alert(stringObject.slice(-3)); // ld!
alert(stringObject.slice(-3,stringObject.length)); // ld!
alert(stringObject.slice(-3,-1)); // ld
【注2】合理運用負數可以簡化代碼
3)startIndex、endIndex 都是可選的,如果都不填則返回字串 stringObject 的全部,等同於slice(0)
var stringObject = "hello world!";
alert(stringObject.slice()); // hello world!
alert(stringObject.slice(0)); // hello world!
4)如果startIndex、endIndex 相等,則返回空串
【注3】String.slice() 與 Array.slice() 相似
stringObject.substring(startIndex、endIndex)
返回字串 stringObject 從 startIndex 開始(包括 startIndex )到 endIndex 結束(不包括 endIndex )為止的所有字元。
1)startIndex 是一個非負的整數,必須填寫。endIndex 是一個非負整數,可選。如果沒有,則預設為字串的長度stringObject.length 。
var stringObject = "hello world!";
alert(stringObject.substring(3)); // lo world!
alert(stringObject.substring(3,stringObject.length)); // lo world!
alert(stringObject.substring(3,7)); // lo w,空格也算在內[l][o][ ][w]
2)如果startIndex、endIndex 相等,則返回空串。如果startIndex 比 endIndex 大,則提取子串之前,調換兩個參數。即stringObject.substring(startIndex,endIndex)等同於stringObject.substring(endIndex,startIndex)
var stringObject = "hello world!";
alert(stringObject.substring(3,3)); // 空串
alert(stringObject.substring(3,7)); // lo w
alert(stringObject.substring(7,3)); // lo w
【注4】與substring()相比,slice()更靈活,可以接收負參數。
stringObject.substr(startIndex,length)
返回字串 stringObject 從 startIndex 開始(包括 startIndex )指定數目(length)的字元字元。
1)startIndex 必須填寫,可以是負數。如果為負,則表示從字串尾部開始算起。即-1表示字串最後一個字元。
2)參數 length 可選,如果沒有指定,則預設為字串的長度 stringObject.length 。
var stringObject = "hello world!";
alert(stringObject.substr(3)); // lo world!
alert(stringObject.substr(3,stringObject.length)); // lo world!
alert(stringObject.substr(3,4)); // lo w
3)substr()可以代替slice()和substring()來使用,從上面代碼看出 stringObject.substr(3,4) 等同於stringObject.substring(3,7)
【注5】ECMAscript 沒有對該方法進行標準化,因此儘量少使用該方法。
JQuery How to check if an element exists
A common question comes up very frequently - "how do I know if XXX exists". The XXX could be a particular DIV with a class, or it might be an ID. The issue is common enough that it has been listed in the jQuery FAQs (http://docs.jquery.com/Frequently_Asked_Questions#How_do_I_test_whether_...).
Some people attempt to just check the jQuery object for the specified selector:
//This will not work
if ( $("#myid") ) {
//do something
}
This will fail. The jQuery object will ALWAYS return something. When we say $( ) we are asking for a jQuery object. So we get one back. The above code will always equate to TRUE.
The jQuery object contains a list/array of the elements that match our selector. So we can ask for the length of this internal list. The jQuery kindly exposes this length for us as the .length property. If the length is greater than zero then we have at least one object that matches our selector.
if ( $("#myid").length > 0 ) {
//do something
}
So now the only question is what we are testing. This is defined by the selector we use. If we want to know if a particular ID exists, we would use a selector of "#theID". If we were trying to determine if a DIV with a particular class existed, we would use the selector of "div.theClass".
if ( $("#theID").length > 0 ) { alert("The ID exists"); }
if ( $("div.theClass").length > 0 ) { alert("The DIV exists"); }
In this way we can check to see if ANY element exists.
2009年9月23日 星期三
2009年9月22日 星期二
javascript for loop json
var json = { "glossary": { "title": "example glossary" } };
alert(json);
alert(json.glossary.title);
for (var x in json) { alert(x); alert(json[x].title); }
用YUM升级CentOS系统中PHP和MySQL
用上umVPS后,很多时候在虚拟主机不用自己动手的事情都要自己搞定了,例如:PHP和MySQL的升级。因为不用自己动手,也动不了,所以冰古不太清楚虚拟主机的PHP和MySQL是不是会及时地更新。但用VPS,可以动手玩一下也保证安全,冰古是很乐意进行更新的。以下就是用YUM升级CentOS系统中PHP和MySQL的过程:
yum是CentOS系统自带的用于方便地添加/删除/更新RPM包的工具,它能自动解决包的倚赖性问题。
用yum更新PHP,只需用一条命令就可以搞定:
#yum update php
但问题来了,使用此命令后,系统告诉我,没有发现可更新的包。而当前的PHP版本只是5.2.1,PHP官方已经更新到5.2.6了。
经过一番询问,才知道原来CentOS系统的源里PHP仍旧是5.2.1,需要额外的源才能升级PHP。
根据外国网友的介绍,冰古添加了额外的源:
登录SSH后依次运行下列命令:
#rpm --import http://www.jasonlitka.com/media/RPM-GPG-KEY-jlitka
#vi /etc/yum.repos.d/utterramblings.repo #文中这里是使用nano,但VPS不能启动nano,用vi代替也是可以的
在打开的文档中加入下面内容:
[utterramblings]
name=Jason's Utter Ramblings Repo
baseurl=http://www.jasonlitka.com/media/EL$releasever/$basearch/
enabled=1
gpgcheck=1
gpgkey=http://www.jasonlitka.com/media/RPM-GPG-KEY-jlitka
保存。
再次运行下面的命令就可以完成php的升级了
#yum update php
同理,运行下面命令,升级mysql
#yum update mysql
摘自:http://bingu.net/508/upgrade-php-mysql-of-centos-system-use-yum-command/
[Debug]Cannot load libphp5.so No such file or directory
#locate libphp5.so
/usr/lib/httpd/modules/libphp5.so
#cp -a /usr/lib/httpd/modules/libphp5.so /opt/httpd/modules/
即可
/usr/lib/httpd/modules/libphp5.so
#cp -a /usr/lib/httpd/modules/libphp5.so /opt/httpd/modules/
即可
2009年9月15日 星期二
2009年9月13日 星期日
自己寫了一個開心網安撫奴隸的小外掛
開心網(kaixin001的那個)我每天必上,9個奴隸從頭到尾安撫一次,感覺很費勁,早上上班來無聊就寫了一個安撫的小程式,放上來。
功能比較簡單,只完成了安撫操作,其他操作原理一樣,工作比較忙就沒時間弄了....
我用的是 curl_http_client.php (curl的包裝類)
下載地址:http://www.phpclasses.org/browse/file/15747.html
我的代碼是:
摘自:http://blog.csdn.net/luobo525/archive/2009/02/04/3861436.aspx
功能比較簡單,只完成了安撫操作,其他操作原理一樣,工作比較忙就沒時間弄了....
我用的是 curl_http_client.php (curl的包裝類)
下載地址:http://www.phpclasses.org/browse/file/15747.html
我的代碼是:
set_time_limit(0);
require("curl_http_client.php");
echo "start";
$curl = new Curl_HTTP_Client(0);
$curl->store_cookies("c:\\cookies.txt");
$post_data = array("url"=>"/home/",
"invisible_mode"=>"0",
"email"=>"luobo525@163.com",
 "password"=>"********",
 "remember"=>"1");
 //登陸
 $loginhtml=$curl->send_post_data("http://www.kaixin001.com/login/login.php", st_data);
 if(preg_match("/登錄開心網/",$loginhtml))
 {
     echo "
登陸失敗!";
     exit;
 }

 echo "
登陸成功...";
 sleep(1);
 //獲得買賣列表
 echo "
獲得奴隸列表...";
 $html=$curl->fetch_url("http://www.kaixin001.com/app/app.php?aid=1028");
 $allNuLi=array();
 preg_match_all("/comfortslave\((.*?)\)/",$html,$nuliArr);
 preg_match_all('/class="sl2">(.*?)<\/a><\/strong> <\/div>/',$html,$nuliNameArr);
 $nuliCnt=count($nuliArr[1]);
 echo "
獲得奴隸數:{$nuliCnt}
";
 if($nuliCnt==0)exit;

 for($i=0;$i<$nuliCnt;$i++)
 {
     $allNuLi[$nuliArr[1][$i]]=$nuliNameArr[1][$i];
     echo $nuliNameArr[1][$i]." ";
 }
 //獲取隨機碼
 preg_match('/var g_verify = "(.*)";/',$html,$verCode);

 foreach ($allNuLi as $nl=>$nlname)
 {
     if(emptyempty($nl))break;
     echo "

奴隸:".$nlname;
     sleep(1);
     $url="http://www.kaixin001.com/slave/comfort_dialog.php?slaveuid=".$nl."&verify=".$verCode[1];
     //echo $url;
     $afhtml= $curl->fetch_url($url);
     if(preg_match('/\$\("error141"\)\.style\.display/',$afhtml))
     {
         echo "
【{$nlname}】已經安撫過了...";
         continue;
     }

     //獲得最高級安撫
     preg_match('/name="comforttype" value="(\d*)"/',$afhtml,$afArr);
     preg_match('/name="verify" value="(.*?)"/',$afhtml,$verify);

     sleep(1);
     //進行安撫
     echo "
進行安撫...";
     $url="http://www.kaixin001.com/slave/comfort1.php";
     $post_data = array("verify"=>$verify[1],"slaveuid"=>$nl,"comforttype"=>$afArr[1]);
     //print_r($post_data);
     $curl->send_post_data($url, $post_data);

     echo "
【".$nlname."】 安撫完成";

 }
 echo "
end";
摘自:http://blog.csdn.net/luobo525/archive/2009/02/04/3861436.aspx
2009年9月8日 星期二
RHEL Ramdisk安裝教學
Introduction
What is a RAM disk? A RAM disk is a portion of RAM which is being used as if it were a disk drive. RAM disks have fixed sizes, and act like regular disk partitions. Access time is much faster for a RAM disk than for a real, physical disk. However, any data stored on a RAM disk is lost when the system is shut down or powered off. RAM disks can be a great place to store temporary data.
The Linux kernel version 2.4 has built-in support for ramdisks. Ramdisks are useful for a number of things, including:
Working with the unencrypted data from encrypted documents
Serving certain types of web content
Mounting Loopback file systems (such as run-from-floppy/CD distributions)
Why did I write this document? Because I needed to setup a 16 MB ramdisk for viewing and creating encrypted documents. I did not want the unencrypted documents to be written to any physical media on my workstation. I also found it amazing that I could easily create a "virtual disk" in RAM that is larger than my first hard drive, a 20 MB Winchester disk. At the time, that disk was so large that I never even considered filling it up, and I never did!
This document should take you step-by-step through the process of creating and using RAM disks.
Assumptions/Setup
I was using Red Hat 9 for this test, but it should work with other GNU/Linux distributions running 2.4.x kernels. I am also assuming that the distribution you are using already has ramdisk support compiled into the kernel. My test machine was a Pentium 4 and had 256 MB of RAM. The exact version of the kernel that I used was: 2.4.20-20.9
Step 1: Take a look at what has already been created by your system
Red Hat creates 16 ramdisks by default, although they are not "active" or using any RAM. It lists devices ram0 - ram 19, but only ram0 - ram15 are usable by default. To check these block devices out, use the following command:
[root]# ls -l /dev/ram*
lrwxrwxrwx 1 root root 4 Jun 12 00:31 /dev/ram -> ram1
brw-rw---- 1 root disk 1, 0 Jan 30 2003 /dev/ram0
brw-rw---- 1 root disk 1, 1 Jan 30 2003 /dev/ram1
brw-rw---- 1 root disk 1, 10 Jan 30 2003 /dev/ram10
brw-rw---- 1 root disk 1, 11 Jan 30 2003 /dev/ram11
brw-rw---- 1 root disk 1, 12 Jan 30 2003 /dev/ram12
brw-rw---- 1 root disk 1, 13 Jan 30 2003 /dev/ram13
brw-rw---- 1 root disk 1, 14 Jan 30 2003 /dev/ram14
brw-rw---- 1 root disk 1, 15 Jan 30 2003 /dev/ram15
brw-rw---- 1 root disk 1, 16 Jan 30 2003 /dev/ram16
brw-rw---- 1 root disk 1, 17 Jan 30 2003 /dev/ram17
brw-rw---- 1 root disk 1, 18 Jan 30 2003 /dev/ram18
brw-rw---- 1 root disk 1, 19 Jan 30 2003 /dev/ram19
brw-rw---- 1 root disk 1, 2 Jan 30 2003 /dev/ram2
brw-rw---- 1 root disk 1, 3 Jan 30 2003 /dev/ram3
brw-rw---- 1 root disk 1, 4 Jan 30 2003 /dev/ram4
brw-rw---- 1 root disk 1, 5 Jan 30 2003 /dev/ram5
brw-rw---- 1 root disk 1, 6 Jan 30 2003 /dev/ram6
brw-rw---- 1 root disk 1, 7 Jan 30 2003 /dev/ram7
brw-rw---- 1 root disk 1, 8 Jan 30 2003 /dev/ram8
brw-rw---- 1 root disk 1, 9 Jan 30 2003 /dev/ram9
lrwxrwxrwx 1 root root 4 Jun 12 00:31 /dev/ramdisk -> ram0
Now, grep through dmesg output to find out what size the ramdisks are:
[root]# dmesg | grep RAMDISK
RAMDISK driver initialized: 16 RAM disks of 4096K size 1024 blocksize
RAMDISK: Compressed image found at block 0
As you can see, the default ramdisk size is 4 MB. I want a 16 MB ramdisk, so the next step will be to configure Linux to use a larger ramdisk size during boot.
Step 2: Increase ramdisk size
Ramdisk size is controlled by a command-line option that is passed to the kernel during boot. Since GRUB is the default bootloader for Red Hat 9, I will modify /etc/grub.conf with the new kernel option. The kernel option for ramdisk size is: ramdisk_size=xxxxx, where xxxxx is the size expressed in 1024-byte blocks. Here is what I will add to /etc/grub.conf to configure 16 MB ramdisks:
# grub.conf generated by anaconda
#
# Note that you do not have to rerun grub after making changes to this file
# NOTICE: You have a /boot partition. This means that
# all kernel and initrd paths are relative to /boot/, eg.
# root (hd0,0)
# kernel /vmlinuz-version ro root=/dev/hda5
# initrd /initrd-version.img
#boot=/dev/hda
default=0
timeout=10
splashimage=(hd0,0)/grub/splash.xpm.gz
title Red Hat Linux (2.4.20-20.9)
root (hd0,0)
kernel /vmlinuz-2.4.20-20.9 ro root=LABEL=/ hdc=ide-scsi ramdisk_size=16000
initrd /initrd-2.4.20-20.9.img
Once you save the file, you will need to reboot your system. After the reboot, a look at the dmesg output should confirm the change has taken effect:
[root]# dmesg | grep RAMDISK
RAMDISK driver initialized: 16 RAM disks of 16000K size 1024 blocksize
RAMDISK: Compressed image found at block 0
Step 3: Format the ramdisk
There is no need to format the ramdisk as a journaling file system, so we will simply use the ubiquitous ext2 file system. I only want to use one ramdisk, so I will only format /dev/ram0:
[root]# mke2fs -m 0 /dev/ram0
mke2fs 1.32 (09-Nov-2002)
Filesystem label=
OS type: Linux
Block size=1024 (log=0)
Fragment size=1024 (log=0)
4000 inodes, 16000 blocks
0 blocks (0.00%) reserved for the super user
First data block=1
2 block groups
8192 blocks per group, 8192 fragments per group
2000 inodes per group
Superblock backups stored on blocks:
8193
Writing inode tables: done
Writing superblocks and filesystem accounting information: done
This filesystem will be automatically checked every 22 mounts or
180 days, whichever comes first. Use tune2fs -c or -i to override.
The -m 0 option keeps mke2fs from reserving any space on the file system for the root user, which is the default behavior. I want all of the ramdisk space available to a regular user for working with encrypted files.
Step 4: Create a mount point and mount the ramdisk
Now that you have formatted the ramdisk, you must create a mount point for it. Then you can mount your ramdisk and use it. We will use the directory /mnt/rd for this operation.
[root]# mkdir /mnt/rd
[root]# mount /dev/ram0 /mnt/rd
Now verify the new ramdisk mount:
[root]# mount | grep ram0
/dev/ram0 on /mnt/rd type ext2 (rw)
[root]# df -h | grep ram0
/dev/ram0 16M 13K 16M 1% /mnt/rd
You can even take a detailed look at the new ramdisk with the tune2fs command:
[root]# tune2fs -l /dev/ram0
tune2fs 1.32 (09-Nov-2002)
Filesystem volume name: none
Last mounted on: not available
Filesystem UUID: fbb80e9a-8e7c-4bd4-b3d9-37c29813a5f5
Filesystem magic number: 0xEF53
Filesystem revision #: 1 (dynamic)
Filesystem features: filetype sparse_super
Default mount options: (none)
Filesystem state: not clean
Errors behavior: Continue
Filesystem OS type: Linux
Inode count: 4000
Block count: 16000
Reserved block count: 0
Free blocks: 15478
Free inodes: 3989
First block: 1
Block size: 1024
Fragment size: 1024
Blocks per group: 8192
Fragments per group: 8192
Inodes per group: 2000
Inode blocks per group: 250
Filesystem created: Mon Dec 8 14:33:57 2003
Last mount time: Mon Dec 8 14:35:39 2003
Last write time: Mon Dec 8 14:35:39 2003
Mount count: 1
Maximum mount count: 22
Last checked: Mon Dec 8 14:33:57 2003
Check interval: 15552000 (6 months)
Next check after: Sat Jun 5 14:33:57 2004
Reserved blocks uid: 0 (user root)
Reserved blocks gid: 0 (group root)
First inode: 11
Inode size: 128
In my case, I need the user "van" to be able to read and write to the ramdisk, so I must change the ownership and permissions of the /mnt/rd directory:
[root]# chown van:root /mnt/rd
[root]# chmod 0770 /mnt/rd
[root]# ls -ald /mnt/rd
drwxrwx--- 2 van root 4096 Dec 8 11:09 /mnt/rd
The ownership and permissions on the ramdisk filesystem/directory should be tailored to your particular needs.
Step 5: Use the ramdisk
Now that it has been created, you can copy, move, delete, edit, and list files on the ramdisk exactly as if they were on a physical disk partiton. This is a great place to view decrypted GPG or OpenSSL files, as well as a good place to create files that will be encrypted. After your host is powered down, all traces of files created on the ramdisk are gone.
To unmount the ramdisk, simply enter the following:
[root]# umount -v /mnt/rd
/dev/ram0 umounted
Note: If you remount the ramdisk, your data will still be there. Once memory has been allocated to the ramdisk, it is flagged so that the kernel will not try to reuse the memory later. Therefore, you cannot "reclaim" the RAM after you are done with using the ramdisk. For this reason, you will want to be careful not to allocate more memory to the ramdisk than is absolutely necessary. In my case, I am allocating < 10% of the physical RAM. You will have to tailor the ramdisk size to your needs. Of course, you can always free up the space with a reboot!
Automating Ramdisk Creation
If you need to create and mount a ramdisk every time your system boots, you can automate the process by adding some commands to your /etc/rc.local init script. Here are the lines that I added:
# Formats, mounts, and sets permissions on my 16MB ramdisk
/sbin/mke2fs -q -m 0 /dev/ram0
/bin/mount /dev/ram0 /mnt/rd
/bin/chown van:root /mnt/rd
/bin/chmod 0750 /mnt/rd
Conclusion
You have now seen how to setup and use a ramdisk on your GNU/Linux system. Hopefully, you will find this information to be interesting and useful!
摘自:http://www.vanemery.com/Linux/Ramdisk/ramdisk.html
參考:http://www.linuxfocus.org/English/November1999/article124.html
2009年9月7日 星期一
Update PHP to 5.2.9
#vi /etc/yum.repos.d/centos.repo
append below to file :
[c5-testing]
name=CentOS-5 Testing
baseurl=http://dev.centos.org/centos/5/testing/$basearch/
enabled=1
gpgcheck=1
gpgkey=http://dev.centos.org/centos/RPM-GPG-KEY-CentOS-testing
save file
#yum clean all
#yum info php
#yum update php*
append below to file :
[c5-testing]
name=CentOS-5 Testing
baseurl=http://dev.centos.org/centos/5/testing/$basearch/
enabled=1
gpgcheck=1
gpgkey=http://dev.centos.org/centos/RPM-GPG-KEY-CentOS-testing
save file
#yum clean all
#yum info php
#yum update php*
Installing PHP 5.2.x or 5.3.x on RedHat ES5, CentOS 5, etc
I’ve had to follow this tutorial a few times myself now so decided I should share it with the world.
A few of our applications which make use of SOAP get a Segmentation Fault if run with PHP 5.1.x or lower. We believe this is due to a bug in PHP but can’t be sure, regardless it works fine in PHP 5.2.4 and above.
Problem is, RedHat ES5 does not have support at this time for anything higher than 5.1.6, and we didn’t want to break RPM dependancys etc by installing from source.
To install PHP 5.2.5 (Highest in repository at this time) you can make use of a RPM repository maintained by Remi. He has a repository for each distro, but to save you translating for the ES5 one I’ll give you the commands here. Run the following to get up and running:
You now have the Remi repository on your system, however it is disabled by default. Obviously you don’t want all of your packages been effected by this repository, however to enable it for a specific package, run the following:
摘自:http://bluhaloit.wordpress.com/2008/03/13/installing-php-52x-on-redhat-es5-centos-5-etc/
A few of our applications which make use of SOAP get a Segmentation Fault if run with PHP 5.1.x or lower. We believe this is due to a bug in PHP but can’t be sure, regardless it works fine in PHP 5.2.4 and above.
Problem is, RedHat ES5 does not have support at this time for anything higher than 5.1.6, and we didn’t want to break RPM dependancys etc by installing from source.
To install PHP 5.2.5 (Highest in repository at this time) you can make use of a RPM repository maintained by Remi. He has a repository for each distro, but to save you translating for the ES5 one I’ll give you the commands here. Run the following to get up and running:
wget http://download.fedora.redhat.com/pub/epel/5/i386/epel-release-5-3.noarch.rpm
wget http://rpms.famillecollet.com/enterprise/remi-release-5.rpm
rpm -Uvh remi-release-5*.rpm epel-release-5*.rpm
You now have the Remi repository on your system, however it is disabled by default. Obviously you don’t want all of your packages been effected by this repository, however to enable it for a specific package, run the following:
yum --enablerepo=remi update php
摘自:http://bluhaloit.wordpress.com/2008/03/13/installing-php-52x-on-redhat-es5-centos-5-etc/
2009年9月5日 星期六
Uninstall mysql on Red Hat Enterprise Linux
List currently installed packages..
#rpm -qa | grep -i '^mysql-'
Then remove one-by-one
rpm --nodeps -ev MySQL-first-package
rpm --nodeps -ev MySQL-second-package
rpm --nodeps -ev MySQL-last-package
Once you remove all packages you download all MySQL 5.4.* packages into a dir and run below command
rpm -ivh MySQL-*.rpm
#rpm -qa | grep -i '^mysql-'
Then remove one-by-one
rpm --nodeps -ev MySQL-first-package
rpm --nodeps -ev MySQL-second-package
rpm --nodeps -ev MySQL-last-package
Once you remove all packages you download all MySQL 5.4.* packages into a dir and run below command
rpm -ivh MySQL-*.rpm
2009年9月1日 星期二
系統監控Shell Script
#!/bin/sh
status_squid_connection="$(ssh root@192.168.0.2 netstat -tun | grep '80' | wc -l)"
#echo $status_squid_connection

status_apache_connection="$(netstat -tun | grep '80' | wc -l)"
#echo $status_apache_connection

status_mysql_connection="$(netstat -tun | grep '3306' | wc -l)"
#echo $status_mysql_connection

LANG=C
for (( i=0;i<15;i=i+1 ))
do
    date_regular_exp=`date --date="$i minutes ago" +\%a\ %b\ %d\ %H:%M`
    if [ $i -gt 0 ]; then
        str_pipe="|"
    fi
    str="${str}${str_pipe}${date_regular_exp}"
done
status_httpd_error_num="$(cat /var/log/httpd/httpd_urcosme/httpd-error.log | egrep "(${str})" | wc -l)"


/usr/bin/lynx --dump "http://DomainName/updateURL?status_squid_connection=$status_squid_connection&status_apache_connection=$status_apache_connection&status_mysql_connection=$status_mysql_connection&status_httpd_error_num=$status_httpd_error_num"
2009年8月31日 星期一
linux date指令LANG / charset /encoding問題
#date
#一 8月 31 15:56:31 CST 2009
如果想要顯示「Mon Aug 31 15:58:51 CST 2009」
請先輸入以下指令
# LANG=C
#一 8月 31 15:56:31 CST 2009
如果想要顯示「Mon Aug 31 15:58:51 CST 2009」
請先輸入以下指令
# LANG=C
2009年8月26日 星期三
2009年8月25日 星期二
nmon performance: A free tool to analyze AIX and Linux performance
Usage notes: This nmon tool is NOT OFFICIALLY SUPPORTED. No warrantee is given or implied, and you cannot obtain help with it from IBM. If you have a question on nmon, please go on the Performance Tools Forum site (see Resources) so that others can find and benefit from the answers. To protect your email address from junk mail, you need to create a USER ID first (takes 20 seconds at most).
The nmon tool runs on:
AIX® 4.1.5, 4.2.0 , 4.3.2, and 4.3.3 (nmon Version 9a: This version is functionally established and will not be developed further.)
AIX 5.1, 5.2, and 5.3 (nmon Version 10: This version now supports AIX 5.3 and POWER5™ processor-based machines, with SMT and shared CPU micro-partitions.)
Linux® SUSE SLES 9, Red Hat EL 3 and 4, Debian on pSeries® p5, and OpenPower™
Linux SUSE, Red Hat, and many recent distributions on x86 (Intel and AMD in 32-bit mode)
Linux SUSE and Red Hat on zSeries® or mainframe
The nmon tool is updated roughly every six months, or when new operating system releases are available. To place your name on the e-mail list for updates, contact Nigel Griffiths.
Use this tool together with nmon analyser (see Resources), which loads the nmon output file and automatically creates dozens of graphs.
Introduction
The nmon tool is designed for AIX and Linux performance specialists to use for monitoring and analyzing performance data, including:
CPU utilization
Memory use
Kernel statistics and run queue information
Disks I/O rates, transfers, and read/write ratios
Free space on file systems
Disk adapters
Network I/O rates, transfers, and read/write ratios
Paging space and paging rates
CPU and AIX specification
Top processors
IBM HTTP Web cache
User-defined disk groups
Machine details and resources
Asynchronous I/O -- AIX only
Workload Manager (WLM) -- AIX only
IBM TotalStorage® Enterprise Storage Server® (ESS) disks -- AIX only
Network File System (NFS)
Dynamic LPAR (DLPAR) changes -- only pSeries p5 and OpenPower for either AIX or Linux
Also included is a new tool to generate graphs from the nmon output and create .gif files that can be displayed on a Web site.
See the README file for more details.
Benefits of the tool
The nmon tool is helpful in presenting all the important performance tuning information on one screen and dynamically updating it. This efficient tool works on any dumb screen, telnet session, or even a dial-up line. In addition, it does not consume many CPU cycles, usually below two percent. On newer machines, CPU usage is well below one percent.
Data is displayed on the screen and updated once every two seconds, using a dumb screen. However, you can easily change this interval to a longer or shorter time period. If you stretch the window and display the data on X Windows, VNC, PuTTY, or similar, the nmon tool can output a great deal of information in one place.
The nmon tool can also capture the same data to a text file for later analysis and graphing for reports. The output is in a spreadsheet format (.csv).
Installing the tool
The tool is a stand-alone binary file (a different file for each AIX or Linux version) that you can install in five seconds, probably less if you type fast. Installation is simple:
Copy the nmonXXX.tar.Z file to the machine. If using FTP, remember to use binary mode.
Note: Version XXX replaces this example.
To uncompress the file, run uncompress nmonXX.tar.Z.
To extract the files, run tar xvf nmonXX.tar.
Read the README file.
To start the nmon tool, type nmon.
If you are the root user, you might need to type ./nmon.
Extra notes for using nmon 9 for AIX 4 only
You must be the root user or allow regular users to read the /dev/kmem file by typing the following command (as root):
chmod ugo+r /dev/kmem
If you want the disk statistics, then also run (as root):
chdev -l sys0 -a iostat=true
How to run the tool interactively
For running the tool interactively, read the front page of the file for a few hints. Then start the tool and use the one-key commands to see the data you want. For example, to get CPU, Memory, and Disk statistics, start nmon and type:
cmd
How to get help information while running interactively
Press the h key.
Additional help information
For additonal help information, try the following:
Type the nmon -? command for brief details.
Type the nmon -h command for full details.
Read the README file.
How to capture the data to a file for later analysis and graphing
Run nmon with the -f flag. See nmon -h for the details. But as an example, try to run nmon for an hour capturing data snapshots every 30 seconds by using: Â Â Â Â
nmon -f -s 30 -c 120
nmon -fT -s 30 -c 120
The second line also captures the top processes. Both of these create the output file in the current directory called: Â Â Â Â
_date_time.nmon
This file is in a comma-separated values (CVS) format and can be imported into a spreadsheet directly. If you are using Lotus® 1-2-3, the file needs to be sorted. (This is not required for the Excel version of the nmon analyser.) On AIX, follow this example: Â Â Â Â
sort -A mymachine_311201_1030.nmon > xxx.csv
Notes to save you time:
To load the nmon data capture file into a spreadsheet, check the spreadsheet documentation for loading CVS data files (.csv). Many spreadsheets accept this data as just one of the possible files to load or provide an import function to do this. Many spreadsheets have a fixed number of columns and rows. I suggest you collect a maximum of 300 snapshots to avoid hitting these issues.
When you are capturing data to a file, nmon disconnects from the shell to ensure that it continues running, even if you log out. This means that nmon can appear to crash, even though it's still running in the background. To see if the process is still running, type:
ps ?ef | grep nmon
Read the README file for more information about which version of nmon to run on your particular operating system.
nmon Version 10 for AIX 5 no longer uses /dev/kmem, but only public APIs. So, you don't have to chage the permissions on /dev/kmem, and there is no need to have 32- and 64-bit versions of nmon.
For AIX 5.1, 5.2, and 5.3, use nmon 10.
On AIX, don't report lslpp -Lcq bos.?p core dumps on AIX 5.1, about ML03 onwards. Also, WLM stats go missing after upgrading to AIX 5.2 ML5 to Nigel Griffiths, as these are AIX bugs. These are avoided by using nmon Version 10.
Don't use Microsoft® Windows® Telnet and use a larger window than 80 x 25 characters. Many developers use VNC and PuTTY to display nmon from a Windows machine -- why not do the same!
New features for nmon on AIX Version 10
New Features Description
Starting up There is also now a small shell script called "nmon" that starts the right nmon version. Place this script and nmon binaries in your $PATH and type: nmon. This version is now only compiled in 32-bit mode. So, it runs on 32- and 64-bit hardware. The idea is to make it easier to install and run.
N = NFS NFS is completely new for nmon 10.
p = Partitions This is for shared CPU partitions information -- the big p5/AIX5.3 feature.
C = CPU This is for machines with 32 plus CPUs -- up to 128 logical CPUs by demand.
c = CPU Details your physical CPU use -- if you are on a POWER5 with AIX 5.3 and in a shared CPU environment.
S = Subclass This is for WLM subclasses -- by request.
a = Disk adapters Gives you details of the disk adapter -- like their full type.
r = Resources This includes your CPU speed in MHz.
k = Kernel Gives some new fields.
L = Large pages Gives you large-page stats -- popular with high-performance guys.
D = Disk Gives you more information about your disks, disk type sizes, free, volume groups, adapter, and so forth.
n = Network Gives you information about your network adapters details, MTU, and errors.
m = Memory Gives you more details on where your memory is going, system (kernel) and processes, and active virtual memory.
-B This is a start-up option to remove the boxes.
Sample output for nmon 10 for AIX 5
Figure 1 below is a sample of the screen output. It shows the opening screen for AIX 5, with lots of useful information.
Figure 1. Sample output for nmon 10 for AIX 5
Figure 2 illustrates the details for CPU (this is a 4 CPU POWER5 machine with SMT switched on), memory use, kernel internal statistics, and disks statistics. Note: This logical partition (LPAR) is using six times its entitlement in half a CPU.
Figure 2. CPU details
Figure 3 shows the details of the network, NFS statistics, and journal filesystem use.
Figure 3. Network details
The details of the POWER5 shared processor micro-partitions statistics are shown in Figure 4 below.
Figure 4. LPAR details
Figure 5 illustrates the details of the Linux version of nmon, showing the CPU (this is a 2 CPU POWER5 machine with SMT switched on), LPAR statistics, memory use, network statistics, file system use, and disks statistics. Note: The physical CPU of this LPAR is only available with SUSE SLES9 Service Pack 1 and Red Hat EL 4 Update 1.
Figure 5. Linux version of nmon
Figure 6 shows the OS details of the machine, disk statistics (detailed mode), and the top processes.
Figure 6. Linux version of nmon continued
Obtaining the tool
The following download options are available:
You can download nmon and its tools from IBM Wiki at http://www-941.haw.ibm.com/collaboration/wiki/display/WikiPtype/nmon.
Check out the Performance Tools forum for nmon questions and ideas at http://www-03.ibm.com/systems/p/community/.
Resources
Learn
"nmon analyser -- A free tool to produce AIX performance reports" (developerWorks, April 2006): Produce a wealth of report-ready graphs from nmon output.
Check out the following IBM Redbooks for additional information on performance:
Understanding IBM pSeries Performance and Sizing, SG24-4810-01, Febraruary 2001
Database Performance on AIX in the DB2 UDB and Oracle Environments, SG24-5511, January 2003
AIX 5L Performance Tools Handbook,SG24-6039, August 2003
Check out other articles and tutorials written by Nigel Griffiths:
AIX and UNIX zone
Across IBM and developerWorks
"AIX 5 performance series: CPU monitoring and tuning": Browse through this article to get rid of your CPU bottlenecks and improve performance.
Search the AIX and UNIX library by topic:
System administration
Application development
Performance
Porting
Security
Tips
Tools and utilities
Java™ technology
Linux
Open source
AIX and UNIX: The AIX and UNIX developerWorks zone provides a wealth of information relating to all aspects of AIX systems administration and expanding your UNIX skills.
New to AIX and UNIX: Visit the New to AIX and UNIX page to learn more about AIX and UNIX.
AIX 5L™ Wiki: A collaborative environment for technical information related to AIX.
IBM Virtual Innovation Center for Hardware: This site is the primary source for all System p AIX development.
Safari bookstore: Visit this e-reference library to find specific technical resources.
developerWorks technical events and webcasts: Stay current with developerWorks technical events and webcasts.
Podcasts: Tune in and catch up with IBM technical experts.
Get products and technologies
IBM trial software: Build your next development project with software for download directly from developerWorks.
nmon: Download nmon and its tools.
Discuss
Participate in the developerWorks blogs and get involved in the developerWorks community.
Participate in the AIX and UNIX forums:
AIX 5L -- technical forum
AIX for Developers Forum
Cluster Systems Management
IBM Support Assistant
Performance Tools -- technical
Virtualization -- technical
More AIX and UNIX forums
nmon questions: Check out the Performance Tools forum for nmon questions and ideas.
About the author
Nigel Griffiths works in the IBM eServer® pSeries Technical Support Advanced Technology Group. He specialises in performance, sizing, tools, benchmarks, and Oracle RDBMS. The nmon tool was developed to support benchmarks and performance tuning for internal use, but by popular demand is given away to deserving friends. If you have a question on nmon, please go on the Performance Tools Forum site (see Resources) so that others can find and benefit from the answers. To protect your email address from junk mail, you need to create a USER ID first (takes 20 seconds at most).
摘自:http://www.ibm.com/developerworks/aix/library/au-analyze_aix/
The nmon tool runs on:
AIX® 4.1.5, 4.2.0 , 4.3.2, and 4.3.3 (nmon Version 9a: This version is functionally established and will not be developed further.)
AIX 5.1, 5.2, and 5.3 (nmon Version 10: This version now supports AIX 5.3 and POWER5™ processor-based machines, with SMT and shared CPU micro-partitions.)
Linux® SUSE SLES 9, Red Hat EL 3 and 4, Debian on pSeries® p5, and OpenPower™
Linux SUSE, Red Hat, and many recent distributions on x86 (Intel and AMD in 32-bit mode)
Linux SUSE and Red Hat on zSeries® or mainframe
The nmon tool is updated roughly every six months, or when new operating system releases are available. To place your name on the e-mail list for updates, contact Nigel Griffiths.
Use this tool together with nmon analyser (see Resources), which loads the nmon output file and automatically creates dozens of graphs.
Introduction
The nmon tool is designed for AIX and Linux performance specialists to use for monitoring and analyzing performance data, including:
CPU utilization
Memory use
Kernel statistics and run queue information
Disks I/O rates, transfers, and read/write ratios
Free space on file systems
Disk adapters
Network I/O rates, transfers, and read/write ratios
Paging space and paging rates
CPU and AIX specification
Top processors
IBM HTTP Web cache
User-defined disk groups
Machine details and resources
Asynchronous I/O -- AIX only
Workload Manager (WLM) -- AIX only
IBM TotalStorage® Enterprise Storage Server® (ESS) disks -- AIX only
Network File System (NFS)
Dynamic LPAR (DLPAR) changes -- only pSeries p5 and OpenPower for either AIX or Linux
Also included is a new tool to generate graphs from the nmon output and create .gif files that can be displayed on a Web site.
See the README file for more details.
Benefits of the tool
The nmon tool is helpful in presenting all the important performance tuning information on one screen and dynamically updating it. This efficient tool works on any dumb screen, telnet session, or even a dial-up line. In addition, it does not consume many CPU cycles, usually below two percent. On newer machines, CPU usage is well below one percent.
Data is displayed on the screen and updated once every two seconds, using a dumb screen. However, you can easily change this interval to a longer or shorter time period. If you stretch the window and display the data on X Windows, VNC, PuTTY, or similar, the nmon tool can output a great deal of information in one place.
The nmon tool can also capture the same data to a text file for later analysis and graphing for reports. The output is in a spreadsheet format (.csv).
Installing the tool
The tool is a stand-alone binary file (a different file for each AIX or Linux version) that you can install in five seconds, probably less if you type fast. Installation is simple:
Copy the nmonXXX.tar.Z file to the machine. If using FTP, remember to use binary mode.
Note: Version XXX replaces this example.
To uncompress the file, run uncompress nmonXX.tar.Z.
To extract the files, run tar xvf nmonXX.tar.
Read the README file.
To start the nmon tool, type nmon.
If you are the root user, you might need to type ./nmon.
Extra notes for using nmon 9 for AIX 4 only
You must be the root user or allow regular users to read the /dev/kmem file by typing the following command (as root):
chmod ugo+r /dev/kmem
If you want the disk statistics, then also run (as root):
chdev -l sys0 -a iostat=true
How to run the tool interactively
For running the tool interactively, read the front page of the file for a few hints. Then start the tool and use the one-key commands to see the data you want. For example, to get CPU, Memory, and Disk statistics, start nmon and type:
cmd
How to get help information while running interactively
Press the h key.
Additional help information
For additonal help information, try the following:
Type the nmon -? command for brief details.
Type the nmon -h command for full details.
Read the README file.
How to capture the data to a file for later analysis and graphing
Run nmon with the -f flag. See nmon -h for the details. But as an example, try to run nmon for an hour capturing data snapshots every 30 seconds by using: Â Â Â Â
nmon -f -s 30 -c 120
nmon -fT -s 30 -c 120
The second line also captures the top processes. Both of these create the output file in the current directory called: Â Â Â Â
This file is in a comma-separated values (CVS) format and can be imported into a spreadsheet directly. If you are using Lotus® 1-2-3, the file needs to be sorted. (This is not required for the Excel version of the nmon analyser.) On AIX, follow this example: Â Â Â Â
sort -A mymachine_311201_1030.nmon > xxx.csv
Notes to save you time:
To load the nmon data capture file into a spreadsheet, check the spreadsheet documentation for loading CVS data files (.csv). Many spreadsheets accept this data as just one of the possible files to load or provide an import function to do this. Many spreadsheets have a fixed number of columns and rows. I suggest you collect a maximum of 300 snapshots to avoid hitting these issues.
When you are capturing data to a file, nmon disconnects from the shell to ensure that it continues running, even if you log out. This means that nmon can appear to crash, even though it's still running in the background. To see if the process is still running, type:
ps ?ef | grep nmon
Read the README file for more information about which version of nmon to run on your particular operating system.
nmon Version 10 for AIX 5 no longer uses /dev/kmem, but only public APIs. So, you don't have to chage the permissions on /dev/kmem, and there is no need to have 32- and 64-bit versions of nmon.
For AIX 5.1, 5.2, and 5.3, use nmon 10.
On AIX, don't report lslpp -Lcq bos.?p core dumps on AIX 5.1, about ML03 onwards. Also, WLM stats go missing after upgrading to AIX 5.2 ML5 to Nigel Griffiths, as these are AIX bugs. These are avoided by using nmon Version 10.
Don't use Microsoft® Windows® Telnet and use a larger window than 80 x 25 characters. Many developers use VNC and PuTTY to display nmon from a Windows machine -- why not do the same!
New features for nmon on AIX Version 10
New Features Description
Starting up There is also now a small shell script called "nmon" that starts the right nmon version. Place this script and nmon binaries in your $PATH and type: nmon. This version is now only compiled in 32-bit mode. So, it runs on 32- and 64-bit hardware. The idea is to make it easier to install and run.
N = NFS NFS is completely new for nmon 10.
p = Partitions This is for shared CPU partitions information -- the big p5/AIX5.3 feature.
C = CPU This is for machines with 32 plus CPUs -- up to 128 logical CPUs by demand.
c = CPU Details your physical CPU use -- if you are on a POWER5 with AIX 5.3 and in a shared CPU environment.
S = Subclass This is for WLM subclasses -- by request.
a = Disk adapters Gives you details of the disk adapter -- like their full type.
r = Resources This includes your CPU speed in MHz.
k = Kernel Gives some new fields.
L = Large pages Gives you large-page stats -- popular with high-performance guys.
D = Disk Gives you more information about your disks, disk type sizes, free, volume groups, adapter, and so forth.
n = Network Gives you information about your network adapters details, MTU, and errors.
m = Memory Gives you more details on where your memory is going, system (kernel) and processes, and active virtual memory.
-B This is a start-up option to remove the boxes.
Sample output for nmon 10 for AIX 5
Figure 1 below is a sample of the screen output. It shows the opening screen for AIX 5, with lots of useful information.
Figure 1. Sample output for nmon 10 for AIX 5
Figure 2 illustrates the details for CPU (this is a 4 CPU POWER5 machine with SMT switched on), memory use, kernel internal statistics, and disks statistics. Note: This logical partition (LPAR) is using six times its entitlement in half a CPU.
Figure 2. CPU details
Figure 3 shows the details of the network, NFS statistics, and journal filesystem use.
Figure 3. Network details
The details of the POWER5 shared processor micro-partitions statistics are shown in Figure 4 below.
Figure 4. LPAR details
Figure 5 illustrates the details of the Linux version of nmon, showing the CPU (this is a 2 CPU POWER5 machine with SMT switched on), LPAR statistics, memory use, network statistics, file system use, and disks statistics. Note: The physical CPU of this LPAR is only available with SUSE SLES9 Service Pack 1 and Red Hat EL 4 Update 1.
Figure 5. Linux version of nmon
Figure 6 shows the OS details of the machine, disk statistics (detailed mode), and the top processes.
Figure 6. Linux version of nmon continued
Obtaining the tool
The following download options are available:
You can download nmon and its tools from IBM Wiki at http://www-941.haw.ibm.com/collaboration/wiki/display/WikiPtype/nmon.
Check out the Performance Tools forum for nmon questions and ideas at http://www-03.ibm.com/systems/p/community/.
Resources
Learn
"nmon analyser -- A free tool to produce AIX performance reports" (developerWorks, April 2006): Produce a wealth of report-ready graphs from nmon output.
Check out the following IBM Redbooks for additional information on performance:
Understanding IBM pSeries Performance and Sizing, SG24-4810-01, Febraruary 2001
Database Performance on AIX in the DB2 UDB and Oracle Environments, SG24-5511, January 2003
AIX 5L Performance Tools Handbook,SG24-6039, August 2003
Check out other articles and tutorials written by Nigel Griffiths:
AIX and UNIX zone
Across IBM and developerWorks
"AIX 5 performance series: CPU monitoring and tuning": Browse through this article to get rid of your CPU bottlenecks and improve performance.
Search the AIX and UNIX library by topic:
System administration
Application development
Performance
Porting
Security
Tips
Tools and utilities
Java™ technology
Linux
Open source
AIX and UNIX: The AIX and UNIX developerWorks zone provides a wealth of information relating to all aspects of AIX systems administration and expanding your UNIX skills.
New to AIX and UNIX: Visit the New to AIX and UNIX page to learn more about AIX and UNIX.
AIX 5L™ Wiki: A collaborative environment for technical information related to AIX.
IBM Virtual Innovation Center for Hardware: This site is the primary source for all System p AIX development.
Safari bookstore: Visit this e-reference library to find specific technical resources.
developerWorks technical events and webcasts: Stay current with developerWorks technical events and webcasts.
Podcasts: Tune in and catch up with IBM technical experts.
Get products and technologies
IBM trial software: Build your next development project with software for download directly from developerWorks.
nmon: Download nmon and its tools.
Discuss
Participate in the developerWorks blogs and get involved in the developerWorks community.
Participate in the AIX and UNIX forums:
AIX 5L -- technical forum
AIX for Developers Forum
Cluster Systems Management
IBM Support Assistant
Performance Tools -- technical
Virtualization -- technical
More AIX and UNIX forums
nmon questions: Check out the Performance Tools forum for nmon questions and ideas.
About the author
Nigel Griffiths works in the IBM eServer® pSeries Technical Support Advanced Technology Group. He specialises in performance, sizing, tools, benchmarks, and Oracle RDBMS. The nmon tool was developed to support benchmarks and performance tuning for internal use, but by popular demand is given away to deserving friends. If you have a question on nmon, please go on the Performance Tools Forum site (see Resources) so that others can find and benefit from the answers. To protect your email address from junk mail, you need to create a USER ID first (takes 20 seconds at most).
摘自:http://www.ibm.com/developerworks/aix/library/au-analyze_aix/
訂閱:
文章 (Atom)


