FreeBSD 的 /var/log 中有很多檔案,而且每天的零晨都會自動壓縮備份成一個 xxx.bz2 的壓縮檔,這些壓縮檔會保留約一個星期或 10 天,之後便會自動刪除,以 maillog 來說它每天會備份一次保留 7 天。
maillog
maillog.0.bz2
maillog.1.bz2
maillog.2.bz2
maillog.3.bz2
maillog.4.bz2
maillog.5.bz2
maillog.6.bz2
maillog.7.bz2
bz2 這些壓縮檔如何檢視呢 ? 可使用 bzcat 這個指令 :
#bzcat maillog.1.bz2 | grep dynamic > file.01
將檔案解開並把 dynamic 相關的文字檔導入 file.01 這個檔
#vi file.01
檢視檔案
今天在 LSS 的實驗室 中學到的透過一些簡易的指令可更方便檢視 maillog 中你要的資訊,LSS 也是重 自由軟體交流網的討論區 中學到的,我也把它記錄下來免得健忘的我要用時又到處找 :
張貼於: 2004/9/4 3:06
之前是用 iptables 把大陸, 香港, 韓國的連線都擋掉,
今天一時興起, 想說找找幾個廣告信大宗來源, 整理如下:
140.111.101.25
202.163.32.0/19
210.202.108.0/29
210.202.113.96/29
210.71.186.176/30
218.36.0.0/12
218.62.128.0/17
218.63.0.0/16
220.163.0.0/15
220.165.0.0/16
220.228.86.228
61.159.254.0/24
61.220.135.112/29
61.220.135.88/28
61.220.185.248/28
61.63.77.113
63.251.144.32/28
有些不一定是廣告信, 但是出現太多次寄給不明帳號, 就擋掉了. 至於這些來源的取得, 可以透過一些常用的程式完成:
cat /var/log/maillog \ #列出郵件紀錄
| awk '{FS="relay=";print $2}' \ #以 relay= 為分隔點, 列出後半段(也就是發信站)
| awk '{FS="]";print $1}' \ #以 ] 為分隔點, 列出前半段(也就是發信站)
| sort \ #排序一下
| uniq -c \ #統計各發信站寄來的數量
| sort -r #將發信最多的排前面
這是比較粗略的檢查法, 要精確一點的話, 可以加上
| grep "Sep 4" \ #只找 9 月 4 號的紀錄
| grep "unknown" \ #只找沒有 DNS 反查的連線
| grep -v "User unknown" \ #但不會找到 User unknown
假如查到的 ip 是 61.159.254.28 , 再另外執行:
whois 61.159.254.28 | more
會 列出這個 IP 隸屬的業者,以及這業者所分配的 IP 範圍, 再列入擋掉的範圍.這個 IP 發廣告信只限於61.159.254.0/24 ,所以沒有擋掉該業者全部, 只擋這個範圍;而其他發信來源有跨多個子網域,就把該業者全部擋掉,例如: 220.163.0.0/15~220.165.0.0/16 是同一業者,廣告信過於分散, 所以全擋.
我的用法採 bzcat 寫法如下 :
#bzcat maillog.* | awk '{FS="relay=";print $2}' | awk '{FS="]";print $1}' | sort | uniq -c | sort -r
摘自:http://blog.ntut.idv.tw/2005/05/freebsd-maillog.html
2008年3月31日 星期一
[Debug]Postfix and MS-Exchange Mail Server Affected by ORDB.org Spam Service
這個星期,公司的mail server收信發生問題,錯誤訊息如下:
「Technical details of permanent failure:
PERM_FAILURE: SMTP Error (state 14): 554 Service unavailable; Client host [XXX.XXX.XXX.XXX] blocked using relays.ordb.org; ordb.org was shut down on December 18, 2006. Please remove from your mailserver.」
經過檢查後,發現ordb.org在2006年12月時已經停服務了,ORDB是由一群志工所提供的一項服務,服務內容是建立「發垃圾郵件的IP」的資料庫,來幫ISP阻檔垃圾郵件。
雖然ORDB宣佈在2006年12月已停止運作,但還是有很多mail server繼續利用ORDB的服務,讓ORDB非常煩惱!
所以這一次ORDB採取所有使用ORDB服務的mail server的主機,不論事實,一致把請求的IP認定為「發垃圾郵件的IP」,我想應該是要讓MIS去停止再使用ORDB的服務!
相關文章如下:
ORDB.org is dead and gone
Spam blocker rises from the dead to bite lax email administrators
解決方法如下:
Postfix and MS-Exchange Mail Server Affected by ORDB.org Spam Service
If you or your mail server / gateway / firewall querying relays.ordb.org; please stop it immediately. If you query relays.ordb.org - mail server will rejecting all incoming mails from that server.
Symantec Mail Security for MS-Exchange Server - Spam Filter
Symantec Mail Security for Microsoft Exchange configuration in the list of Anti-spam blacklist servers including relays.ordb.org. Immediately remove the entry.
Remove ORDB.ORG from MS-Exchange Server Spam Filter
In Exchange Server 2003 you can find the feature for blacklist support within the global settings of your organization. Visit MS-Exchange System Manager > Global Settings > Message Delivery Properties -> Connection Filtering tab > Remove relays.ordb.org
Remove Linux / UNIX - Postfix Mail Server - Spam Filter
Open postfix configuration file and remove the following line:
Restart postfix mail server:
「Technical details of permanent failure:
PERM_FAILURE: SMTP Error (state 14): 554 Service unavailable; Client host [XXX.XXX.XXX.XXX] blocked using relays.ordb.org; ordb.org was shut down on December 18, 2006. Please remove from your mailserver.」
經過檢查後,發現ordb.org在2006年12月時已經停服務了,ORDB是由一群志工所提供的一項服務,服務內容是建立「發垃圾郵件的IP」的資料庫,來幫ISP阻檔垃圾郵件。
雖然ORDB宣佈在2006年12月已停止運作,但還是有很多mail server繼續利用ORDB的服務,讓ORDB非常煩惱!
所以這一次ORDB採取所有使用ORDB服務的mail server的主機,不論事實,一致把請求的IP認定為「發垃圾郵件的IP」,我想應該是要讓MIS去停止再使用ORDB的服務!
相關文章如下:
ORDB.org is dead and gone
Spam blocker rises from the dead to bite lax email administrators
解決方法如下:
Postfix and MS-Exchange Mail Server Affected by ORDB.org Spam Service
If you or your mail server / gateway / firewall querying relays.ordb.org; please stop it immediately. If you query relays.ordb.org - mail server will rejecting all incoming mails from that server.
Symantec Mail Security for MS-Exchange Server - Spam Filter
Symantec Mail Security for Microsoft Exchange configuration in the list of Anti-spam blacklist servers including relays.ordb.org. Immediately remove the entry.
Remove ORDB.ORG from MS-Exchange Server Spam Filter
In Exchange Server 2003 you can find the feature for blacklist support within the global settings of your organization. Visit MS-Exchange System Manager > Global Settings > Message Delivery Properties -> Connection Filtering tab > Remove relays.ordb.org
Remove Linux / UNIX - Postfix Mail Server - Spam Filter
Open postfix configuration file and remove the following line:
$ vi /usr/local/etc/postfix/main.cf
## 將以下之內容註解 ##
# reject_rbl_client relays.ordb.org,
Restart postfix mail server:
$ /usr/local/sbin/postfix stop
$ /usr/local/sbin/postfix start
2008年3月20日 星期四
[Debug]ERROR 2002 (HY000): Can't connect to local MySQL server through socket '/tmp/mysql.sock' (2)
前幾天遇到了一個鳥問題~~mysql 一灌完啟動不了
原來是自已太急了在灌完後執行mysql_install_db後有出現下面的註是
You can start the MySQL daemon with:
cd /usr/local ; /usr/local/bin/mysqld_safe &
結果自已太急~~一直在console下打msyql就出現下面的錯誤
ERROR 2002 (HY000): Can't connect to local MySQL server through socket '/tmp/mysql.sock' (2)
只要在第一次執行的時後打
/usr/local/bin/mysqld_safe &
來啟動
以後都用mysql 就可以執行了。
摘自:http://blog.johnpupu.tw/?p=8
2008年3月19日 星期三
[PHP]Session執行步驟
When session_start() is called:
open
read
clean (if cleaning is being done this call)
write
close
When session_destroy() is called after session_start():
open
read
clean (if cleaning is being done this call)
destroy
close
When session_regenerate_id(1) is called after session_start():
open
read
clean (if cleaning is being done this call)
destroy
write
close
open
read
clean (if cleaning is being done this call)
write
close
When session_destroy() is called after session_start():
open
read
clean (if cleaning is being done this call)
destroy
close
When session_regenerate_id(1) is called after session_start():
open
read
clean (if cleaning is being done this call)
destroy
write
close
[PHP]設session.gc_maxlifetime,但gc卻沒有執行
這個回收處理系統裡面的session本身應該是隨機的處理在session
目錄裡面的session檔案.
你在這個設定中設定了分子項.但是沒有設定分母項所以,請除過期的session的機會還是只有預設的1%的機會.
所以你必須要設定你的分母為1,才會是 1/1=100%
以這樣的設定,每一個SESSION在下次開啟SESSION_START時100%會去清除.
如果你的.ini_set('session.gc_divisor', 1); 設成2/那系統只有50%機會隨機去清除SESSION本的的值.
優點是在系統過期時.其他使用者,或者有任何人啟動 SESSION時.
就會將這個過期的 SESSION.全部移除.
不過缺點是系統的LOADING 會變的非常的沈重.尤其在大量使用者使用這個系統的時候.
系統會不間斷一直讀取你的SESSION目錄,以清除你的過期的垃圾SESSION.
另外.session.cookie_lifetime 的時間設成0 /表示使用者中止連線/系統預設為150-到300秒 (APACHE設定值)
之前你的SESSION ID沒有遺失之前你自己使用這個SESSION還是會被視為有效(因為系統好像會先查你的SESSION是否存在:不刪除正確的SESSION_ID取得檔),
但是,當有任何非目前的CLIENT 跑了一下SESSION_START的話.SESSION還是會被別的CLIENT移除.
也就是你開了一個視窗跑了一個SESSION你.就算過了15秒你還是一直可以用. //0-15秒
第16-N秒中間你的COOKIE如果還存在你SESSION_ID還可以用,你的SESSION 檔還是不會刪除 //0-16秒
16秒之後你如果再開一個流覽器去跑這個SESSION_START() 那你之前那個SESSION檔就會被剛除了.
結論是.
建議你如果要限制使用者登入的時間的話.
你可以在$_session中記一個時間值,自己去比對這個時間值是不是愈時.會更簡單容易.而且簡省資源.
為了整體的系統穩定.不建議調升垃圾處理時間.及垃圾資料的隨機處理機率
摘自:http://cc2007.php5.idv.tw/bb-3818.htm
目錄裡面的session檔案.
你在這個設定中設定了分子項.但是沒有設定分母項所以,請除過期的session的機會還是只有預設的1%的機會.
所以你必須要設定你的分母為1,才會是 1/1=100%
<?php
ob_start();
ini_set('session.save_path',"C:\\php\\tmp2"); //設定在存目錄
ini_set('session.name', 'pissession'); // session值使用名稱
ini_set('session.gc_probability', 1); // 回收處理分子項
ini_set('session.gc_divisor', 1); // 回收處理分母項
ini_set('session.gc_maxlifetime', 15); // 清除以目前時間差中失效的過期session
ini_set('session.cookie_lifetime', 0); // Cookie的SID存在時間

echo $_SESSION['pis'];
if(isset($_SESSION['pis'])){
    echo 'gc_maxlifetime = ' . ini_get('session.gc_maxlifetime') . "
";
    echo 'logined:'.$_SESSION['pis'];
}else{
    echo 'timeout';
}
?>
以這樣的設定,每一個SESSION在下次開啟SESSION_START時100%會去清除.
如果你的.ini_set('session.gc_divisor', 1); 設成2/那系統只有50%機會隨機去清除SESSION本的的值.
優點是在系統過期時.其他使用者,或者有任何人啟動 SESSION時.
就會將這個過期的 SESSION.全部移除.
不過缺點是系統的LOADING 會變的非常的沈重.尤其在大量使用者使用這個系統的時候.
系統會不間斷一直讀取你的SESSION目錄,以清除你的過期的垃圾SESSION.
另外.session.cookie_lifetime 的時間設成0 /表示使用者中止連線/系統預設為150-到300秒 (APACHE設定值)
之前你的SESSION ID沒有遺失之前你自己使用這個SESSION還是會被視為有效(因為系統好像會先查你的SESSION是否存在:不刪除正確的SESSION_ID取得檔),
但是,當有任何非目前的CLIENT 跑了一下SESSION_START的話.SESSION還是會被別的CLIENT移除.
也就是你開了一個視窗跑了一個SESSION你.就算過了15秒你還是一直可以用. //0-15秒
第16-N秒中間你的COOKIE如果還存在你SESSION_ID還可以用,你的SESSION 檔還是不會刪除 //0-16秒
16秒之後你如果再開一個流覽器去跑這個SESSION_START() 那你之前那個SESSION檔就會被剛除了.
結論是.
建議你如果要限制使用者登入的時間的話.
你可以在$_session中記一個時間值,自己去比對這個時間值是不是愈時.會更簡單容易.而且簡省資源.
為了整體的系統穩定.不建議調升垃圾處理時間.及垃圾資料的隨機處理機率
摘自:http://cc2007.php5.idv.tw/bb-3818.htm
2008年3月15日 星期六
PHP 快速轉換到 JavaScript
現在 Javascript 當紅, 那要從 PHP 轉換到 Javascript 有沒有什麼快速的方法, PHP 有提供太多方便的 function, 在 Javascript 要如何實作或轉換呢?
最簡單的方法是直接嵌入一個 php.js 就可以了, 雖然這是一個好用的方法, 但是我覺得要用的時後, 看看 Library 裡面怎麼寫, 順便學學 Javascript 應該會比較好~
看這個 Library 還在繼續發展中, 還沒試用過, 不知道 IE/FF 的問題有沒有測試過(ex: JavaScript: substr() 負數的算法 IE, Firefox 不同).
總之, 要從 PHP 轉換到寫 Javascript, 使用此 Library 應該會讓轉換過程比較快. :)
詳細可見: PHP to Javascript Project: php.js php.js 壓縮的php.js
摘自:http://plog.longwin.com.tw/programming/2008/01/31/php_javascript_phpjs_2008
MySQL 設定 Replication (Master - Slave)
MySQL 設定寫入 Master 後, 自動 Replication 到 Slave 去, 運作基本原理是:
- INSERT/UPDATE/DELETE 語法, 自動寫入 Master 的 binlog file.
- 由 GRANT REPLICATION 授權的帳號, 自動將 SQL 語法 repl 到 Slave 的 DB 執行.
- 因而完成 Replication 的動作.
下述詳細可見: MySQL 5.0 Reference Manual :: 15 Replication
設定 Replication 的操作 (Master)
- $ sudo vim /etc/mysql/my.cnf # 下面是 Debian Linux 的設定, 找到下面的設定, 新增/修改 成下面這樣子.
#bind-address = 127.0.0.1
server-id = 1
log_bin = /var/log/mysql/mysql-bin.log
- $ sudo /etc/init.d/mysql restart
- $ mysql -u root -p # 進入 mysql
- mysql> GRANT REPLICATION SLAVE ON *.* TO 'repl'@'%' IDENTIFIED BY 'repl_pass'; # 先假設 帳號 repl, 密碼 repl_pass, 此步驟是 設定 repl 的帳號/密碼, 格式: GRANT REPLICATION SLAVE ON *.* TO 'repl_user'@'%.mydomain.com' IDENTIFIED BY 'repl_password'; (Replace <some_password>with a real password!)
- mysql> FLUSH TABLES WITH READ LOCK; # 先讓 DB 不要再寫資料進去
- mysql> SHOW MASTER STATUS; # 這邊資料都要記好, 等一下設定 Slave 要用
+----------------------+------------+------------------+----------------------+
| File | Position | Binlog_Do_DB | Binlog_Ignore_DB |
+----------------------+------------+------------------+----------------------+
| mysql-bin.000014 | 232 | | |
+----------------------+------------+------------------+----------------------+
- mysql> quit # 離開, 準備倒資料
- 倒資料, 可以由下述的方法倒, 此次採用步驟 1
- $ mysqldump -u root -p DB > dbdump.sql
- $ mysqldump --all-databases --lock-all-tables >dbdump.sql
- $ mysqldump --all-databases --master-data >dbdump.sql # --master-data: 會自動將CHANGE MASTER 的語法帶在裡面
- $ mysql -u root -p # 進入 mysql
- mysql> UNLOCK TABLES; # dump 完資料後, 進去 mysql 解除唯讀
- 再來就是將 dbdump.sql scp 到 Slave 去即可.
- Master 就到此為止.
設定 Replication 的操作 (Slave)
- $ sudo vim /etc/mysql/my.cnf
server-id = 2 # server-id 不能與其它機器相同
log_bin = /var/log/mysql/mysql-bin.log
- $ mysql -u root -p # 進入 mysql
- mysql> create database DBNAME;
- mysql> use DBNAME; source dbdump.sql; 或 $ mysql -u root -p DBNAME < dbdump.sql
- mysql> CHANGE MASTER TO
MASTER_HOST='MASTER_HOSTNAME',
MASTER_USER='repl',
MASTER_PASSWORD='repl_pass',
MASTER_LOG_FILE='mysql-bin.000014',
MASTER_LOG_POS=1319669; # 這邊就要用到之前 Master 抄下來的值. - mysql> START SLAVE; # 這樣子就會開始 Replication 了, 會將 LOG_POS 之後新的資料開始 sync 回來.
- mysql> show master status; # 檢查一下設定
- mysql> show slave status; # 檢查一下設定, 看是不是有異常狀況.
測試
- 在 master: mysql> create database test2;
- 在 slave: mysql> show database; # 應該會看到 test2
- 在 master 上的任何操作應該都會馬上 replication 到 slave 去.
其它相關網頁
摘自:http://plog.longwin.com.tw/my_note-app-setting/2008/03/11/mysql_replication_master_slave_set_2008
查查看有多少人正在共用你所使用的虛擬主機
myIPneighbors 是一個可以查詢有多少網站被放在同一個 IP 底下的工具。一般我們所租用的虛擬主機其實都是共享的,也就是說同一台主機裡會存放著好幾個網站,所以有些虛擬主機商會為了不影響其他使用者的權益而限制 CPU 使用時間就是因為主機是共享的。
藉由 myIPneighbors 我們可以知道,我的網站所在的虛擬主機裡還存放著多少其他的鄰居,從而粗略的判斷出我們的虛擬主機商的服務品質。因為只要同一台主機裡面同時存在著過多的網站,那我們的網站的執行效率一定就會打折扣。那為什麼說是粗略的呢?因為 myIPneighbors 所查詢出來的結果其實是有多少網站掛在同一個 IP 底下,而不是同一台主機裡面。所以如果我們使用的主機裡設有許多不同 IP 的話那麼查詢結果只是顯示主機裡一部份的網站而已,我們並沒有辦法精準的判斷出虛擬主機商是否還塞了其他的網站在裡面。
摘自:http://blog.joaoko.net/archives/433
PHP 程式效能優化的 40 條建議
使用 str_replace > preg_replace, 但是 strtr 又比 str_replace 快, $row['id'] 比 $row[id] 快 7 倍, 雖然有些龜毛了點, 偶爾注意一下也不錯~ :)
原文: 40 Tips for optimizing your php code
轉載自翻譯: 優化PHP程式的40條建議
- 如果一個方法可靜態化,就對它做靜態聲明。速率可提升至4倍
- echo 比 print 快
- 使用echo的多重參數(譯註:指用逗號而不是句點)代替字元串連接
- 在執行for循環之前確定最大循環數,不要每循環一次都計算最大值
- 註銷那些不用的變量尤其是大數組,以便釋放內存
- 盡量避免使用__get,__set,__autoload
- require_once()代價昂貴
- 在包含文件時使用完整路徑,解析操作系統路徑所需的時間會更少
- 如果你想知道腳本開始執行(譯註:即服務器端收到客戶端請求)的時刻,使用$_SERVER['REQUEST_TIME']要好於time()
- 函數代替正則表達式完成相同功能
- str_replace函數比preg_replace函數快,但strtr函數的效率是str_replace函數的四倍
- 如果一個字元串替換函數,可接受數組或字元作為參數,並且參數長度不太長,那麼可以考慮額外寫一段替換程式,使得每次傳遞參數是一個字元,而不是只寫一行程式接受數組作為查詢和替換的參數
- 使用選擇分支語句(譯註:即switch case)好於使用多個if,else if語句
- 用@屏蔽錯誤消息的做法非常慢
- 打開apache的mod_deflate模塊
- 資料庫連接當使用完畢時應關掉
- $row['id']的效率是$row[id]的7倍
- 錯誤訊息代價昂貴
- 盡量不要在for循環中使用函數,比如for ($x=0; $x < count($array); $x)每循環一次都會調用count()函數
- 在function中遞增局部變量,速度是最快的。幾乎與在函數中調用局部變量的速度相當
- 遞增一個全局變量要比遞增一個局部變量慢2倍
- 遞增一個物件屬性(如:$this->prop++)要比遞增一個局部變量慢3倍
- 遞增一個未預定義的局部變量要比遞增一個預定義的局部變量慢9至10倍
- 僅定義一個局部變量而沒在函數中調用它,同樣會減慢速度(其程度相當於遞增一個局部變量)。PHP大概會檢查看是否存在全局變量
- 方法調用看來與類中定義的方法的數量無關,因為我(在測試方法之前和之後都)添加了10個方法,但性能上沒有變化
- 派生類中的方法運行起來要快於在基類中定義的同樣的方法
- 調用帶有一個參數的空函數,其花費的時間相當於執行7至8次的局部變量遞增操作。類似的方法調用所花費的時間接近於15次的局部變量遞增操作
- 用單引號代替雙引號來包含字元串,這樣做會更快一些。因為PHP會在雙引號包圍的字元串中搜尋變量,單引號則不會。當然,只有當你不需要在字元串中包含變量時才可以這麼做
- 輸出多個字元串時,用逗號代替句點來分隔字元串,速度更快。註意:只有echo能這麼做,它是一種可以把多個字元串當作參數的“函數”(譯註:PHP手冊中說echo是語言結構,不是真正的函數,故把函數加上了雙引號)
- Apache解析一個PHP腳本的時間要比解析一個靜態HTML頁面慢2至10倍。盡量多用靜態HTML頁面,少用腳本
- 除非腳本可以緩存,否則每次調用時都會重新編譯一次。引入一套PHP緩存機制通常可以提升25%至100%的性能,以免除編譯開銷
- 盡量做緩存,可使用memcached。memcached是一款高性能的內存物件緩存系統,可用來加速動態Web應用程式,減輕數據庫負載。對運算碼 (OP code)的緩存很有用,使得腳本不必為每個請求做重新編譯
- 當操作字元串並需要檢驗其長度是否滿足某種要求時,你想當然地會使用strlen()函數。此函數執行起來相當快,因為它不做任何計算,只返回在zval 結構(C的內置數據結構,用於存儲PHP變量)中存儲的已知字元串長度。但是,由於strlen()是函數,多多少少會有些慢,因為函數調用會經過諸多步驟,如字母小寫化(譯註:指函數名小寫化,PHP不區分函數名大小寫),會跟隨被調用的函數一起執行。在某些情況下,你可以使用isset() 技巧加速執行你的程式
舉例如下:
if (strlen($foo) < 5) { echo "Foo is too short"; }
與下面的技巧做比較:
if (!isset($foo{5})) { echo "Foo is too short"; }
調用isset()恰巧比strlen()快,因為與後者不同的是,isset()作為一種語言結構,意味著它的執行不需要函數查找和字母小寫化。也就是說,實際上在檢驗字元串長度的頂層程式中你沒有花太多開銷 - 當執行變數$i的遞增或遞減時,$i++會比++$i慢一些。這種差異是PHP特有的,並不適用於其他語言,所以請不要修改你的C或Java程式並指望它們能立即變快,沒用的。++$i更快是因為它只需要3條指令(opcodes),$i++則需要4條指令。後置遞增實際上會產生一個臨時變量,這個臨時變量隨後被遞增。而前置遞增直接在原值上遞增。這是最優化處理的一種,正如Zend的PHP優化器所作的那樣。牢記這個優化處理不失為一個好主意,因為並不是所有的指令優化器都會做同樣的優化處理,並且存在大量沒有裝配指令優化器的網際網路服務提供商(ISPs)和服務器
- 並不是所有都要使用OOP,面向物件往往開銷很大,每個方法和物件調用都會消耗很多Memory
- 並非要用 class 實現所有的數據結構,數組也很有用
- 不要把方法細分得過多,仔細想想你真正打算重用的是哪些程式?
- 當你需要時,你總能把程式分解成方法
- 盡量採用大量的PHP內置函數
- 如果在程式中存在大量耗時的函數,你可以考慮用C擴展的方式實現它們
- 評估檢驗(profile)你的程式。檢驗器會告訴你,程式的哪些部分消耗了多少時間。Xdebug調試器包含了檢驗程式,評估檢驗總體上可以顯示出程式的瓶頸
- mod_zip可作為Apache模塊,用來即時壓縮你的數據,並可讓數據傳輸量降低80%
- 另一篇優化PHP的精彩文章,由John Lim撰寫
摘自:http://plog.longwin.com.tw/programming/2008/02/05/php_optimizing_40_comment_2008
2008年3月12日 星期三
[Imagick]圖像函式多種用法&教學
Seam carving
Mikko Koppanen February 13th, 2008
Today I was reading trough the ImageMagick ChangeLog and noticed an interesting entry. "Add support for liquid rescaling". I rushed to check the MagickWand API docs and there it was: MagickLiquidRescaleImage! After about ten minutes of hacking the Imagick support was done. Needless to say; I was excited ![]()
For those who don't know what seam carving is check the demo here. More detailed information about the algorithm can be found here: "Seam Carving for Content-Aware Image Resizing" by Shai Avidan and Ariel Shamir
To use this functionality you need to install at least ImageMagick 6.3.8-2 and liblqr. Remember to pass --with-lqr to ImageMagick configuration line. You can get liblqr here: http://liblqr.wikidot.com/. The Imagick side of the functionality should appear in the CVS today if everything goes as planned.
Here is a really simple example just to illustrate the results of the operation. The parameters might be far from optimal (didn't do much testing yet). The original dimensions of image are 500x375 and the resulting size is 500x200.
Update: the functionality is pending until license issues are solved.
PHP:
The original image by flickr/jennconspiracy
And the result:
Update. On kenrick's request here is an image which is scaled down to 300x300
Typesetting
Mikko Koppanen January 17th, 2008
Ever had the situation where you have a piece of string which you need to overlay on an image? Maybe a situation where the area reserved for the string is known in pixels but you need to know the font size to fill most of the area? Think no more!
Here is a small example of how to fit a certain piece of a string on to an area of which you know the width and the height or only the width. The magic happens through the ImageMagick CAPTION: format. You can see from the example images how the parameters actually affect the image.
PHP:
- <?php
- /* How wide is our image */
- $image_width = 200;
- /* Give zero for autocalculating the height */
- $image_height = 200;
- /* Specify the text */
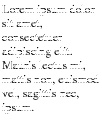
- $text = "Lorem ipsum dolor sit amet, consectetuer adipiscing elit.
- Mauris lectus mi, mattis non, euismod vel, sagittis nec, ipsum.";
- /* Instanciate imagick */
- $im = new Imagick();
- /* Create new image using caption: pseudo format */
- $im->newPseudoImage( $image_width, $image_height, "caption:" . $text );
- /* Put 1px border around the image */
- $im->borderImage( 'black', 1, 1 );
- /* PNG format */
- $im->setImageFormat( "png") ;
- /* Output */
- header( "Content-Type: image/png" );
- echo $im;
- ?>
Here is image with width 100 and height 0:
Width 100 Height 50:
Width 200 Height 200 (as you can see the font size is now larger):

Padding thumbnail with color
Mikko Koppanen January 11th, 2008
I know, it's been a while since I last blogged. This is because a lot of things are happening in my personal life. I recently relocated to London from Finland and started a new job. Things are quite busy but I will try to post an example now and then. In the meanwhile I would like to hear about sites using Imagick, so if your project is not super secret please post an url and maybe a small explanation what you're doing with Imagick on the site. This is purely for my personal interest.
Anyway, to the point. Today's example originates from a question asked by a user. How do I thumbnail the image inside given dimensions proportionally and fill the "blank" areas with a color? Well, the answer is here ![]()
The code is for Imagick 2.1.0 but adapting to older versions should not be hard.
PHP:
- <?php
- /* Define width and height of the thumbnail */
- $width = 100;
- $height = 100;
- /* Instanciate and read the image in */
- $im = new Imagick( "test.png" );
- /* Fit the image into $width x $height box
- The third parameter fits the image into a "bounding box" */
- $im->thumbnailImage( $width, $height, true );
- /* Create a canvas with the desired color */
- $canvas = new Imagick();
- $canvas->newImage( $width, $height, 'pink', 'png' );
- /* Get the image geometry */
- $geometry = $im->getImageGeometry();
- /* The overlay x and y coordinates */
- $x = ( $width - $geometry['width'] ) / 2;
- $y = ( $height - $geometry['height'] ) / 2;
- /* Composite on the canvas */
- $canvas->compositeImage( $im, imagick::COMPOSITE_OVER, $x, $y );
- /* Output the image*/
- header( "Content-Type: image/png" );
- echo $canvas;
- ?>
The source image:

The resulting image:

Creating buttons with Imagick
Mikko Koppanen November 21st, 2007
A fellow called kakapo asked me to create a button with Imagick. He had an image of the button and a Photoshop tutorial but unfortunately the tutorial was in Chinese. My Chinese is a bit rusty so it will take a little longer to create that specific button ![]()
The button in this example is created after this tutorial http://xeonfx.com/tutorials/easy-button-tutorial/ (yes, I googled "easy button tutorial"). The code and the button it creates are both very simple but the effect looks really nice.
Here we go with the code:
PHP:
- <?php
- /* Create a new Imagick object */
- $im = new Imagick();
- /* Create empty canvas */
- $im->newImage( 200, 200, "white", "png" );
- /* Create the object used to draw */
- $draw = new ImagickDraw();
- /* Set the button color.
- Changing this value changes the color of the button */
- $draw->setFillColor( "#4096EE" );
- /* Create the outer circle */
- $draw->circle( 50, 50, 70, 70 );
- /* Create the smaller circle on the button */
- $draw->setFillColor( "white" );
- /* Semi-opaque fill */
- $draw->setFillAlpha( 0.2 );
- /* Draw the circle */
- $draw->circle( 50, 50, 68, 68 );
- /* Set the font */
- $draw->setFont( "./test1.ttf" );
- /* This is the alpha value used to annotate */
- $draw->setFillAlpha( 0.17 );
- /* Draw a curve on the button with 17% opaque fill */
- $draw->bezier( array(
- array( "x" => 10 , "y" => 25 ),
- array( "x" => 39, "y" => 49 ),
- array( "x" => 60, "y" => 55 ),
- array( "x" => 75, "y" => 70 ),
- array( "x" => 100, "y" => 70 ),
- array( "x" => 100, "y" => 10 ),
- ) );
- /* Render all pending operations on the image */
- $im->drawImage( $draw );
- /* Set fill to fully opaque */
- $draw->setFillAlpha( 1 );
- /* Set the font size to 30 */
- $draw->setFontSize( 30 );
- /* The text on the */
- $draw->setFillColor( "white" );
- /* Annotate the text */
- $im->annotateImage( $draw, 38, 55, 0, "go" );
- /* Trim extra area out of the image */
- $im->trimImage( 0 );
- /* Output the image */
- header( "Content-Type: image/png" );
- echo $im;
- ?>
And here is a few buttons I created by changing the fill color value:


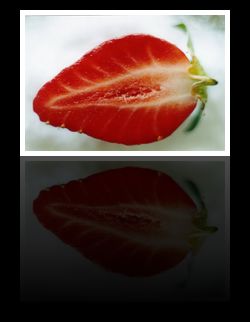
Creating a reflection
Mikko Koppanen November 19th, 2007
Here is a simple example of creating a reflection of an image. The reflection is created by flipping the image and overlaying a gradient on it. Then both, the original image and the reflection is overlayed on a canvas.
This example is created for Imagick 2.1.x but with a little tuning it should work with earlier versions.
PHP:
- <?php
- /* Read the image */
- $im = new Imagick( "strawberry.png" );
- /* Thumbnail the image */
- $im->thumbnailImage( 200, null );
- /* Create a border for the image */
- $im->borderImage( "white", 5, 5 );
- /* Clone the image and flip it */
- $reflection = $im->clone();
- $reflection->flipImage();
- /* Create gradient. It will be overlayd on the reflection */
- $gradient = new Imagick();
- /* Gradient needs to be large enough for the image
- and the borders */
- $gradient->newPseudoImage( $reflection->getImageWidth() + 10,
- $reflection->getImageHeight() + 10,
- "gradient:transparent-black"
- );
- /* Composite the gradient on the reflection */
- $reflection->compositeImage( $gradient, imagick::COMPOSITE_OVER, 0, 0 );
- /* Add some opacity */
- $reflection->setImageOpacity( 0.3 );
- /* Create empty canvas */
- $canvas = new Imagick();
- /* Canvas needs to be large enough to hold the both images */
- $width = $im->getImageWidth() + 40;
- $height = ( $im->getImageHeight() * 2 ) + 30;
- $canvas->newImage( $width, $height, "black", "png" );
- /* Composite the original image and the reflection on the canvas */
- $canvas->compositeImage( $im, imagick::COMPOSITE_OVER, 20, 10 );
- $canvas->compositeImage( $reflection, imagick::COMPOSITE_OVER,
- 20, $im->getImageHeight() + 10 );
- /* Output the image*/
- header( "Content-Type: image/png" );
- echo $canvas;
- ?>
The source image:

And the result:
P.S. Please send me some new images which I can use in these examples ![]()
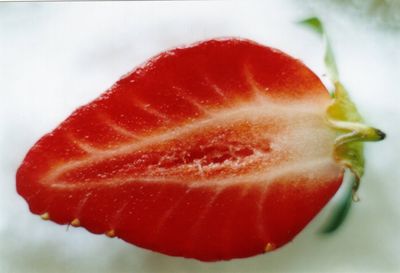
ImagickPixelIterator is not read-only after all..
Mikko Koppanen November 15th, 2007
A few days ago I got a help request from a user: "How do you change pixel color during the iteration with ImagickPixelIterator". My initial response was that ImagickPixelIterator is read-only.
Well, I have to admit I was wrong. After searching trough ImageMagick docs I stumbled across an example and noticed that PixelIterator (and therefor ImagickPixelIterator) is not read-only after all. I have tried the code like in this example before; without the syncIterator call after each row. After adding the Imagick::syncIterator call everything worked as expected.
This example will work with Imagick 2.1.0 (the RC1 was released yesterday) but with a little tweaking it should work with 2.0.x too.
PHP:
- <?php
- /* Create new object with the image */
- $im = new Imagick( "strawberry.png" );
- /* Get iterator */
- $it = $im->getPixelIterator();
- /* Loop trough pixel rows */
- foreach( $it as $row => $pixels )
- {
- /* For every second row */
- if ( $row % 2 )
- {
- /* Loop trough the pixels in the row (columns) */
- foreach ( $pixels as $column => $pixel )
- {
- /* Paint every second pixel black*/
- if ( $column % 2 )
- {
- $pixel->setColor( "black" );
- }
- }
- }
-
- /* Sync the iterator, this is important
- to do on each iteration */
- $it->syncIterator();
- }
- /* Display the image */
- header( "Content-Type: image/png" );
- echo $im;
- ?>
The source image:
![]()
The result image:
![]()
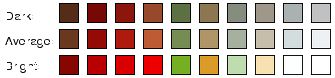
Color analysis
Mikko Koppanen November 5th, 2007
The idea for today's example comes from Jonathan. Jonathan was asking: "I’d like to request a tutorial. One thing I’d really like to know how to do is analyze an image for it’s color “palette”, or in other words, to find what the primary colors are that are used in an image."
I don't know if this is exactly what he meant but I hope this example can be used as a kickstart for color analysis. The code in the example reduces the image colors to 10, then discards all but one pixel of every color and then creates the palettes out of those colors. This might not be the most accurate way to do this, but at least it's fast ![]()
The code creates three different "palettes" from image; average palette, dark palette and bright palette. I got the idea for three different palettes from MarcosBL at freenode.
Here is the code:
PHP:
- <?php
- /* The original image is the average colors */
- $average = new Imagick( "test.png" );
- /* Reduce the amount of colors to 10 */
- $average->quantizeImage( 10, Imagick::COLORSPACE_RGB, 0, false, false );
- /* Only save one pixel of each color */
- $average->uniqueImageColors();
- /* Clone the average and modulate to brighter */
- $bright = $average->clone();
- $bright->modulateImage ( 125, 200, 100 );
- /* Clone the average and modulate to darker */
- $dark = $average->clone();
- $dark->modulateImage ( 80, 100, 100 );
- /* Helper function to create the mini-images */
- function createImages( Imagick $composite, Imagick $im )
- {
- /* Get ImagickPixelIterator */
- $it = $im->getPixelIterator();
-
- /* Reset the iterator to begin */
- $it->resetIterator();
- /* Loop trough rows */
- while( $row = $it->getNextIteratorRow() )
- {
- /* Loop trough columns */
- foreach ( $row as $pixel )
- {
- /* Create a new image which contains the color */
- $composite->newImage( 20, 20, $pixel );
- $composite->borderImage( new ImagickPixel( "black" ), 1, 1 );
- }
- }
- }
- /* This object holds the color images */
- $composite = new Imagick();
- /* Create "icons" for each palette */
- createImages( $composite, $dark );
- createImages( $composite, $average );
- createImages( $composite, $bright );
- /* Montage the color images into single image
- Ten images per row, three rows */
- $montage = $composite->montageImage( new imagickdraw(), "10x3+0+0",
- "20x20+4+3>", imagick::MONTAGEMODE_UNFRAME,
- "0x0+3+3" );
- /* Free some resources */
- $composite->destroy();
- /* Create an empty canvas */
- $canvas = new Imagick();
- $canvas->newImage( $montage->getImageWidth() + 55,
- $montage->getImageHeight(),
- new ImagickPixel( "white" ) );
- /* Display the canvas as png */
- $canvas->setImageFormat( "png" );
- /* Set font size to 12 points */
- $draw = new ImagickDraw();
- $draw->setFontSize( 12 );
- /* Create legends for each palette */
- $canvas->annotateImage( $draw, 5, 20, 0, "Dark: " );
- $canvas->annotateImage( $draw, 5, 45, 0, "Average: " );
- $canvas->annotateImage( $draw, 5, 70, 0, "Bright: " );
- /* Composite the montaged images next to texts */
- $canvas->compositeImage( $montage, Imagick::COMPOSITE_OVER, 55, 0 );
- /* Output the image */
- header( "Content-Type: image/png" );
- echo $canvas;
- ?>
Edited the example to work with 2.0.x
The first source image:
The created palette:
The second source image:

And the palette:
And one more:

Palette:
Trimming an image
Mikko Koppanen November 2nd, 2007
Especially product images usually "suffer" from this issue; the product itself is composited on a white background and there are large areas of white around the object.
This is a simple example to demonstrate how to easily trim the areas off the image and only display the parts where the object lies.
Imagick::trimImage takes one parameter which is "fuzz". Quoting ImageMagick manual: "By default target must match a particular pixel color exactly. However, in many cases two colors may differ by a small amount. The fuzz member of image defines how much tolerance is acceptable to consider two colors as the same. For example, set fuzz to 10 and the color red at intensities of 100 and 102 respectively are now interpreted as the same color for the purposes of the floodfill."
I use fuzz 0 in this example because the background color pixels are all same color.
PHP:
- <?php
- /* Create the object and read the image in */
- $im = new Imagick( "test.png" );
- /* The background color. This is what we trim. */
- $im->setImageBackgroundColor( new ImagickPixel( "rgb(213,213,213)" ) );
- /* Trim the image. */
- $im->trimImage( 0 );
- /* Ouput the image */
- header( "Content-Type: image/" . $im->getImageFormat() );
- echo $im;
- ?>
The source image is a simple png image with black circle on gray background:

The trimmed image:

Analyzing image properties
Mikko Koppanen October 26th, 2007
Imagick provides various ways to identify image properties. These properties include for example some basic attributes like width, height, format and some more advanced attributes like exif tags, profiles and colorspaces.
This example will demonstrate a few basic ways to read these attributes from an image. The image used in this example is from www.exif.org and can be found here http://exif.org/samples/fujifilm-dx10.jpg.
The support for getImageProperties and getImageProfiles was added in ImageMagick version 6.3.5-9 and Imagick version 2.0.0RC4.
PHP:
- <?php
- $im = new Imagick( "fujifilm-dx10.jpg" );
- $identify = $im->identifyImage();
- /* Ouput some basic attributes */
- echo '<b>Basic image properties:</b> <br />';
- echo 'Image geometry: ' , $identify['geometry']['width'] , 'x' , $identify['geometry']['height'] , '<br />';
- echo 'Image format: ' , $identify["format"] , '<br />';
- echo 'Image type: ' , $identify["type"] , '<br />';
- echo 'Image compression: ' , $identify["compression"] , '<br />';
- echo 'Image size: ' , $identify["fileSize"] , '<br />';
- echo '<br /><br />';
- echo '<b>All image properties:</b> <br />';
- /* Loop trough image properties */
- foreach ( $im->getImageProperties() as $k => $v )
- {
- echo $k , ' => ' , $v , '<br />';
- }
- echo '<br /><br />';
- echo '<b>All image profiles:</b> <br />';
- /* Same goes for properties */
- foreach ( $im->getImageProfiles() as $k => $v )
- {
- }
- ?>
The output looks something like this:
Basic image properties:
Image geometry: 1024x768
Image format: JPEG (Joint Photographic Experts Group JFIF format)
Image type: TrueColor
Image compression: JPEG
Image size: 129.955kb
All image properties:
exif:ApertureValue => 41/10
exif:BrightnessValue => -27/10
exif:ColorSpace => 1
exif:ComponentsConfiguration => ...
exif:CompressedBitsPerPixel => 14/10
exif:Compression => 6
exif:Copyright => J P Bowen
exif:DateTime => 2001:04:12 20:33:14
exif:DateTimeDigitized => 2001:04:12 20:33:14
exif:DateTimeOriginal => 2001:04:12 20:33:14
exif:ExifImageLength => 768
exif:ExifImageWidth => 1024
exif:ExifOffset => 258
exif:ExifVersion => 0210
exif:ExposureBiasValue => 0/10
exif:ExposureProgram => 2
exif:FileSource => .
exif:Flash => 1
exif:FlashPixVersion => 0100
exif:FNumber => 42/10
exif:FocalLength => 58/10
exif:FocalPlaneResolutionUnit => 3
exif:FocalPlaneXResolution => 2151/1
exif:FocalPlaneYResolution => 2151/1
exif:InteroperabilityIndex => R98
exif:InteroperabilityOffset => 708
exif:InteroperabilityVersion => 0100
exif:ISOSpeedRatings => 150
exif:JPEGInterchangeFormat => 856
exif:JPEGInterchangeFormatLength => 10274
exif:Make => FUJIFILM
exif:MaxApertureValue => 41/10
exif:MeteringMode => 5
exif:Model => DX-10
exif:Orientation => 1
exif:ResolutionUnit => 2
exif:SceneType => .
exif:SensingMethod => 2
exif:ShutterSpeedValue => 66/10
exif:Software => Digital Camera DX-10 Ver1.00
exif:XResolution => 72/1
exif:YCbCrPositioning => 2
exif:YResolution => 72/1
jpeg:colorspace => 2
jpeg:sampling-factor => 2x1,1x1,1x1
Signature => 434d8554488bf9af5fc551adeba43e6d1d04ac36559a02357cf5df93db4b35c5
All image profiles:
Profile name: exif (size: 11136)
摘自:http://valokuva.org/?cat=1
2008年3月10日 星期一
[CakePHP]CakeSession needs support to set cookies over ALL subdomains
Description
I have a site where I need to preserve cookies over all sub-domains. Since it is quite useless to set the domain of a cookie to another domain (since browsers won't allow that) just allowing a flag to cover all subdomains might be useful.
Core...
in cake/libs/session.php function initSession()
摘自:https://trac.cakephp.org/ticket/830
I have a site where I need to preserve cookies over all sub-domains. Since it is quite useless to set the domain of a cookie to another domain (since browsers won't allow that) just allowing a flag to cover all subdomains might be useful.
Core...
define('CAKE_SESSION_SUBDOMAINS', true);
in cake/libs/session.php function initSession()
switch($this->security) {
    case 'high':
        $this->cookieLifeTime=0;
        if (function_exists('ini_set')) {
            ini_set('session.referer_check', $this->host);
        }
    break;
    case 'medium':
        $this->cookieLifeTime = 7 * 86400;
    break;
        case 'low':
    default:
        $this->cookieLifeTime = 788940000;
    break;
}

//subdomain code
if (CAKE_SESSION_SUBDOMAINS){
    if (substr_count ($this->host, ".") == 1){
        cookie_domain = "." . $this->host;
    }else{
        $cookie_domain = preg_replace ('/^([^.])*/i', null, $this->host);
    }
    ini_set ("session.cookie_domain", $cookie_domain);
}
//end subdomain code
摘自:https://trac.cakephp.org/ticket/830
2008年3月5日 星期三
[FreeBSD]利用 pw 指令來增加/變換 user 的 group
例:帳號 abcd 所屬群組 abcd
變換帳號 abcd 的預設群組為 staff (當然得要先有 staff 這個群組)
變換帳號 abcd 的預設群組為 office,並加入到 www,mysql,squid 三群組中
不變換預設群組,只將帳號 abcd 加入到 office,staff,game,software 四群組中
將帳號 abcd 維持在預設群組中,並從其它附屬的群組中移除
變換帳號 abcd 的預設群組為 staff (當然得要先有 staff 這個群組)
$ pw user mod -n abcd -g staff
$ groups abcd
staff
變換帳號 abcd 的預設群組為 office,並加入到 www,mysql,squid 三群組中
$ pw user mod -n abcd -g office -G www,mysql,squid
$ groups abcd
office www mysql squid
不變換預設群組,只將帳號 abcd 加入到 office,staff,game,software 四群組中
$ pw user mod -n abcd -G office,staff,game,software
$ groups abcd
abcd www mysql squid
將帳號 abcd 維持在預設群組中,並從其它附屬的群組中移除
$ pw user mod -n abcd -G ""
$ groups abcd
abcd
[FreeBSD]關於 Proftpd 設定 DefaultRoot
原來 DefaultRoot可以重複設,比如:
就是設定「除了ice_gogogo這個群組登入後到自己家目錄,其餘皆會 chroot 到 /srv」。採取的規則是 first match ,所以要是反過來設就會有不一樣的結果。
摘自:http://williewu.blogspot.com/2007/03/proftpd-defaultroot.html
DefaultRoot ~ ice_gogogo
DefaultRoot /srv/
就是設定「除了ice_gogogo這個群組登入後到自己家目錄,其餘皆會 chroot 到 /srv」。採取的規則是 first match ,所以要是反過來設就會有不一樣的結果。
摘自:http://williewu.blogspot.com/2007/03/proftpd-defaultroot.html
2008年3月4日 星期二
[教學] Ramdisk 簡易按裝圖文教學與自動備份製作
首先下載 Ramdisk Rainwen大提供的連結 http://www.badongo.com/file/7201826
安裝程式
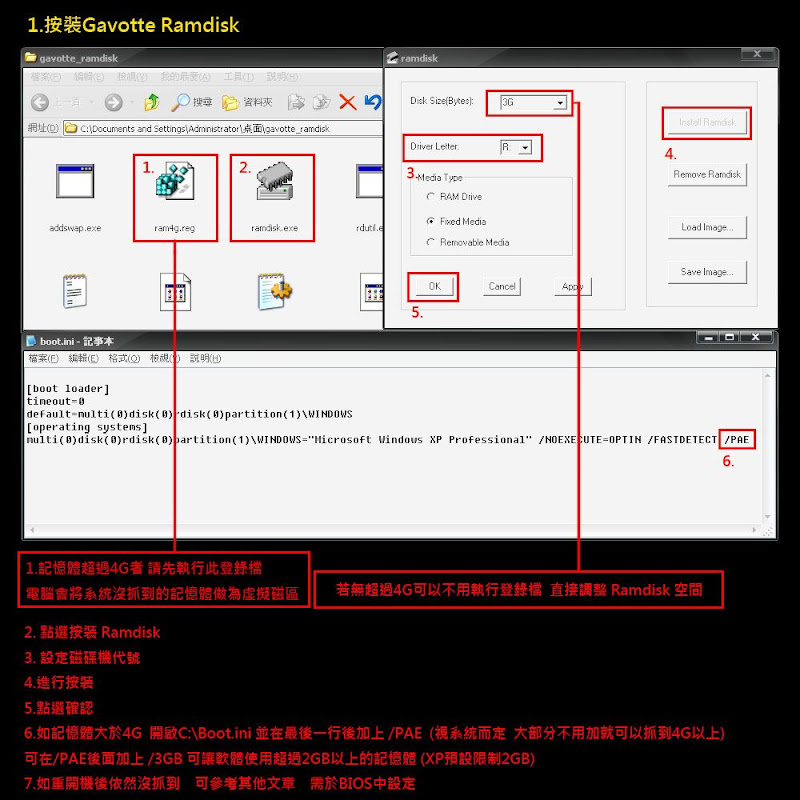
系統設定
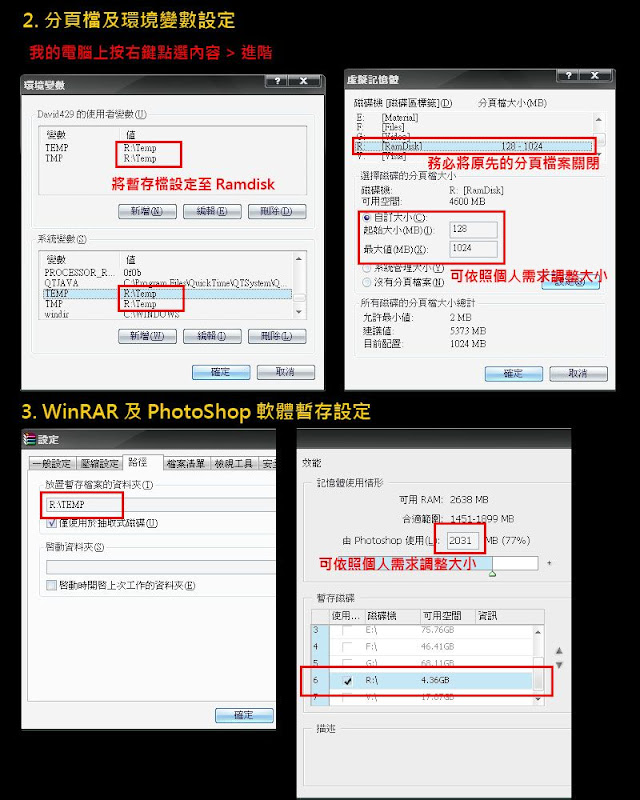
製作開關機備份
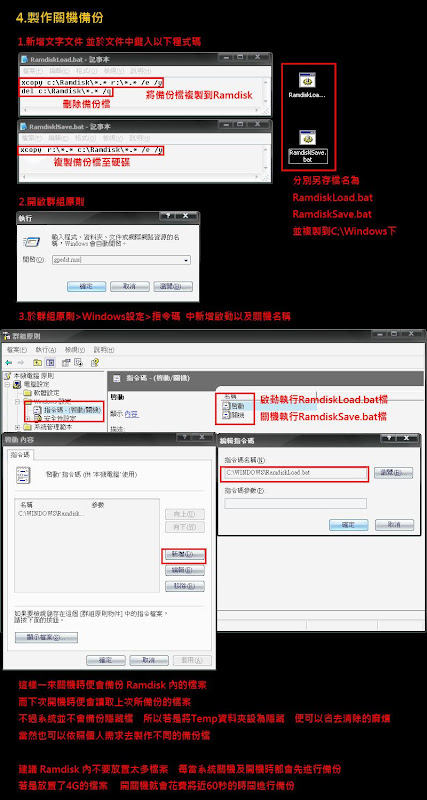
系統資訊
以上內容如有出錯煩請告知
Ramdisk實際測試
http://www.pcdvd.com.tw/showthread.php?p=1080721014
摘自:http://www.pcdvd.com.tw/showthread.php?t=771727
安裝程式
系統設定
製作開關機備份
系統資訊
以上內容如有出錯煩請告知
Ramdisk實際測試
http://www.pcdvd.com.tw/showthread.php?p=1080721014
摘自:http://www.pcdvd.com.tw/showthread.php?t=771727
[病毒]KAVO,熊貓燒香
前一陣子電腦中了毒,經過一番爬文後發現這應該是「KAVO隨身碟病毒」
症狀是雙擊C、D槽都無法直接開啟,且還有被詢問要用什麼程式來開啟C、D槽的怪事
此症狀中了「熊貓燒香」時也會有
但熊貓燒香還有個特徵,那就是會讓電腦中副檔名為.exe的應用程式圖示變成這樣
不過我只有無法開啟硬碟而已
今天和我的傀儡聊天,發現他家電腦和公司電腦也出現了跟我之前一樣的情形
我才知道原來這個病毒近來這麼夯!(雖然都醫好了,但我中了不止一次)
這種隨身碟病毒,在你把受感染的隨身碟插進電腦中時,即立刻蔓延至所有其它電腦中的磁碟
凡是某磁碟打不開;打開後從另一個視窗跳出來,或是無法顯示隱藏檔都屬於不正常現象
甚至電腦中一些軟體打開後立刻關閉,譬如我的Yahoo即時通、迅雷等等程式
另外在WINDOWS\system32資料夾裡,會有Kavo.exe及Kavo01.dll兩個偽裝成系統檔的檔案
並且關閉資料夾選項內顯示所有隱藏檔的功能,目的就是要讓人看不見它
見下圖,在控制台中"資料夾選項"的"檢視"標籤(依樣式不同,資料夾選項也許在"外觀和主題"內)
選了"顯示所有檔案和資料夾"按確定後,再回來看一次,如果它又自己跳回來那你就是中毒了
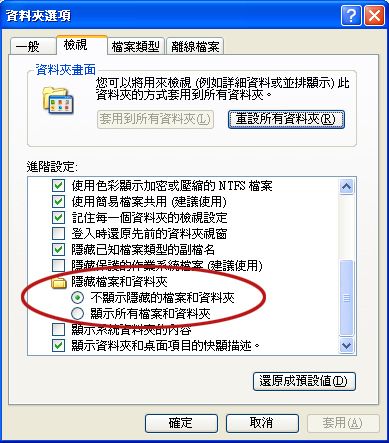
意義就是為了不讓你看到或刪除掉Kavo.exe及Kavo01.dll
解決之道:
首先在我的電腦按右鍵>內容>系統還原標籤,打勾"關閉所有磁碟上的系統還原"後按確定
接著點此下載kavo_killer.exe(感謝原作 張書維),下載後執行
直接按上方"開始清除",此時你可以再回資料夾選項看看是不是已經可以"顯示所有檔案和資料夾"了
「傳說拔掉熊貓的懶毛就可以找回遺失的C槽」,別再相信沒有根據的說法了
請再點此下載開啟所有磁碟.bat
此批次檔會幫助你開啟所有C到Z的磁碟(不管你有沒有),如此一來所有硬碟就能順利開啟了!
摘自:http://www.wretch.cc/blog/davydie&article_id=9076589
症狀是雙擊C、D槽都無法直接開啟,且還有被詢問要用什麼程式來開啟C、D槽的怪事
此症狀中了「熊貓燒香」時也會有
但熊貓燒香還有個特徵,那就是會讓電腦中副檔名為.exe的應用程式圖示變成這樣
不過我只有無法開啟硬碟而已
今天和我的傀儡聊天,發現他家電腦和公司電腦也出現了跟我之前一樣的情形
我才知道原來這個病毒近來這麼夯!(雖然都醫好了,但我中了不止一次)
這種隨身碟病毒,在你把受感染的隨身碟插進電腦中時,即立刻蔓延至所有其它電腦中的磁碟
凡是某磁碟打不開;打開後從另一個視窗跳出來,或是無法顯示隱藏檔都屬於不正常現象
甚至電腦中一些軟體打開後立刻關閉,譬如我的Yahoo即時通、迅雷等等程式
另外在WINDOWS\system32資料夾裡,會有Kavo.exe及Kavo01.dll兩個偽裝成系統檔的檔案
並且關閉資料夾選項內顯示所有隱藏檔的功能,目的就是要讓人看不見它
見下圖,在控制台中"資料夾選項"的"檢視"標籤(依樣式不同,資料夾選項也許在"外觀和主題"內)
選了"顯示所有檔案和資料夾"按確定後,再回來看一次,如果它又自己跳回來那你就是中毒了
意義就是為了不讓你看到或刪除掉Kavo.exe及Kavo01.dll
解決之道:
首先在我的電腦按右鍵>內容>系統還原標籤,打勾"關閉所有磁碟上的系統還原"後按確定
接著點此下載kavo_killer.exe(感謝原作 張書維),下載後執行
直接按上方"開始清除",此時你可以再回資料夾選項看看是不是已經可以"顯示所有檔案和資料夾"了
「傳說拔掉熊貓的懶毛就可以找回遺失的C槽」,別再相信沒有根據的說法了
請再點此下載開啟所有磁碟.bat
此批次檔會幫助你開啟所有C到Z的磁碟(不管你有沒有),如此一來所有硬碟就能順利開啟了!
摘自:http://www.wretch.cc/blog/davydie&article_id=9076589
2008年3月1日 星期六
Excel讀取CSV數值字串的解決方法
在產生讓Excel讀取的CSV(Comma Separated Values)檔案時,由於Excel的自動轉換功能,導致想要保持原樣的欄位也被強迫轉錯了。例如字串的"00123"會被Excel自動轉成數值的 123。真是傷腦筋。
還好,最後在這裡找到解決方法。原來只要加上等號就可以了,也就是是把 "00123" 寫成 ="00123" 就解決了。
摘自:http://blog.roodo.com/emisjerry/archives/2598976.html
還好,最後在這裡找到解決方法。原來只要加上等號就可以了,也就是是把 "00123" 寫成 ="00123" 就解決了。
摘自:http://blog.roodo.com/emisjerry/archives/2598976.html
訂閱:
文章 (Atom)


