/usr/sbin/postsuper -d queue_mail_id
或
/usr/sbin/postsuper -d ALL
2009年11月26日 星期四
擋掉(block) Baidu Spider
影響主機負載過重與頻寬傳輸量最有可能的原因就是 Robots 機器人作祟,而其中又以 百度(Baidu) Spider 為最。
.htaccess:
Or
httpd.conf
Module Identifier: setenvif_module
.htaccess:
RewriteEngine On
RewriteCond %{HTTP_USER_AGENT} ^Baiduspider [NC]
RewriteRule .* - [F]
Or
SetEnvIf User-Agent ^Baidu baidu
Deny from env=baidu
httpd.conf
SetEnvIfNoCase User-Agent "^Baidu" bad_bot

Order Allow,Deny
Allow from all
Deny from env=bad_bot
Module Identifier: setenvif_module
2009年11月25日 星期三
mysqldump教學
mysqldump ignore exclude table
mysqldump particular table
mysqldump -u username -p database --ignore-table=database.table1 --ignore-
table=database.table2 > database.sql
mysqldump particular table
mysqldump -u username -p database table1 > table1.sql
2009年11月23日 星期一
tar exclude
長久以來都是整個目錄tar起來,還沒有真的用過exclude功能,嘗試了一下之後發現exclude除了要帶路徑之外還要再加上個*,不然想exclude的路徑一樣會被tar起來。
這樣子是不會work2的:
tar czf auto_import.tar.gz --exclude="auto_import/csv_files/" --exclude="auto_import/tmp_csv/" auto_import
這樣子才對:
tar czf auto_import.tar.gz --exclude="auto_import/csv_files/*" --exclude="auto_import/tmp_csv/*" auto_import
這樣子是不會work2的:
tar czf auto_import.tar.gz --exclude="auto_import/csv_files/" --exclude="auto_import/tmp_csv/" auto_import
這樣子才對:
tar czf auto_import.tar.gz --exclude="auto_import/csv_files/*" --exclude="auto_import/tmp_csv/*" auto_import
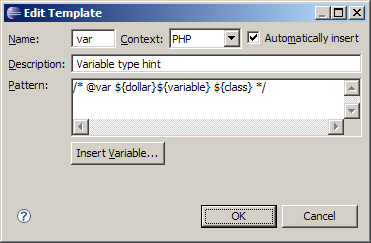
Small hint for PDT, use autocomplete in /* @var */type hint.
@var variable type hint is very useful, but adding it a little bit complex: usually you need to type the class name or copy/paste it from somewhere:
/* @var $controller Zend_Controller_Front */
But with Eclipse PDT templates you can simplify this and add an autocomplete for variable name and class name:
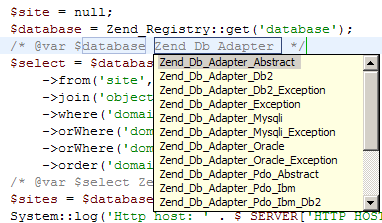
To add this template open Window menu, select Preferences and then navigate to PHP/Templates section in the tree. Then click "New..." button and fill the fields correspondingly:
After that, in the code view type "var" and press Ctrl+Space. Select "var - Variable type hint" in the list and continue by selecting or typing variable name and class name as shown on the video below:
摘自:http://www.alexatnet.com/node/179
/* @var $controller Zend_Controller_Front */
But with Eclipse PDT templates you can simplify this and add an autocomplete for variable name and class name:

To add this template open Window menu, select Preferences and then navigate to PHP/Templates section in the tree. Then click "New..." button and fill the fields correspondingly:

After that, in the code view type "var" and press Ctrl+Space. Select "var - Variable type hint" in the list and continue by selecting or typing variable name and class name as shown on the video below:
摘自:http://www.alexatnet.com/node/179
2009年11月19日 星期四
網頁縮圖教學
System Requirements:
Linux based OS, GTK 2, Internet connection, High color display mode.
Linux kernel - 2.2.14 or higher with the following libraries or packages:
glibc 2.3.2 or higher
XFree86-3.3.6 or higher
gtk+2.0 or higher
fontconfig (also known as xft)
libstdc++5
Tested on Red Hat Fedora 5 , Novell SuSE Linux 10.0, Red Hat Fedora 4, Red Hat Enterprise Linux 4 , Red Hat Enterprise Linux 3
If you system doesn't have libpangocairo, please try to install libpangocairo ( type "rpm -Uivh cairo-1.0.2-1.1.fc4.nr.i386.rpm glitz-0.4.3-1.1.fc4.nr.i386.rpm libpixman-0.1.5-1.1.fc4.nr.i386.rpm pango-1.10.3-1.1.fc4.nr.i386.rpm pango-devel-1.10.3-1.1.fc4.nr.i386.rpm" to install)
If you are using Fedora Linux, You can also to use the software installation tool Yum to install those dependencies.
Known Issues
Page content generated by plugins (such as Flash-based content) is not included in saved images. This problem should disappear after Mozilla bug 313462 is fixed. Instead, you can try our windows based component htmlsnapshot!
Usage:
1. Extract the install package to a folder. (for example, /html2image/)
2. Add the folder path to ld path for shared library. For example
export LD_LIBRARY_PATH=/html2image/
or
you can also add the path to html2image to /etc/ld.so.conf, then run ldconfig
3. Run html2image which is a command line tool to convert html to image. (bmp and png image format are supported currently). The following are some examples:
a. Convert url to bmp
html2image www.google.com a.bmp
b. Convert url to jpg
html2image www.google.com a.jpg
c. Convert local html file to png
html2image file://home/user/test.html a.png
4. For more help, type "html2image -h"
5. You can also run html2image with Xvfb on the text mode console. In the html2image folder, run the below command:
./Xvfb :1 -screen 0 640x480x24 -nolisten tcp -audit 4 -auth X1.cfg & export DISPLAY=:1 & ./html2image www.google.com /root/b.png
The command can be called in batch or web CGI script files to convert url or html to image files..
How to use html2image linux on CentOS 5
here is detailed example on how to use html2image linux on CentOS 5. This serves as a good example on how to use html2image. Other Linux distribution can be done similarly
1. Install CentOS.
2. Login into the server (you can use the text mode login here)
3. Enter a folder, download html2image
wget http://www.guangmingsoft.net/htmlsnapshot/html2image.i386.tar.gz
4. Extract html2image
tar xvzf html2image.i386.tar.gz
cd html2image
export LD_LIBRARY_PATH=./
5. Make a symbol link for X11
ln -s /usr/share/X11 /usr/X11R6/lib/X11
You should do this to avoid the X11 error "could not open default font 'fixed'"
6. Run Xvfb
./Xvfb :1 -screen 0 640x480x24 -nolisten tcp -audit 4 -auth X1.cfg & export DISPLAY=:1
7. Now you can run html2image, it should work
./html2image www.google.com a.jpg
How to use html2image linux on Ubuntu 64
Here is detailed example on how to use html2image linux on Ubuntu 64 bit (Ubuntu 7.10 - the Gutsy Gibbon)
This serves as a good example on how to use html2image. Other 64 bit Linux distribution can be done similarly.
1. Install Ubuntu 64
2. Login into the server (you can use the text mode login here. This is suitable for headless server as well)
If you are in GUI mode, Ctrl+Alt+F2 will switch you to text mode.
3. Enter a folder, download html2image
wget http://www.guangmingsoft.net/htmlsnapshot/html2image.i386.tar.gz
4. Extract html2image
tar xvzf html2image.i386.tar.gz
cd html2image
export LD_LIBRARY_PATH=./
4. Install 32bit application support libraries.
sudo apt-get install ia32-libs
sudo apt-get install lib32nss-mdns (Needed for Ubuntu9)
5. Install Xvfb coming with the Ubuntu
sudo apt-get install xvfb
6. Run Xvfb
Xvfb :1 -screen 0 640x480x24 -nolisten tcp -audit 4 -auth X1.cfg & export DISPLAY=:1
Of course, you could try high resolution like 1024x768x24
7. Now you can run html2image, it should work
./html2image www.google.com a.jpg
Check if the a.jpg is created successfully
How to use html2image linux on Fedora 8 x86_64
Here is detailed example on how to use html2image linux on Fedora 8 64 bit. This serves as a good example on how to use html2image. Other 64 bit Linux distribution can be done similarly.
1. Install Fedora 8 x86_64
2. Login into the server (you can use the text mode login here. This is suitable for headless server as well)
3. Enter a folder, download html2image
wget http://www.guangmingsoft.net/htmlsnapshot/html2image.i386.tar.gz
4. Extract html2image
tar xvzf html2image.i386.tar.gz
cd html2image
export LD_LIBRARY_PATH=./
5. Install Xvfb coming with the Fedora 8
su root
yum install Xvfb
6. Run Xvfb
Xvfb :1 -screen 0 640x480x24 -nolisten tcp -audit 4 -auth X1.cfg & export DISPLAY=:1
Of course, you could try high resolution like 1024x768x24
7. Now you can run html2image, it should work
./html2image www.google.com a.jpg
Check if the a.jpg is created successfully
Use html2image linux with CGI program like php:
How to use html2image Linux in php script:
1. Extract the new package to a folder (for exampe /html2image)
2. add the folder path (/html2image) to /etc/ld.so.conf
run ldconfig on command line to enable the changes.
3. run nweb
./nweb 8181 /html2image
the small web server for html to image is started.
4. You can call the web server in php script.
see html2imagetest.php for example. Please change the IP to your server IP.
License:
The Server License costs $299.95 per site. It can be used on one Linux server.
近来在做一个directory,搜集一些个人常用的站点。每个站点都需要一份截图。折腾了一番,选用了khtml2png。khtml2png从2.6.0开始需要Qt library的支持,以下是详细的Requirements:
Requirements For running and compiling you need some libraries and tools. You can find the Debian package names in braces
* g++
* KDE 3.x
* kdelibs for KDE 3.x (kdelibs4-dev)
* zlib (zlib1g-dev)
* cmake
服务器系统是redhat EL4,g++和zlib都是装过的了,尚缺kde&cmake。那就先装罢。
用apt-get安装KDE for redhat
添加几个kde的源,先创建一个新的list
vi /etc/apt/sources.list.d/kde.list
添加如下地址
rpm http://apt.kde-redhat.org/apt/kde-redhat redhat/el4/i386 stable
rpm http://apt.kde-redhat.org/apt/kde-redhat all stable
保存之后,先update一下,然后安装qt,arts,kdelibs,和kdebase
apt-get update
apt-get install qt arts kdelibs kdebase
apt-get dist-upgrade
安装kdelibs for KDE (kdelibs4-dev)
kdelibs4-dev这个包是debian用的,redhat适用的是kdelibs-devel。直接用apt-get安装即可。zlib(zlib1g-dev)也一样,redhat适用的是zlib-devel
安装cmake
wget http://www.cmake.org/files/v2.4/cmake-2.4.7.tar.gz
tar zxvf cmake-2.4.7.tar.gz
cd cmake-2.4.7
./bootstrap
make
make install
cmake的安装需在安装qt之后进行,否则会找不到qt_include_path。
安装khtml2png
wget http://nchc.dl.sourceforge.net/sourceforge/khtml2png/khtml2png-2.6.7a.tar.gz
tar zxvf khtml2png-2.6.7a.tar.gz
cd khtml2png-2.6.7a
./configure
make
make install
即可。
用法
khtml2png2 http://163.com 163_com.png
指定图片尺寸
khtml2png2 --height 1024 --width 768 http://163.com 163_com.png
执行上述指令后,桌面会打开一个浏览器窗口,载入目标页面,截图完成后自行关闭。在没有X或者是ssh连接服务器的情况下,需要再做点别的事情。 启动xfs daemon和X Server
/etc/init.d/xfs start
/usr/X11R6/bin/X :1 &
之后在khtml2png2的指令上加一条
--display :1
即可
批量截图
因为安全级的关系,没有使用PEF让php直接执行指令自动截图。转而加入了手动的因素。 即由php取得需要生成截图的网址列表,再生成一个批处理文件。然后由管理员手动执行。 PHP生成的批处理文件siteslist
#!/bin/sh
khtml2png2 --display :1 http://www.163.com 163_com.png
khtml2png2 --display :1 http://www.google.com google_com.png
每行一条,如有必要可以适当的sleep一下。需要采集截图时,执行如下指令即可
sh sitelist
在 Linux 環境使用 khtml2png 製作網頁縮圖
只要使用 khtml2png 這個小工具, 就能製作如同 HEMiDEMi、BlogMarks.net 所呈現的網頁縮圖.
在 Ubuntu 5.10 環境下 (GNOME) 的安裝過程
在 Fedora Core 3 文字模式 (init 3) 未安裝 X window 環境下的操作
需求套件
Ubuntu: g++, kdelibs4-dev, zlib1g-dev
Fedora Core: gcc-c++, kdelibs-devel, zlib-devel
在 Ubuntu 5.10 環境下 (GNOME) 的安裝過程
sudo su -
cd /usr/local/src
wget http://nchc.dl.sourceforge.net/sourceforge/khtml2png/khtml2png-1.0.3.tar.bz2
tar -jxf khtml2png-1.0.3.tar.bz2
cd khtml2png-1.0.3
./configure --prefix=/usr/local
make
make install
執行檔為: /usr/local/bin/khtml2png
使用範例
khtml2png --width 1024 --height 768 --scaled-width 320 --scaled-height 240 http://www.hinet.net/ hinet.png
以 1024 x 768 的虛擬視窗瀏覽 hinet 首頁, 並將虛擬視窗存成 320 x 240 的 hinet.png 檔
在 Fedora Core 3 文字模式 (init 3) 未安裝 X window 環境下的操作
除前述之需求套件外, 需另外加裝 xorg-x11 (皆以 yum 安裝)
安裝 khtml2png 時, configure 參數為: --prefix=/usr/local --with-qt-dir=/usr/lib/qt-3.3
啟動 xfs daemon: /etc/init.d/xfs start
啟動 X server: /usr/X11R6/bin/X :1 &
執行 khtml2png: 同前述範例, 加上 --display :1 參數即可
ps. 美化虛擬視窗內的中文字型請參考: 從 Fedora Core 3 最小安裝開始
khtml2png's User Agent ID
Mozilla/5.0 (compatible; Konqueror/3.4; Linux) KHTML/3.4.2 (like Gecko)
參考資料:
khtml2png - Make screenshots from webpages
Experts Exchange - HTML: Convert html file to image
http://www.guangmingsoft.net/htmlsnapshot/html2image.htm#Support
http://hi.baidu.com/imdao/blog/item/73906081665b1ddebc3e1ee3.html
http://www.guangmingsoft.net/htmlsnapshot/html2image.htm#Support
How to fix Internal Server Error in Wordpress Websites SoftException in Application cpp:256
Everything has been fine so far on my Wordpress websites until just yesterday. I opened one up and saw the following error on the screen:
Internal Server Error
he server encountered an internal error or misconfiguration and was unable to complete your request.
lease contact the server administrator, webmaster@##DOMAIN##.com and inform them of the time the error occurred, and anything you might have done that may have caused the error.
ore information about this error may be available in the server error log.
dditionally, a 404 Not Found error was encountered while trying to use an ErrorDocument to handle the request.
t had me stumped for a little while. I could log into the server ok, and all the files were there.
I checked the database, it seemed to be alright also.
I then did what the message suggested and checked the error logs.
I found multiple lines going back some hours with the following:
“SoftException in Application.cpp:601: Directory “**directory**” is writeable by group”
&
“SoftException in Application.cpp:256: File “**file**.php” is writeable by group”
Strange…
o, I thought back to what I had done the day before.
Yes, that’s it, I had installed a couple of new Wordpress plugins, perhaps that’s done it?
nce I had logged in to thorhammaraxx.com using FTP I almost instantly noticed the permission settings were not as I’d like them to be for several directories and files.
They were all set at 775 or above (ughh!) allowing group write access.
I changed them back to 755 for now to see what effect it would have and refreshed the page.
INGO the site is back up and running.
don’t have an answer to which plugin caused the changes, or even if it was a plugin. The only thing I do know is that it only happened to those sites, where I had added plugins. What has me stumped is that they all worked fine straight after being installed. I tested them!
nyway, the outcome was much better than I had thought it was going to be. I did expect to have to back up the database and files and spend the day tinkering with the server set up.
o, before you go wild on your own server trying to fix this error message. Check your permission settings in your directories and files first and see if that does it.
on’t forget to leave a comment here if it helped or even if you’ve had the same problem but with a different cause.
Or even if you know of a plugin that causes strange behaviour.
I’d love to here from you.
2009年11月16日 星期一
控制項不可見、未啟動或無法接受焦點,因此無法將焦點
can't move focus to the control because it is invisible
解決方法如下
解決方法如下
function getFocusFunc(objId) {
    function doFocus() {
        if (document.getElementById) {
            document.getElementById(objId).focus();
        }
    }
    return doFocus;
}

function set_focus() {
    // Do whatever until you get to the point where you need to set focus to the iframe
    if(jQuery.browser.msie){
        setTimeout(getFocusFunc('objId'), 10);
    }else{
        $("#objId").focus();
    }
}
2009年11月13日 星期五
訂閱:
文章 (Atom)


