2014年12月16日 星期二

Installing mcrypt extension for PHP on OSX Mountain Lion

(download your php version)
$ wget http://www.php.net/get/php-5.3.15.tar.bz2/from/a/mirror $ tar -xvzf php-5.3.15.tar.gz $ cd php-5.3.15/ext/mcrypt

$ phpize
$ ./configure
$ make
$ make test
$ sudo make install 

mcrypt.so is now in your PHP ext dir (/usr/lib/php/extensions/no-debug-non-zts-20090626/ in my case), now you need to add to php.ini as a module

$ vi /etc/php.ini
$ (insert) extension=mcrypt.so

$ sudo apachectl restart

If need to install libmcrypt, please follow below steps:
1. Get libmcrypt 2.5.8 from Sourceforge,  this is direct download link.
2. tar -zxvf libmcrypt-2.5.8.tar.gz
3. cd libmcrypt-2.5.8
4. ./configure
5. make
6. make install

2014年12月15日 星期一

Solved Non-static method PEAR::raiseError() should not be called statically

$pear = new PEAR();
CHANGE "PEAR::raiseError" to $pear->raiseError();

2014年12月10日 星期三

Mac OSX phpunit install

To install via terminal:
$ curl https://phar.phpunit.de/phpunit.phar -o phpunit.phar
$ chmod +x phpunit.phar
$ cp phpunit.phar /usr/local/bin/.
$ mv phpunit.phar /usr/local/bin/phpunit

2014年11月14日 星期五

PHP 使用 CURL 同步抓取多個網頁

一般 CURL 抓網頁的方法, 是一頁一頁抓, 假設要抓 4頁, 所費時間各別是 5,10,7,5 秒, 那全部總合所花的時間就是 5 + 10 + 7 + 5 = 27 秒. 若能同時間去抓取多個網頁, 所花費的時間 5,10,7,5 秒, 全部總合所花的時間是 10 秒.(花費最多時間的秒數) 於 JavaScript 可使用 AJAX 的 async(YAHOO.util.Connect.asyncRequest) 來達成, 於 PHP 可以用 CURL 來達成此 Multi-Threading 的效果. 官方文件: PHP: curl_multi_init 程式(async.php) View Raw Code? 0) // 每個 connect 要間隔多久 usleep($wait_usec); // 250000 = 0.25 sec } while ($running > 0); */ /* 此做法就可以避免掉 CPU loading 100% 的問題 */ // 參考自: http://www.hengss.com/xueyuan/sort0362/php/info-36963.html /* 此作法可能會發生無窮迴圈 do { $mrc = curl_multi_exec($mh, $active); } while ($mrc == CURLM_CALL_MULTI_PERFORM); while ($active and $mrc == CURLM_OK) { if (curl_multi_select($mh) != -1) { do { $mrc = curl_multi_exec($mh, $active); } while ($mrc == CURLM_CALL_MULTI_PERFORM); } } */ /* // 感謝 Ren 指點的作法. (需要在測試一下) // curl_multi_exec的返回值是用來返回多線程處裡時的錯誤,正常來說返回值是0,也就是說只用$mrc捕捉返回值當成判斷式的迴圈只會運行一次,而真的發生錯誤時,有拿$mrc判斷的都會變死迴圈。 // 而curl_multi_select的功能是curl發送請求後,在有回應前會一直處於等待狀態,所以不需要把它導入空迴圈,它就像是會自己做判斷&自己決定等待時間的sleep()。 */ do { curl_multi_exec($mh, $running); curl_multi_select($mh); } while ($running > 0); /* 讀取資料 */ foreach($handle as $i => $ch) { $content = curl_multi_getcontent($ch); $data[$i] = (curl_errno($ch) == 0) ? $content : false; } /* 移除 handle*/ foreach($handle as $ch) { curl_multi_remove_handle($mh, $ch); } curl_multi_close($mh); return $data; } ?> 使用 View Raw Code? example1, [1] => example2 ?> 測試 sleep.php # 看時間延長取得的效果 View Raw Code? View Raw Code? 5, [1] => 10, [2] => 7, [3] => 5 ?> http://blog.longwin.com.tw/2009/10/php-multi-thread-curl-2009/

2014年11月13日 星期四

Resolving Stubborn Wi-Fi Connection Problems in Mac OS X

A fair amount of Mac users have encountered long lasting Wi-Fi connection issues, whether it’s a dropping connection, a refusal to reconnect after waking from sleep, or any other number of oddities pertaining to wireless networking. Often these connection problems can be resolved with renewing a DHCP lease and changing the MTU size, but sometimes things are more stubborn and a wireless connection will continue to drop or throw unusual connection errors when waking from sleep. If you find yourself struggling with persistent wifi problems, try deleting all preference plist files associated with wireless settings in OS X:
Fixing Wi-Fi problems in Mac OS X

Fix Stubborn Wi-Fi Problems by Deleting Preference Files

Before beginning, be sure to have the wi-fi password of your primary network handy. You will need it to rejoin the network.
  • Pull down the Wi-Fi menu and turn Wi-FI OFF
  • Turn Wi-F off in OS X
  • From any Finder window, hit Command+Shift+G to bring up Go To Folder, and enter the following path:
  • /Library/Preferences/SystemConfiguration/
    Going to the Wi-Fi preferences folder
  • Locate the following files, copy them to the desktop for a backup, then delete them from the /SystemConfiguration/ folder:
  • com.apple.airport.preferences.plist
    com.apple.network.identification.plist
    NetworkInterfaces.plist
    preferences.plist

    Remove Wi-Fi preference files in Mac OS X to resolve connection problems
  • Empty the Trash and reboot the Mac
  • Turn Wi-Fi back ON from the Wi-Fi menu, join your preferred network as usual
This process forces OS X to create all new preference files for wireless networking, which can be an effective troubleshooting strategy if the wi-fi problems began after upgrading versions of Mac OS X and even installing incremental system updates.
The wi-fi connection should now work as expected unless there’s a deeper problem, whether it’s a compatibility issue with the router (often resolved by this DHCP and MTU fix), a problem the router itself, or something as simple as network interference (here’s how to check connection strength and interference issues), which can often be resolved by reconfiguring a routers physical arrangement or changing it’s broadcast channel.
Let us know if this worked for you, or if you have any other helpful wifi troubleshooting tips. 

reference : http://osxdaily.com/2012/11/30/resolving-stubborn-wi-fi-connection-problems-in-mac-os-x/

2014年8月15日 星期五

Plunker Helping developers make the web

http://plnkr.co/

MSSQL xml indexed

XML data type is usually used to store semi-structured data with great flexibility and query capabilities. It’s a good choice for developing platform agnostic applications to separate storage of complex data from processing at application layer, which understands the complex data relationship. To achieve optimal performance of querying XML data in SQL Server, extra steps need to be taken to ensure query access pattern matches how XML data is stored and indexed.
Here are 3 quick tips from query performance perspective based on real customer experience.
1.       Promoting key XML attribute/property to relational column. Promoting to relational column will get you to on-par performance with relational queries, the best you can get out of modern RDBMS. To achieve optimal performance and scalability with XML data, I strongly recommend you first consider this option. The idea is identifying hot elements or attributes that your workload queries on the most. Then add computed columns using user functions to promote the elements or attributes out of XML data. Note it does require application code change to modify queries to take advantage of the promoted columns. A simple example below is a table with “XMLDATA” that has a hot element “a1”. Here are steps to add a computed column to promote the element (Note adding the computed column is offline operation for the table). 
CREATE FUNCTION udf_get_a1 (@xData xml)
RETURNS varchar(30)
WITH SCHEMABINDING
BEGIN
   DECLARE @a1  varchar(30)
   SELECT @a1 = @xData.value('(/Dept[1]/orders/a1/text())[1]', 'varchar(30)')
   RETURN @a1
END
Go
ALTER TABLE Orders
ADD a1 AS dbo.udf_get_a1(XMLDATA) PERSISTED
Go
CREATE INDEX ind_a1 ON Orders(a1)
Go

Now the original query below

SELECT *
FROM Orders t
WHERE t.XMLDATA.exist(N'(/Dept[1]/orders/a1/text())[1][.="Company10001Special"]') = 1

Needs to be rewritten as

SELECT *
FROM Orders
WHERE a1='Company10001Special'
In a customer lab, we observed exponential performance gain by using this method (1000+ times faster!!). To caution against over-promotion, when you add too many promoted columns, the overhead of index change could reduce the performance gain.
2.       Typed or Untyped XML data? Typed XML means there is validating schema defined against the data. For untyped XML, the whole XML data is treated as a big string. To decide whether or not to define typed XML, you need to examine your XML query access pattern. Generally speaking, schema speeds up lookups since the data types of XML elements/attributes are known. But it would slow down INSERT due to overhead of validating new data. For UPDATE, it would benefit from faster lookups like SELECT, but incur same schema validation overhead like INSERT.


Better off
Worse off
Typed (w/ schema)
Faster SELECT
Slower INSERT
Untyped (w/o schema)
Faster INSERT
Slower SELECT

3.       What XML indexes to add? Again depending on query access pattern, you may choose different XML indexes. Note XML index strategy is different than relational index. Popular DTA (Database Tuning Advisor) tool wouldn’t be able to recommend XML indexes. Fortunately there are only 3 types of secondary XML indexes to consider in addition to the required primary XML index.

Secondary XML index type
Benefits this type of queries
Path
XPath queries  with explicit path expression (XMLcol.exist ('/Dept/Orders/[@id="10001"]')= 1)
Value
XPath queries  with no explicit path expression but with value predicate (XMLcol.exist('//[@id="10001"]') = 1)
Property
XPath queries  with multiple row results

As straight forward as it sounds, you may find it difficult to examine your application and find out what appropriate indexes to add. The best way I recommend is to add all 3 types of XML indexes and test your workload to find out which XML indexes were used to determine the ones to keep (Be aware of rebuilding index affecting system availability). You can build XML indexes on either untyped or typed data. But you will get more gain with indexes on typed data. I see up to 50 times faster query response (SELECT queries) compared to plain untyped XML! However for DML queries, they could be significantly impacted by the overhead of XML index change plus schema validation. So again the key is to test your workload to find out if it makes sense to add XML indexes.

In conclusion, Promotion to relational column is the primary option you should consider when working with XML data. Whether or not to use XML schema and XML indexes, you need to be careful about your decision. Test your workload and identify the XQueries, which are critical to the overall performance. There is no DTA to help you, no query hints apply to XQueries either. Examine the query plans of those XQueries thoroughly to eliminate inefficiency.

reference : http://blogs.msdn.com/b/sqlcat/archive/2010/03/01/performance-tips-of-using-xml-data-in-sql-server.aspx

2014年5月26日 星期一

國際匯款大PK

「為什麼銀行說會有看不見的手續費用?」
「台灣匯到澳洲的手續費要多少錢?」
「要怎麼匯學費到澳洲?」


諸如此類的問題,我想每個到澳洲打工渡假的新手背包都曾經碰過。
不論是在櫃台和櫃員雞同鴨講或是家人問什麼都答不出來,只聽到一堆艱澀的專有名詞等等,
都讓我們在這裡一起為大家解答,和比較全台灣20間銀行的匯款手續費,讓你不會花冤枉錢喔。: )


也就是說,如果我們是單純的匯款,第一銀行、彰化銀行、富邦銀行、玉山銀行、台灣銀行都是不錯的選擇。

然後讓我們來開始超熱門的Q&A,解答大家的疑問。

Q1.國際匯款到底有哪一些手續費用要支付?
A1.其實總共有三筆手續費要支付,分別是,匯出手續費中間銀行費用匯入手續費
     匯出手續費:你拿去做匯款的銀行收取的。(台灣的話就是上面這20間費用的比較可以參考)
     中間銀行:國際間的匯款一定會透過中間銀行,但中間銀行每一次匯款時都不一定會相同,每間收的費用也不一樣
                  所以銀行也無法知道會被收取多少,除非用全額匯達不然會直接從匯出款項裡扣款!
     匯入手續費:收款銀行所收取的,每一間銀行也都不同。(如果是澳洲Commonwealth收的是$20 )
     
Q2.什麼叫全額匯達??
A2.簡單說就是我要確保我匯的金額到達匯入行時一塊不差。所以我在匯出時就自行支付中間銀行的費用。
     但因為其實銀行無法肯定確切金額,通常會要我們支付絕對不會不夠的金額~也就是往往都付多了~
     所以除非必要,其實不需要全額匯達喔!!

Q3.那匯款會不會匯錯或匯不見?
A3. 匯款一定會需要的"銀行名稱、銀行地址、帳戶名稱、受款帳號、swift code"
     只要有一個字母錯了就會立刻被通知退匯~(通常走出銀行24小時內就會接到通知)
     所以匯錯的機率其實非常低的喔!!

Q4.匯款大概幾天會收到?
A4.大概3~5個工作天就會收到喔!!

Q5.匯學費的話有需要全額匯達嗎?
A5.的確正常來說學費是不應該有短缺的。但有鑑於近來許多學生碰到行員無法理解意思,
     加上全額匯達的手續費高昂,也不是全部銀行都可以做全額匯達,
     所以,可以不需要喔!!~只要單純匯出學費單上的金額,真的金額有短缺的話,到學校再補現金就好。
     PS.千千萬萬不要聽行員說而匯比學費更多的金額喔,之後請學校退款會很麻煩的!!

大家在填寫匯款單時要小心仔細的填寫喔!!如果在匯的當下有問題或不太確定的話,請直接打電話給我們喔!~: ))

reference : http://abcwithyou.pixnet.net/blog/post/45084650-%E5%9C%8B%E9%9A%9B%E5%8C%AF%E6%AC%BE%E5%A4%A7pk

2014年5月12日 星期一

Form Autocomplete and Remember Password with AngularJS

Recently a user complained about the log in form not saving the credentials.This is a common problem with AJAX and single-page applications. But I decided to get to the bottom with it.
The UserApp “dashboard” is built with the JavaScript framework AngularJS, and it doesn’t play along very well with the “save password” feature. These are the issues I addressed:
  1. The form cannot be dynamically inserted into the DOM.
  2. The form must perform an actual POST request.
  3. When the browser autofills the fields, the scope doesn’t get updated.
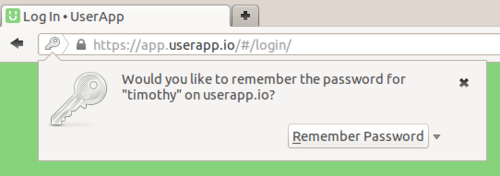
Firefox was easy, all it required was that the form had a name attribute.
name="login-form" ng-submit="login()"> id="login" name="login" type="text" ng-model="user.login"> id="password" name="password" type="password" ng-model="user.password">
firefox - remember password
But when Firefox autofills the fields the scope doesn’t get updated. So I googled and found some hacks for it. But for the scenario I tried to solve, this felt overkill. Because that was needed was the login and password form values after the form had been submitted. So no need for any fancy two-way bindings with some ugly hacks on top of it. Thats why I went with this solution. Good ol’ fashion DOM access (with jQuery):
$scope.login = function() {
    $scope.user = {
        login: $("#login").val(),
        password: $("#password").val()
    };
    ...
    return false;
};
Now it works in Firefox. What about Chrome?
Well, it turns out that Chrome only shows the save password dialog if the form submit actually passes, which would destroy our AJAX request.
Here’s a solution to the problem:
  • When the form get posted, do the AJAX request to authenticate the user in ng-submit and return with false to abort the form submission.
  • If it succeeds, save the session in a cookie and just post the form again and return with true this time.
  • When the page reloads it finds the session cookie and redirects the user to the home screen.
Sure, it makes the page to reload but it’s only once when logging in to the app. Make sure that the form gets posted to same page.
Solution? Add a hidden form to index.html and copy the other form’s parameters into it when it’s getting submitted.
I wrapped this up with a directive:
app.directive("ngLoginSubmit", function(){
return {
    restrict: "A",
    scope: {
        onSubmit: "=ngLoginSubmit"
    },
    link: function(scope, element, attrs) {
        $(element)[0].onsubmit = function() {
            $("#login-login").val($("#login", element).val());
            $("#login-password").val($("#password", element).val());

            scope.onSubmit(function() {
                $("#login-form")[0].submit();
            });
            return false;
        };
    }
};
});
Hidden form on index.html:
name="login-form" id="login-form" method="post" action="" style="display: none;"> name="login" id="login-login" type="text"> name="password" id="login-password" type="password">
Log in form template:
name="login-form" autocomplete="on" ng-login-submit="login"> id="login" name="login" type="text" autocomplete="on"> id="password" name="password" type="password" autocomplete="on">
The login controller:
$scope.login = function(submit) {
    $scope.user = {
        login: $("#login").val(),
        password: $("#password").val()
    };

    function ajaxCallback() {
        submit();
    }   

    return false;
};
re-post warning
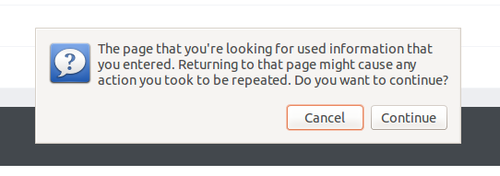
Now it works fine, except that every time you press F5 the browser asks if you really want to resend the “form”. This is pretty annoying, so I fixed it by creating a new page, pre-login.html, and posted the hidden form to it instead. This page then redirects back to the app (index.html).
Everybody happy!

reference : http://timothy.userapp.io/post/63412334209/form-autocomplete-and-remember-password-with-angularjs

2014年5月4日 星期日

Result of toJSON() on a date is different between IE8 and IE9+

Prior to ES5, parsing of dates was entirely implementation dependent. IE 8 (and lower) won't parse the ISO 8601 format specified in ES5, so just parse it yourself:
// parse ISO format date like 2013-05-06T22:00:00.000Z
function dateFromISO(s) {
  s = s.split(/\D/);
  return new Date(Date.UTC(s[0], --s[1]||'', s[2]||'', s[3]||'', s[4]||'', s[5]||'', s[6]||''))
}
Assumes the string is UTC.

reference : http://stackoverflow.com/questions/17592717/result-of-tojson-on-a-date-is-different-between-ie8-and-ie9

2014年4月28日 星期一

21種集體拍照姿勢,不要再傻傻得站一排了!

21種集體拍照姿勢,不要再傻傻得站一排了!


嫩芽 |  中校 |  發送訊息 | 檢舉 
發表於: 2014/04/28 11:57 am (1天前)
家人朋友同事各種聚會、旅遊,總是排排站嗎?學學了下面21種集體照經典拍照姿勢,讓大家的的聚會、旅遊留下美好的回憶吧~

1、一群朋友的趣味合照,一起跑、一起跳,都能增加歡樂感。


2、有點像前一個的變奏,同樣選一個做最前,然後其他人好像探頭出來的樣子,你可以透過控制光圈大細,來決定誰會清晰於畫面。


3、當拍攝一大群人時,你不可能控制每個人的動作與表達方式,但你應留意整體的構圖,將全體視為一個主體來拍照,同時注意是否每個人都有露面。


4、這種各自站立的合照,頗適合小組團隊,例如一支樂隊,然後讓主力、重心人物站在中間及站前一點,會有突出效果。


5、這種方式是很自然、普通的朋友間合照,很普通,但是很容易拍出效果,所以很不錯。


6、試著橫排合照之餘,從旁邊拍攝,選擇大光圈,同時對焦於最接近的那一位,會得到淺景深效果,遠一點的人雖然變得模糊,但出來的感覺會很有趣。


7、拍攝一大群人時,以全身照拍攝是最可行、最常用的方式,也用作記錄及公式合照,拍攝時須注意是否每人都露面。


8、選一個做最前面的那位,然後一個跟一個靠著前面那個來站著合照,這樣整體的投入感會很強,也很有氣氛。(雖然很像八十年代的樂隊CD封面……)


9、圍圈躺下,頭貼頭,在戶外的草地之類會是有趣的拍攝方式。


10、這個比起普通合影有趣一點。請所有人靠近,尤其是頭部要靠攏多一些,並擁向鏡頭。


11、可以的話,在高角度例如走上露台或是屋頂來拍攝團體照,會是不錯的選擇,照片會變得更有吸引力、更有趣。


12、這個也是從背面拍攝,不過姿勢略有改變。


13、這種拍攝姿勢,適合在戶外草地或是自家床上,感覺會很有趣,而且有復數的孩子也會非常好玩。


14、一家人俯臥在地,同時以雙手撐起上身,拍攝時以低角度為佳。


15、同坐在沙發上,而這種姿勢感覺會十分親密。 


16、也是一同坐在沙發上,但這次試試從沙發的背面來拍攝,你會得到截然不同的效果。 


17、一家人在戶外合照的輕鬆方式,就是坐在草地上之類,留意拍攝時與他們保持視線水平。


18、這是最基本的家庭合照,一家人坐在或靠在沙發上,然後如果盡可能把照片剪裁,將不需要的家具等移除於照片外,效果會更好。


19、很基本而舒適的全身合照,而且也不論家庭成員的數字,同樣可以做得不錯。


20、由父母背著子女來拍攝合照,會是另一種很親密的拍攝姿勢。


21、讓一家人手牽手迎面走過來,連續拍攝,選擇各人步伐最好的一張,留意對焦情況。


~~~圖文網路轉載

wibiya widget