Solution:
Edit config.inc.php. The line should look like this:
$cfg['blowfish_secret'] = '';
Enter in this line a password-like word or phrase, for example:
$cfg['blowfish_secret'] = 'holla';
2007年12月30日 星期日
[Debug]MySQL - Data too long for column
Data too long for column ,資料長度大於欄位長度,使自動截斷,而不產生錯誤訊息。
1. 再 my.ini 檔裡面的
2. 找到sql-mode="STRICT_TRANS_TABLES, ....."
3. 去掉 STRICT_TRANS_TABLES 變成 sql-mode="............'
4. 重新啟動 mysql
5. 完成
1. 再 my.ini 檔裡面的
2. 找到sql-mode="STRICT_TRANS_TABLES, ....."
3. 去掉 STRICT_TRANS_TABLES 變成 sql-mode="............'
4. 重新啟動 mysql
5. 完成
[Debug]MySQL - InnoDB feature is disabled
話說這個錯誤似乎是發生在Windows based的MySQL.
今天安裝mediawiki的時候跳出來的錯誤
The ‘InnoDB’ feature is disabled; you need MySQL built with ‘InnoDB’ to have it working (localhost)
解決方案其實很簡單, 就是到my.ini去把skip-innodb mark起來就好, 如下:
1.停止MySQL service
2.修改 # skip-innodb
3.啟動MySQL service
摘自:http://itopia.blogsite.org/wordpressbeta/?p=3
今天安裝mediawiki的時候跳出來的錯誤
The ‘InnoDB’ feature is disabled; you need MySQL built with ‘InnoDB’ to have it working (localhost)
解決方案其實很簡單, 就是到my.ini去把skip-innodb mark起來就好, 如下:
1.停止MySQL service
2.修改 # skip-innodb
3.啟動MySQL service
摘自:http://itopia.blogsite.org/wordpressbeta/?p=3
2007年12月29日 星期六

2007年12月28日 星期五
快速的在Blogger加入「最新文章」
Blogger釋出新的API後,馬上有高手應用這個API。
在Beautiful Beta中就利用這個API製作出簡單的將“最新文章”加入你的Blogger的方法,原文請參閱文章下方的「消息來源」。
我在這稍做簡短的解釋。
首先在範本的修改Html中,將下列程式加入在</head>之前。
接著在Widget Installation and Downloads Page這裡,選擇你想加入你Blog的widget,目前有提供下列幾種的widget:
這裡我以最新文章為例:
按下Recent posts widget下方的按紐,會出現如下的視窗:
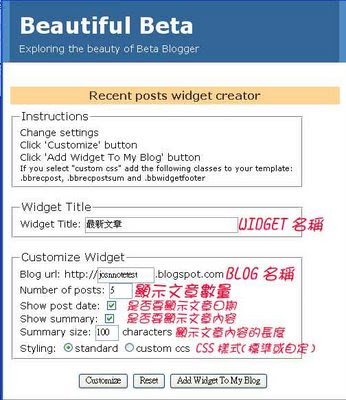
將一些基本的條件設定完成後按下,或重新設定,
之後按下,會再出現下面的視窗:

選擇你的Blog和Widget的名稱,按下“新增迷你組件“,之後再選個好位置放置,這樣你的Blog就擁有最新文章在你的Sidebar了。
之後如果要更動一些基本的參數,只要進入這個Widget的畫面,修改下列的參數就可以了。
如果你想自行定義CSS,只要將上面的standardstyling改為false,再自行加下入下列幾個參數到你的CSS之中即可:
摘自:http://joshnote.blogspot.com/2007/02/bloggerapiapi-beautiful-beta-apiblogger.html
在Beautiful Beta中就利用這個API製作出簡單的將“最新文章”加入你的Blogger的方法,原文請參閱文章下方的「消息來源」。
我在這稍做簡短的解釋。
首先在範本的修改Html中,將下列程式加入在</head>之前。
<script src='http://home.planet.nl/~hansoosting/downloads/beautifulbeta.js' type='text/javascript'/>
接著在Widget Installation and Downloads Page這裡,選擇你想加入你Blog的widget,目前有提供下列幾種的widget:
- Recent posts widget–最新文章
- Recent comments widget–最新意見
- Search widget–搜尋引擎
- Recent Posts Widget for FTP Blogs(如果你的blogger是存在自己的空間,那最新文章就用這一個)
- Weather Report Widget–天氣報告
這裡我以最新文章為例:
按下Recent posts widget下方的按紐,會出現如下的視窗:
將一些基本的條件設定完成後按下,或重新設定,
之後按下,會再出現下面的視窗:
選擇你的Blog和Widget的名稱,按下“新增迷你組件“,之後再選個好位置放置,這樣你的Blog就擁有最新文章在你的Sidebar了。
之後如果要更動一些基本的參數,只要進入這個Widget的畫面,修改下列的參數就可以了。
- numposts = 5(顯示文章數量)
- showpostdate = true(是否顯示日期,是為true,否為false)
- showpostsummary = true(是否顯示文章內容,是為true,否為false)
- numchars = 100(顯示文章內容的長度)
- standardstyling = true(是否使用內定的CSS樣式,是為true,否為false)
如果你想自行定義CSS,只要將上面的standardstyling改為false,再自行加下入下列幾個參數到你的CSS之中即可:
- .bbrecpost
- .bbrecpostsum
- .bbwidgetfooter
摘自:http://joshnote.blogspot.com/2007/02/bloggerapiapi-beautiful-beta-apiblogger.html
2007年12月27日 星期四


2007年12月26日 星期三
快樂製造機
吳金津 (中國時報 浮世繪 2007/09/22)
前幾天到內湖聽一場演講,讓我印象最深刻的是主講者朱平先生,分享如何讓自己做
個「快樂製造機」,
他談到他每天早晨都會去逛傳統市場,每天都會製造一些快樂給賣菜的老闆們。
比如他買了23元的菜,拿30元給老闆,說:「老闆,23元算25元,找我5元就好。」這些老闆們反應大致上有四種反應──
第一種:起初非常驚訝,之後非常開心地找了5元,說謝謝。
第二種:老闆堅持找7元,不佔客戶便宜,但老闆很開心。
第三種:是多送點蔥蒜,也很開心。
第四種:是最高竿的反應,「不然我幫你湊30元好了,一共是32元,算你30元就好。」
哇,真是高手,原本是要讓老闆佔便宜的,反過來卻讓客戶多買又有佔便宜的感受,更是個「快樂製造機」。
前日傍晚,我逛傳統黃昏市場時,決定玩一下朱先生的遊戲,暫時改了殺價習慣,想創造點快樂給老闆們。
我到一家以前常殺價、討斤兩的攤販前,買了157元的青菜,
結帳時,剛好聽到菜販老闆對旁人說了一個笑話,非常好笑,
我非常愉快地說:「老闆,你好幽默,你的笑話很好笑,157元算160元,這裡是160元,不用找了。」
老闆笑了,說:「這怎麼可以,不然妳還需要甚麼,我送妳。」
老闆便送我一大塊嫩薑。
後來到了另一家買甜不辣29元,拿30元給老闆,
我說:「阿伯,29元算30元,不用找了。」老闆有點訝異,一時之間反應不過來,還是找了1元給我,
我笑笑地把1元還給他,說不用找,他趕緊又多放了一塊甜不辣給我,從他驚訝轉而高興的表情,我知道我做到了。
回家的路上,我嘴角掛著微笑,哼著歌。睡前在日記裡寫下:「算一算,我多花了4元,賺到了甚麼?
1.賺到了好心情;
2.賺到了老闆的笑容;
3.賺到了老闆的謝意;
4.賺到了老闆的友誼;
5.賺到了一塊嫩薑和一塊甜不辣;
6.賺到了愉快的晚餐。」
當我們決心要當個「快樂製造機」時,就會感染對方,形成一個良性的影響,讓更多周遭的人像我們一樣,成為「快樂製造機」。
PHP wiki引擎在中文區域的流行度
根據百度收錄數量進行排序
| 名稱 | 收錄數量 | 檢測時間 | 運行環境 | 中文支援 | 版權 | 編輯器 | 備註 |
| MediaWiki | 42.6萬 | 2006.12.31 | PHP+資料庫 | 優秀(UTF8 | 開源GPL | wiki文本 | 影響最大的wiki程式 |
| Drupal Wiki | 8.2萬 | 2006.12.31 | ? | ? | ? | ? | Drupal CMS系統的wiki模塊,支持MySQL或PostgreSQL。 |
| TikiWiki | 4.6萬 | 2007.01.02 | ? | ? | ? | ? | CMS/Groupware -- 功能豐富完善的成熟wiki系統。 http://tikiwiki.org" |
| PukiWiki | 2.9萬 | 2006.12.31 | ? | ? | ? | ? | 在日本廣泛使用,易於安裝,特性豐富。用於XOOPS的插件版本稱為PukiWikiMod |
| DokuWiki | 2.9萬 | 2006.12.31 | ? | ? | ? | ? | 一個簡單的wiki程式,適合小公司的文檔需要。使用平面文字檔案存儲,無需資料庫。 http://www.splitbrain.org/dokuwiki/" |
| PmWiki | 2.9萬 | 2006.12.31 | ? | ? | 開源GPL | ? | 具有版本記錄、群組功能的wiki程式,可以進行頁面和群組密碼保護。安裝簡單,定製容易,皮膚美觀。 http://www.pmichaud.com/pmwiki" |
| PhpWiki | 1.13萬 | 2006.12.31 | ? | ? | 開源GPL | ? | 第一個公開發佈的php wiki程式,運行於relational資料庫上,平面檔,或者DBM。1999.12誕生。 http://phpwiki.org/" |
| CoWiki | 0.56萬 | 2006.12.31 | ? | ? | ? | ? | 遵循 loose wikis 的傳統,with easy and intuitional markup, 增加Unix式的訪問管理,目錄/文檔體系,以及plugin API for your functionalities and enhancements. All documents are parsed to XML for further export and transformation. coWiki是一個模塊化的程式,基於範本,支援多語言 ... 需要PHP5和MySQL |
| WikiX | 0.27萬 | 2007.01.02 | ? | ? | ? | ? | 基於PHP/MySQL/PostgreSQL的wiki程式。致力於讓用戶能夠重新定義語法,通過使用 wikiXmacros 和PHP plugin的各種 stages 來實現。 http://wikix.org/" |
| WakkaWiki | 0.26萬 | 2007.01.02 | ? | ? | ? | ? | 非常小巧的PHP/MySQL Wiki程式,安裝迅速,有頁面訪問控製表,完善的版本控制、頁面評論等。已不再維護。 |
| Bitweaver | 0.20萬 | 2006.12.31 | ? | ? | ? | ? | |
| GetWiki | 0.19萬 | 2006.12.31 | ? | ? | ? | ? | mediawiki的一個分支 |
| WikkiTikkiTavi | 0.16萬 | 2007.01.02 | ? | ? | ? | ? | PHP/MySQL。 |
| IWiki | 0.13萬 | 2006.12.31 | ? | ? | ? | ? | |
| WikiDoc | 0.09萬 | 2007.01.02 | ? | ? | ? | ? | PHP/MySQL。開源,以wiki為基礎的文檔管理系統。 |
| PWiki | 0.06萬 | 2006.12.31 | ? | ? | ? | ? | 可附加檔,有版本功能。運行於文件系統,無需資料庫 http://wiki.2gn.com/" 或 http://2gn.com/source.html" |
| Cardboard wiki | 0.05萬 | 2006.12.31 | ? | ? | ? | ? | |
| YaWiki | 0.05萬 | 2007.01.02 | ? | ? | ? | ? | 重量級的PHP/PEAR wiki。基於一些新的PEAR庫(Auth, Benchmark, Cache_Lite, Date, DB, DB_Table, HTML_QuickForm, which itself depends on: HTML_Common, Var_Dump) http://wiki.ciaweb.net/yawiki/index.php?area=Yawiki&page=HomePage" |
| WikyBlog | 0.05萬 | 2007.01.02 | ? | ? | ? | ? | 強調簡單化,安裝時無需配置,不需要資料庫。 http://www.qwikiwiki.com/" PHP/MySQL 具有ajax增強的tab介面,支援google maps。 http://www.wikyblog.com" |
| QWiki | 0.04萬 | 2007.01.02 | ? | ? | ? | ? | 強調簡單化,安裝時無需配置,不需要資料庫。 http://www.qwikiwiki.com/" |
| WikkaWiki | 0.03萬 | 2006.12.31 | ? | ? | ? | ? | (110K) 輕量級PHP/MySQL wiki引擎,WakkaWiki的分支作品,註重速度、擴展形、安全等,有許多特性擴展和錯誤修訂。 |
| ErfurtWiki | 0.03萬 | 2006.12.31 | ? | ? | ? | ? | |
| MoniWiki | 0.03萬 | 2006.12.31 | PHP | ? | 開源GPL | ? | 幾乎完全相容於MoinMoin。英語、法語、韓語。RCS後臺。http://moniwiki.sourceforge.net/wiki.php" |
| WackoWiki | 0.02萬 | 2007.01.02 | ? | ? | ? | ? | WakkaWiki的一個分支,有英語、德語、俄語及更多翻譯,以及大量新的特性。 |
| TipiWiki | 0.02萬 | 2007.01.02 | ? | ? | ? | ? | 系統簡單,安裝容易。alpha stage |
| UniWakka | 0.01萬 | 2007.01.02 | ? | ? | ? | ? | 一個WakkaWiki的分支。致力於提供科學類網站內容的協作和認證(authoring)工具。支持WikiFarm安裝、MathMl、腳註、內容表格、bibtex導入/導出、latex導出、latex類似的引用、openoffice導出等等。 |
| Wiclear | 0.01萬 | 2007.01.02 | ? | ? | ? | ? | (http://wiclear.free.fr") -- PHP/MySQL下的wiki程式,開發中。具有 easy themability 支援,多語言支援,評論頁、ACL等等。 |
| WikePage | 0.01萬 | 2007.01.02 | ? | ? | ? | ? | (http://www.cyrocom.com/") (~25K) -- 小巧的wiki程式,具有密碼保護模式或wiki模式,支援多語種,簡單的banner支援,支援表格、圖片加鏈接,支持CSS。使用平面檔系統存儲數據。 |
| WikiNi | 0.0001萬 | 2007.01.02 | ? | ? | ? | ? | WakkaWiki的一個分支,法語。增加了一些新特性(頁面刪除、文字差異對比等)。 |
| CoMaWiki | 0.000001萬 | 2006.12.31 | ? | ? | ? | ? | WakkaWiki的變種,有顯著變化 |
| CoTeia | 0.00萬 | 2006.12.31 | ? | ? | ? | ? |
摘自:http://www.allwiki.com/index.php?title=Php_wiki%E7%A8%8B%E5%BA%8F%E7%9A%84%E6%B5%81%E8%A1%8C%E5%BA%A6&variant=zh-hk
2007年12月25日 星期二
Using distinct and count with CakePHP
This post is the answer to Mandy Singh’s comment to the article Select distinct with CakePHP in which he asked how to use “count” with “distinct”. The answer I gave then — to use a custom query — works, but there exists a more Cake-like solution.
The obvious solution — using findCount() — doesn’t work, as there is no way to specify that you want to use “distinct”.
So to get the desired result we have to use a find() or findAll() statement as shown in the following example:
The obvious solution — using findCount() — doesn’t work, as there is no way to specify that you want to use “distinct”.
So to get the desired result we have to use a find() or findAll() statement as shown in the following example:
$this->User->find(null, "COUNT(DISTINCT User.city) AS 'count'");
Redirect with exit
If you do a redirect in CakePHP 1.1 you often have to add an exit() after the redirect statement to stop the script execution:
Thanks to a small enhancement in CakePHP 1.2 in the form of an additional parameter for the redirect() function you can now do:
It’s the same functionality as in the previous code snippet, but with the advantage that your code becomes testable (you cannot test a function which contains an exit(), as the exit() also stops the execution of the test).
$this->redirect('controller/action');
exit();
Thanks to a small enhancement in CakePHP 1.2 in the form of an additional parameter for the redirect() function you can now do:
$this->redirect('controller/action', null, true);It’s the same functionality as in the previous code snippet, but with the advantage that your code becomes testable (you cannot test a function which contains an exit(), as the exit() also stops the execution of the test).
Writing an installer for your CakePHP application
If you write an application which the user must install on his own server, you have to think about the installation process of your application. In this article I will describe the approach I have used in my application.
This approach is heavily inspired by the one used by WordPress. That means the user has to create the database and to define the database settings in app/config/database.php himself. When this is done, the user must run the installer, which then creates the tables and does some application-specific stuff like creating a default user.
The installer is a usual controller, which is automatically called when the user accesses the application for the first time. For this purpose I added a bit of logic to app/config/routes.php:
So as long as there is no “installed.txt” file, the user gets the first page of the installer when he requests the url of the application. The consequence of this logic is that we have to create such a file at the end of the installation process (see below).
The installer controller itself is straight-forward, each action is one step in the installation process. You can find a minimal version of the installer below:
It is a pragmatic solution with the drawback that it is not really reusable,..
This approach is heavily inspired by the one used by WordPress. That means the user has to create the database and to define the database settings in app/config/database.php himself. When this is done, the user must run the installer, which then creates the tables and does some application-specific stuff like creating a default user.
The installer is a usual controller, which is automatically called when the user accesses the application for the first time. For this purpose I added a bit of logic to app/config/routes.php:
if (file_exists(TMP.'installed.txt')) {
// the routes for when the application has been installed
} else {
Router::connect('/:action', array('controller' => 'installer'));
}
So as long as there is no “installed.txt” file, the user gets the first page of the installer when he requests the url of the application. The consequence of this logic is that we have to create such a file at the end of the installation process (see below).
The installer controller itself is straight-forward, each action is one step in the installation process. You can find a minimal version of the installer below:
// app/controllers/
uses('model' . DS . 'connection_manager');
class InstallerController extends AppController {
var $uses = array();
function beforeFilter() {
if (file_exists(TMP.'installed.txt')) {
echo 'Application already installed. Remove app/config/installed.txt to reinstall the application';
exit();
}
}
function index() {
}
function database() {
$db = ConnectionManager::getDataSource('default');
if(!$db->isConnected()) {
echo 'Could not connect to database. Please check the settings in app/config/database.php and try again';
exit();
}
$this->__executeSQLScript($db, CONFIGS.'sql'.DS.'app.sql');
$this->redirect('/installer/thanks');
}
function thanks() {
file_put_contents(TMP.'installed.txt', date('Y-m-d, H:i:s'));
}
function __executeSQLScript($db, $fileName) {
$statements = file_get_contents($fileName);
$statements = explode(';', $statements);
foreach ($statements as $statement) {
if (trim($statement) != '') {
$db->query($statement);
}
}
}
}
It is a pragmatic solution with the drawback that it is not really reusable,..
How to enable/disable debug messages for a certain action
An often asked question in the CakePHP IRC channel is: “How can I enable [or disable] the debug messages for a certain action?” The answer to this question is simple (works in both CakePHP 1.1 and 1.2):
Please notice that the key must be in lowercase, ‘DEBUG’ won’t have the desired effect.
function action() {
Configure::write('debug', '2');

// do something
}
Please notice that the key must be in lowercase, ‘DEBUG’ won’t have the desired effect.
Select distinct with CakePHP
The solution is rather simple:
Or with the array syntax:
Please notice that the keyword “DISTINCT” has to be uppercase, else you will get the following error:
Unknown column 'distinct User.city'
$this->User->findAll(null, 'DISTINCT User.city');Or with the array syntax:
$this->User->findAll(null, array('DISTINCT User.city'));Please notice that the keyword “DISTINCT” has to be uppercase, else you will get the following error:
Unknown column 'distinct User.city'
MySQL優化經驗
MySQL優化經驗
同時線上訪問量繼續增大 對於1G記憶體的伺服器明顯感覺到吃力嚴重時甚至每天都會死機 或者時不時的伺服器卡一下 這個問題曾經困擾了我半個多月MySQL使用是很具伸縮性的演算法,因此你通常能用很少的記憶體運行或給MySQL更多的被存以得到更好的性能。
安裝好mysql後,配製檔應該在/usr/local/mysql/share/mysql目錄中,配製檔有幾個,有my-huge.cnf my-medium.cnf my-large.cnf my-small.cnf,不同的流量的網站和不同配製的伺服器環境,當然需要有不同的配製檔了。
一般的情況下,my-medium.cnf這個配製檔就能滿足我們的大多需要;一般我們會把配置檔拷貝到/etc/my.cnf 只需要修改這個配置檔就可以了,使用mysqladmin variables extended-status –u root –p 可以看到目前的參數,有3個配置參數是最重要的,即key_buffer_size,query_cache_size,table_cache。
key_buffer_size只對MyISAM表起作用,
key_buffer_size指定索引緩衝區的大小,它決定索引處理的速度,尤其是索引讀的速度。一般我們設為16M,實際上稍微大一點的站點 這個數字是遠遠不夠的,通過檢查狀態值Key_read_requests和Key_reads,可以知道key_buffer_size設置是否合理。比例key_reads / key_read_requests應該盡可能的低,至少是1:100,1:1000更好(上述狀態值可以使用SHOW STATUS LIKE ‘key_read%’獲得)。 或者如果你裝了phpmyadmin 可以通過伺服器運行狀態看到,筆者推薦用phpmyadmin管理mysql,以下的狀態值都是本人通過phpmyadmin獲得的實例分析:
這個伺服器已經運行了20天
比例接近1:8000 健康狀況非常好
另外一個估計key_buffer_size的辦法 把你網站資料庫的每個表的索引所占空間大小加起來看看以此伺服器為例:比較大的幾個表索引加起來大概125M 這個數字會隨著表變大而變大。
從4.0.1開始,MySQL提供了查詢緩衝機制。使用查詢緩衝,MySQL將SELECT語句和查詢結果存放在緩衝區中,今後對於同樣的SELECT語句(區分大小寫),將直接從緩衝區中讀取結果。根據MySQL用戶手冊,使用查詢緩衝最多可以達到238%的效率。
通過調節以下幾個參數可以知道query_cache_size設置得是否合理
Qcache_lowmem_prunes的值非常大,則表明經常出現緩衝不夠的情況,同時Qcache_hits的值非常大,則表明查詢緩衝使用非常頻繁,此時需要增加緩衝大小Qcache_hits的值不大,則表明你的查詢重複率很低,這種情況下使用查詢緩衝反而會影響效率,那麼可以考慮不用查詢緩衝。此外,在SELECT語句中加入SQL_NO_CACHE可以明確表示不使用查詢緩衝。
Qcache_free_blocks,如果該值非常大,則表明緩衝區中碎片很多query_cache_type指定是否使用查詢緩衝
我設置:
得到如下狀態值:
Qcache queries in cache 12737 表明目前緩存的條數
Qcache inserts 20649006
Qcache hits 79060095 看來重複查詢率還挺高的
Qcache lowmem prunes 617913 有這麼多次出現緩存過低的情況
Qcache not cached 189896
Qcache free memory 18573912 目前剩餘緩存空間
Qcache free blocks 5328 這個數字似乎有點大 碎片不少
Qcache total blocks 30953
如果記憶體允許32M應該要往上加點
table_cache指定表快取記憶體的大小。每當MySQL訪問一個表時,如果在表緩衝區中還有空間,該表就被打開並放入其中,這樣可以更快地訪問表內容。通過檢查峰值時間的狀態值Open_tables和Opened_tables,可以決定是否需要增加table_cache的值。如果你發現open_tables等於table_cache,並且opened_tables在不斷增長,那麼你就需要增加table_cache的值了(上述狀態值可以使用SHOW STATUS LIKE ‘Open%tables’獲得)。注意,不能盲目地把table_cache設置成很大的值。如果設置得太高,可能會造成檔描述符不足,從而造成性能不穩定或者連接失敗。
對於有1G記憶體的機器,推薦值是128-256。
筆者設置table_cache = 256
得到以下狀態:
雖然open_tables已經等於table_cache,但是相對於伺服器運行時間來說,已經運行了20天,opened_tables的值也非常低。因此,增加table_cache的值應該用處不大。如果運行了6個小時就出現上述值 那就要考慮增大table_cache。
如果你不需要記錄2進制log 就把這個功能關掉,注意關掉以後就不能恢復出問題前的資料了,需要您手動備份,二進位日誌包含所有更新資料的語句,其目的是在恢復資料庫時用它來把資料盡可能恢復到最後的狀態。另外,如果做同步複製( Replication )的話,也需要使用二進位日誌傳送修改情況。
log_bin指定日誌檔,如果不提供檔案名,MySQL將自己產生缺省檔案名。MySQL會在檔案名後面自動添加數位引,每次啟動服務時,都會重新生成一個新的二進位檔。此外,使用log-bin-index可以指定索引檔;使用binlog-do-db可以指定記錄的資料庫;使用binlog-ignore-db可以指定不記錄的資料庫。注意的是:binlog-do-db和binlog-ignore-db一次只指定一個資料庫,指定多個資料庫需要多個語句。而且,MySQL會將所有的資料庫名稱改成小寫,在指定資料庫時必須全部使用小寫名字,否則不會起作用。
關掉這個功能只需要在他前面加上#號
開啟慢查詢日誌( slow query log ) 慢查詢日誌對於跟蹤有問題的查詢非常有用。它記錄所有查過long_query_time的查詢,如果需要,還可以記錄不使用索引的記錄。下面是一個慢查詢日誌的例子:
開啟慢查詢日誌,需要設置參數log_slow_queries、long_query_times、log-queries-not-using-indexes。
log_slow_queries指定日誌檔,如果不提供檔案名,MySQL將自己產生缺省檔案名。long_query_times指定慢查詢的閾值,缺省是10秒。log-queries-not-using-indexes是4.1.0以後引入的參數,它指示記錄不使用索引的查詢。筆者設置long_query_time=10
筆者設置:
參數說明:
back_log
要求MySQL能有的連接數量。當主要MySQL線程在一個很短時間內得到非常多的連接請求,這就起作用,然後主線程花些時間(儘管很短)檢查連接並且啟動一個新線程。back_log值指出在MySQL暫時停止回答新請求之前的短時間內多少個請求可以被存在堆疊中。只有如果期望在一個短時間內有很多連接,你需要增加它,換句話說,這值對到來的TCP/IP連接的偵聽佇列的大小。你的作業系統在這個佇列大小上有它自己的限制。 Unix listen(2)系統調用的手冊頁應該有更多的細節。檢查你的OS文檔找出這個變數的最大值。試圖設定back_log高於你的作業系統的限制將是無效的。
max_connections
併發連接數目最大,120 超過這個值就會自動恢復,出了問題能自動解決
thread_cache
沒找到具體說明,不過設置為32後 20天才創建了400多個線程 而以前一天就創建了上千個線程 所以還是有用的
thread_concurrency
代碼:
補充
優化table_cachetable_cache指定表快取記憶體的大小。每當MySQL訪問一個表時,如果在表緩衝區中還有空間,該表就被打開並放入其中,這樣可以更快地訪問表內容。通過檢查峰值時間的狀態值Open_tables和Opened_tables,可以決定是否需要增加table_cache的值。如果你發現open_tables等於table_cache,並且opened_tables在不斷增長,那麼你就需要增加table_cache的值了(上述狀態值可以使用SHOW STATUS LIKE ‘Open%tables’獲得)。注意,不能盲目地把table_cache設置成很大的值。如果設置得太高,可能會造成檔描述符不足,從而造成性能不穩定或者連接失敗。對於有1G記憶體的機器,推薦值是128-256。
案例1:該案例來自一個不是特別繁忙的伺服器table_cache – 512open_tables – 103opened_tables – 1273uptime – 4021421 (measured in seconds)該案例中table_cache似乎設置得太高了。在峰值時間,打開表的數目比table_cache要少得多。
案例2:該案例來自一台開發伺服器。table_cache – 64open_tables – 64opened-tables – 431uptime – 1662790 (measured in seconds)雖然open_tables已經等於table_cache,但是相對於伺服器運行時間來說,opened_tables的值也非常低。因此,增加table_cache的值應該用處不大。案例3:該案例來自一個upderperforming的伺服器table_cache – 64open_tables – 64opened_tables – 22423uptime – 19538該案例中table_cache設置得太低了。雖然運行時間不到6小時,open_tables達到了最大值,opened_tables的值也非常高。這樣就需要增加table_cache的值。優化key_buffer_sizekey_buffer_size指定索引緩衝區的大小,它決定索引處理的速度,尤其是索引讀的速度。通過檢查狀態值Key_read_requests和Key_reads,可以知道key_buffer_size設置是否合理。比例key_reads / key_read_requests應該盡可能的低,至少是1:100,1:1000更好(上述狀態值可以使用SHOW STATUS LIKE ‘key_read%’獲得)。key_buffer_size只對MyISAM表起作用。即使你不使用MyISAM表,但是內部的臨時磁片表是MyISAM表,也要使用該值。可以使用檢查狀態值created_tmp_disk_tables得知詳情。對於1G記憶體的機器,如果不使用MyISAM表,推薦值是16M(8-64M)。
案例1:健康狀況key_buffer_size – 402649088 (384M)key_read_requests – 597579931key_reads - 56188案例2:警報狀態key_buffer_size – 16777216 (16M)key_read_requests – 597579931key_reads - 53832731案例1中比例低於1:10000,是健康的情況;案例2中比例達到1:11,警報已經拉響。
同時線上訪問量繼續增大 對於1G記憶體的伺服器明顯感覺到吃力嚴重時甚至每天都會死機 或者時不時的伺服器卡一下 這個問題曾經困擾了我半個多月MySQL使用是很具伸縮性的演算法,因此你通常能用很少的記憶體運行或給MySQL更多的被存以得到更好的性能。
安裝好mysql後,配製檔應該在/usr/local/mysql/share/mysql目錄中,配製檔有幾個,有my-huge.cnf my-medium.cnf my-large.cnf my-small.cnf,不同的流量的網站和不同配製的伺服器環境,當然需要有不同的配製檔了。
一般的情況下,my-medium.cnf這個配製檔就能滿足我們的大多需要;一般我們會把配置檔拷貝到/etc/my.cnf 只需要修改這個配置檔就可以了,使用mysqladmin variables extended-status –u root –p 可以看到目前的參數,有3個配置參數是最重要的,即key_buffer_size,query_cache_size,table_cache。
key_buffer_size只對MyISAM表起作用,
key_buffer_size指定索引緩衝區的大小,它決定索引處理的速度,尤其是索引讀的速度。一般我們設為16M,實際上稍微大一點的站點 這個數字是遠遠不夠的,通過檢查狀態值Key_read_requests和Key_reads,可以知道key_buffer_size設置是否合理。比例key_reads / key_read_requests應該盡可能的低,至少是1:100,1:1000更好(上述狀態值可以使用SHOW STATUS LIKE ‘key_read%’獲得)。 或者如果你裝了phpmyadmin 可以通過伺服器運行狀態看到,筆者推薦用phpmyadmin管理mysql,以下的狀態值都是本人通過phpmyadmin獲得的實例分析:
這個伺服器已經運行了20天
key_buffer_size – 128M
key_read_requests – 650759289
key_reads - 79112
比例接近1:8000 健康狀況非常好
另外一個估計key_buffer_size的辦法 把你網站資料庫的每個表的索引所占空間大小加起來看看以此伺服器為例:比較大的幾個表索引加起來大概125M 這個數字會隨著表變大而變大。
從4.0.1開始,MySQL提供了查詢緩衝機制。使用查詢緩衝,MySQL將SELECT語句和查詢結果存放在緩衝區中,今後對於同樣的SELECT語句(區分大小寫),將直接從緩衝區中讀取結果。根據MySQL用戶手冊,使用查詢緩衝最多可以達到238%的效率。
通過調節以下幾個參數可以知道query_cache_size設置得是否合理
Qcache inserts
Qcache hits
Qcache lowmem prunes
Qcache free blocks
Qcache total blocks
Qcache_lowmem_prunes的值非常大,則表明經常出現緩衝不夠的情況,同時Qcache_hits的值非常大,則表明查詢緩衝使用非常頻繁,此時需要增加緩衝大小Qcache_hits的值不大,則表明你的查詢重複率很低,這種情況下使用查詢緩衝反而會影響效率,那麼可以考慮不用查詢緩衝。此外,在SELECT語句中加入SQL_NO_CACHE可以明確表示不使用查詢緩衝。
Qcache_free_blocks,如果該值非常大,則表明緩衝區中碎片很多query_cache_type指定是否使用查詢緩衝
我設置:
query_cache_size = 32M
query_cache_type= 1
得到如下狀態值:
Qcache queries in cache 12737 表明目前緩存的條數
Qcache inserts 20649006
Qcache hits 79060095 看來重複查詢率還挺高的
Qcache lowmem prunes 617913 有這麼多次出現緩存過低的情況
Qcache not cached 189896
Qcache free memory 18573912 目前剩餘緩存空間
Qcache free blocks 5328 這個數字似乎有點大 碎片不少
Qcache total blocks 30953
如果記憶體允許32M應該要往上加點
table_cache指定表快取記憶體的大小。每當MySQL訪問一個表時,如果在表緩衝區中還有空間,該表就被打開並放入其中,這樣可以更快地訪問表內容。通過檢查峰值時間的狀態值Open_tables和Opened_tables,可以決定是否需要增加table_cache的值。如果你發現open_tables等於table_cache,並且opened_tables在不斷增長,那麼你就需要增加table_cache的值了(上述狀態值可以使用SHOW STATUS LIKE ‘Open%tables’獲得)。注意,不能盲目地把table_cache設置成很大的值。如果設置得太高,可能會造成檔描述符不足,從而造成性能不穩定或者連接失敗。
對於有1G記憶體的機器,推薦值是128-256。
筆者設置table_cache = 256
得到以下狀態:
Open tables 256
Opened tables 9046
雖然open_tables已經等於table_cache,但是相對於伺服器運行時間來說,已經運行了20天,opened_tables的值也非常低。因此,增加table_cache的值應該用處不大。如果運行了6個小時就出現上述值 那就要考慮增大table_cache。
如果你不需要記錄2進制log 就把這個功能關掉,注意關掉以後就不能恢復出問題前的資料了,需要您手動備份,二進位日誌包含所有更新資料的語句,其目的是在恢復資料庫時用它來把資料盡可能恢復到最後的狀態。另外,如果做同步複製( Replication )的話,也需要使用二進位日誌傳送修改情況。
log_bin指定日誌檔,如果不提供檔案名,MySQL將自己產生缺省檔案名。MySQL會在檔案名後面自動添加數位引,每次啟動服務時,都會重新生成一個新的二進位檔。此外,使用log-bin-index可以指定索引檔;使用binlog-do-db可以指定記錄的資料庫;使用binlog-ignore-db可以指定不記錄的資料庫。注意的是:binlog-do-db和binlog-ignore-db一次只指定一個資料庫,指定多個資料庫需要多個語句。而且,MySQL會將所有的資料庫名稱改成小寫,在指定資料庫時必須全部使用小寫名字,否則不會起作用。
關掉這個功能只需要在他前面加上#號
#log-bin 開啟慢查詢日誌( slow query log ) 慢查詢日誌對於跟蹤有問題的查詢非常有用。它記錄所有查過long_query_time的查詢,如果需要,還可以記錄不使用索引的記錄。下面是一個慢查詢日誌的例子:
開啟慢查詢日誌,需要設置參數log_slow_queries、long_query_times、log-queries-not-using-indexes。
log_slow_queries指定日誌檔,如果不提供檔案名,MySQL將自己產生缺省檔案名。long_query_times指定慢查詢的閾值,缺省是10秒。log-queries-not-using-indexes是4.1.0以後引入的參數,它指示記錄不使用索引的查詢。筆者設置long_query_time=10
筆者設置:
sort_buffer_size = 1M
max_connections=120
wait_timeout =120
back_log=100
read_buffer_size = 1M
thread_cache=32
interactive_timeout=120
thread_concurrency = 4
參數說明:
back_log
要求MySQL能有的連接數量。當主要MySQL線程在一個很短時間內得到非常多的連接請求,這就起作用,然後主線程花些時間(儘管很短)檢查連接並且啟動一個新線程。back_log值指出在MySQL暫時停止回答新請求之前的短時間內多少個請求可以被存在堆疊中。只有如果期望在一個短時間內有很多連接,你需要增加它,換句話說,這值對到來的TCP/IP連接的偵聽佇列的大小。你的作業系統在這個佇列大小上有它自己的限制。 Unix listen(2)系統調用的手冊頁應該有更多的細節。檢查你的OS文檔找出這個變數的最大值。試圖設定back_log高於你的作業系統的限制將是無效的。
max_connections
併發連接數目最大,120 超過這個值就會自動恢復,出了問題能自動解決
thread_cache
沒找到具體說明,不過設置為32後 20天才創建了400多個線程 而以前一天就創建了上千個線程 所以還是有用的
thread_concurrency
#設置為你的cpu數目x2,例如,只有一個cpu,那麼thread_concurrency=2
#有2個cpu,那麼thread_concurrency=4
skip-innodb
#去掉innodb支持
代碼:
# Example MySQL config file for medium systems.
#
# This is for a system with little memory (32M - 64M) where MySQL plays
# an important part, or systems up to 128M where MySQL is used together with
# other programs (such as a web server)
#
# You can copy this file to
# /etc/my.cnf to set global options,
# mysql-data-dir/my.cnf to set server-specific options (in this
# installation this directory is /var/lib/mysql) or
# ~/.my.cnf to set user-specific options.
#
# In this file, you can use all long options that a program supports.
# If you want to know which options a program supports, run the program
# with the "--help" option.


# The following options will be passed to all MySQL clients
[client]
#password = your_password
port = 3306
socket = /tmp/mysql.sock
#socket = /var/lib/mysql/mysql.sock
# Here follows entries for some specific programs


# The MySQL server
[mysqld]
port = 3306
socket = /tmp/mysql.sock
#socket = /var/lib/mysql/mysql.sock
skip-locking
key_buffer = 128M
max_allowed_packet = 1M
table_cache = 256
sort_buffer_size = 1M
net_buffer_length = 16K
myisam_sort_buffer_size = 1M
max_connections=120
#addnew config
wait_timeout =120
back_log=100
read_buffer_size = 1M
thread_cache=32
skip-innodb
skip-bdb
skip-name-resolve
join_buffer_size=512k
query_cache_size = 32M
interactive_timeout=120
long_query_time=10
log_slow_queries= /usr/local/mysql4/logs/slow_query.log
query_cache_type= 1
# Try number of CPU's*2 for thread_concurrency
thread_concurrency = 4


#end new config
# Don't listen on a TCP/IP port at all. This can be a security enhancement,
# if all processes that need to connect to mysqld run on the same host.
# All interaction with mysqld must be made via Unix sockets or named pipes.
# Note that using this option without enabling named pipes on Windows
# (via the "enable-named-pipe" option) will render mysqld useless!
#
#skip-networking


# Replication Master Server (default)
# binary logging is required for replication
#log-bin


# required unique id between 1 and 2^32 - 1
# defaults to 1 if master-host is not set
# but will not function as a master if omitted
server-id = 1


# Replication Slave (comment out master section to use this)
#
# To configure this host as a replication slave, you can choose between
# two methods :
#
# 1) Use the CHANGE MASTER TO command (fully described in our manual) -
# the syntax is:
#
# CHANGE MASTER TO MASTER_HOST=, MASTER_PORT=,
# MASTER_USER=, MASTER_PASSWORD= ;
#
# where you replace , , by quoted strings and
# by the master's port number (3306 by default).
#
# Example:
#
# CHANGE MASTER TO MASTER_HOST='125.564.12.1', MASTER_PORT=3306,
# MASTER_USER='joe', MASTER_PASSWORD='secret';
#
# OR
#
# 2) Set the variables below. However, in case you choose this method, then
# start replication for the first time (even unsuccessfully, for example
# if you mistyped the password in master-password and the slave fails to
# connect), the slave will create a master.info file, and any later
# change in this file to the variables' values below will be ignored and
# overridden by the content of the master.info file, unless you shutdown
# the slave server, delete master.info and restart the slaver server.
# For that reason, you may want to leave the lines below untouched
# (commented) and instead use CHANGE MASTER TO (see above)
#
# required unique id between 2 and 2^32 - 1
# (and different from the master)
# defaults to 2 if master-host is set
# but will not function as a slave if omitted
#server-id = 2
#
# The replication master for this slave - required
#master-host =
#
# The username the slave will use for authentication when connecting
# to the master - required
#master-user =
#
# The password the slave will authenticate with when connecting to
# the master - required
#master-password =
#
# The port the master is listening on.
# optional - defaults to 3306
#master-port =
#
# binary logging - not required for slaves, but recommended
#log-bin


# Point the following paths to different dedicated disks
#tmpdir = /tmp/
#log-update = /path-to-dedicated-directory/hostname


# Uncomment the following if you are using BDB tables
#bdb_cache_size = 4M
#bdb_max_lock = 10000


# Uncomment the following if you are using InnoDB tables
#innodb_data_home_dir = /var/lib/mysql/
#innodb_data_file_path = ibdata1:10M:autoextend
#innodb_log_group_home_dir = /var/lib/mysql/
#innodb_log_arch_dir = /var/lib/mysql/
# You can set .._buffer_pool_size up to 50 - 80 %
# of RAM but beware of setting memory usage too high
#innodb_buffer_pool_size = 16M
#innodb_additional_mem_pool_size = 2M
# Set .._log_file_size to 25 % of buffer pool size
#innodb_log_file_size = 5M
#innodb_log_buffer_size = 8M
#innodb_flush_log_at_trx_commit = 1
#innodb_lock_wait_timeout = 50


[mysqldump]
quick
max_allowed_packet = 16M


[mysql]
no-auto-rehash
# Remove the next comment character if you are not familiar with SQL
#safe-updates


[isamchk]
key_buffer = 20M
sort_buffer_size = 20M
read_buffer = 2M
write_buffer = 2M


[myisamchk]
key_buffer = 20M
sort_buffer_size = 20M
read_buffer = 2M
write_buffer = 2M


[mysqlhotcopy]
interactive-timeout
補充
優化table_cachetable_cache指定表快取記憶體的大小。每當MySQL訪問一個表時,如果在表緩衝區中還有空間,該表就被打開並放入其中,這樣可以更快地訪問表內容。通過檢查峰值時間的狀態值Open_tables和Opened_tables,可以決定是否需要增加table_cache的值。如果你發現open_tables等於table_cache,並且opened_tables在不斷增長,那麼你就需要增加table_cache的值了(上述狀態值可以使用SHOW STATUS LIKE ‘Open%tables’獲得)。注意,不能盲目地把table_cache設置成很大的值。如果設置得太高,可能會造成檔描述符不足,從而造成性能不穩定或者連接失敗。對於有1G記憶體的機器,推薦值是128-256。
案例1:該案例來自一個不是特別繁忙的伺服器table_cache – 512open_tables – 103opened_tables – 1273uptime – 4021421 (measured in seconds)該案例中table_cache似乎設置得太高了。在峰值時間,打開表的數目比table_cache要少得多。
案例2:該案例來自一台開發伺服器。table_cache – 64open_tables – 64opened-tables – 431uptime – 1662790 (measured in seconds)雖然open_tables已經等於table_cache,但是相對於伺服器運行時間來說,opened_tables的值也非常低。因此,增加table_cache的值應該用處不大。案例3:該案例來自一個upderperforming的伺服器table_cache – 64open_tables – 64opened_tables – 22423uptime – 19538該案例中table_cache設置得太低了。雖然運行時間不到6小時,open_tables達到了最大值,opened_tables的值也非常高。這樣就需要增加table_cache的值。優化key_buffer_sizekey_buffer_size指定索引緩衝區的大小,它決定索引處理的速度,尤其是索引讀的速度。通過檢查狀態值Key_read_requests和Key_reads,可以知道key_buffer_size設置是否合理。比例key_reads / key_read_requests應該盡可能的低,至少是1:100,1:1000更好(上述狀態值可以使用SHOW STATUS LIKE ‘key_read%’獲得)。key_buffer_size只對MyISAM表起作用。即使你不使用MyISAM表,但是內部的臨時磁片表是MyISAM表,也要使用該值。可以使用檢查狀態值created_tmp_disk_tables得知詳情。對於1G記憶體的機器,如果不使用MyISAM表,推薦值是16M(8-64M)。
案例1:健康狀況key_buffer_size – 402649088 (384M)key_read_requests – 597579931key_reads - 56188案例2:警報狀態key_buffer_size – 16777216 (16M)key_read_requests – 597579931key_reads - 53832731案例1中比例低於1:10000,是健康的情況;案例2中比例達到1:11,警報已經拉響。
2007年12月24日 星期一
YONEX 羽球拍試打會-2007

心裡的Orz:真的是一場很爛的活動
特別告知各位:試打的拍子並沒有高級拍子 (NS9000s,NS9000x,AT900T,AT900P....),而是台灣製的入門拍or非主流拍,型號我忘了。
當天早上,8:30am就到達秀朗國小,在校園內都沒有任何指示牌,自已像無頭蒼蠅一樣,自已把整個校園繞了一圈,好不容易找到羽球館!
9:00am就在羽球館中等待yy的主辦人員,秀朗國小有四個羽球場地,9點開始,固定球友就陸陸續續的開始來打羽球,這時候如果有人進入羽球館,心裡就會想說這是不是yy的主辦人員,還是球友?
但是一直等到10:30am,yy的人員才跚跚來遲,手裡握著一杯咖啡,一臉毫不在乎的樣子。
這時,有其他人問yy人員,活動不是9點開始嗎?yy人員回答說,活動是11點開始,這也太離譜了,網站明明是寫9-12點...
更令人生氣的是,當到yy人員到來是,所有場地已被固定球友占滿,yy人員也沒有主動清場來讓試拍的我們有場地可以試拍,yy人員也沒有問我們誰是要來試拍的...
我當時只有一個人前去,沒有伙伴可以和我試打,心裡不僅OS-yy人員到底是來幹什麼的,活動辦成這個樣子,五~八支拍子放在桌上,就坐在那邊什麼都沒做。
完全沒有考慮要怎麼樣主導活動,讓每個人都有機會試到每一支拍子。
十分鐘過去,最後還是由那邊的球友空出1/2的場地讓我們試拍,六個人要試五~八支的拍子,卻只有半面場地可以用,可想而知,場面一片混亂,看到這樣的活動,我沒有試拍,就很生氣的就離開了。
yy在我心目前的美好印像真是大打折扣。也奉勸以後想要參加的各位,不要浪費自已寶貴的時間,去參加這種活動。
訂閱:
文章 (Atom)


