2016年12月25日 星期日
2016年12月16日 星期五
phpstorm connection with xdebug was not established. validate installation
Another way to solve it - to change the port of xdebug in php.ini. For example to 9001:
xdebug.remote_port=9001
After that you need to change xdebug port in PhpStorm in Preferences->Languages & Frameworks -> PHP -> Debug. Xdebug port set to 9001.
from : http://stackoverflow.com/questions/31285486/connection-between-phpstorm-and-xdebug
Cannot tap homebrew/php: invalid syntax in tap!
Make sure you're not stuck behind the update bug as well.
cd $(brew --prefix) && git fetch && git reset --hard origin/master
from : https://github.com/Homebrew/homebrew-php/issues/3558
Mac OSX php7 curl error 35 fixed
I've seen this error happen when php is compiled with a version of cURL that uses Apple's Secure Transport under Yosemite and the target of the URL request doesn't support SSLv3 (which was probably disabled due to the POODLE vulnerability). What is the output of this command?
$ php -i | grep "SSL Version"
I suspect you'll see this:
SSL Version => SecureTransport
You can overcome this by installing a version of php which uses a version of cURL which uses OpenSSL instead of SecureTransport. This is most easily done with homebrew. So install that first if you don't already have it. If homebrew is installed but you haven't run
brew update since upgrading to Yosemite, do that first. Also make sure you've installed XCode >= 6.1 and the latest XCode command line tools. brew doctor will tell you if you've done it all right.
Add the Homebrew taps below that you will need in order to get brewed php installed. Skip this step if these repos are already tapped. If you're unsure if these repos are already tapped, just run the commands below. Worst case scenario, you'll get a harmless
Warning: Already tapped!$ brew tap homebrew/dupes
$ brew tap homebrew/versions
$ brew tap homebrew/php
Then install curl with openssl:
$ brew install --with-openssl curl
Then install php using the curl you just installed and brewed openssl:
$ brew install --with-homebrew-curl php55- if using apache, make sure to add
LoadModule php5_module /usr/local/opt/php55/libexec/apache2/libphp5.soto your/etc/apache2/httpd.confand restart apache. - if using nginx, follow the caveat instuctions for starting fpm:To launch php-fpm on startup:
mkdir -p ~/Library/LaunchAgents
cp /usr/local/opt/php55/homebrew.mxcl.php55.plist ~/Library/LaunchAgents/
launchctl load -w ~/Library/LaunchAgents/homebrew.mxcl.php55.plist
Install any php extensions you're going to need eg.
mcrypt.$ brew install php55-mcrypt
After you're done, run this again:
$ php -i | grep "SSL Version"
And you should see:
SSL Version => OpenSSL/1.0.2h
And now, re-test your application
from : http://stackoverflow.com/questions/26461966/osx-10-10-curl-post-to-https-url-gives-sslread-error
2016年12月13日 星期二
Laracasts Tips
Request::exists('popular')
?popular => true
?nopopular => false
Request::has('popular')
?popular => false
?popular=hasValue => true
Filter Model
$lesson = (new Lesson)->newQuery();
if($request->exists('popular')){
$lesson->orderBy('views','desc');
}
if($request->has('difficulty')){
$lesson->where('difficulty', $request->difficulty);
}
return $lesson->get();
Simpler Code
1. No Abbreviations
2. Don't use else
- Defensive code
- Guard
- Reflection
3. One Level of Indentation
4. Limit you instance variables
- One responsibility for one class ( No more that 4 instance variables)
5. Wrap Primitives
- Doest it bring clarity
- Is there behavior?
class EmailAdress {
public function __construct($email){
if ( ! filter_var($email, FILTER_VALIDATE_EMAIL)){
throw new InvalidArgumentException;
}
$this->email = $email;
}
}
- Consistency
- Important domain concept
class Location {
public function __construct($latitude, $longtitude){
}
}
2016年12月12日 星期一
Laravel Tips
Pretend login user
Auth::loginUsingId(x);
Hook event in Model
Class Document extend Eloquent
{
public static functio boot(){
parent::boot();
static::updating(function($document)){
//do something
}
}
}
Pivot Model method withTimestamps and withPivot
public function adjustments(){
return $this->belongWithMany(User::class, 'adjustments')
->withTimestamps()
->withPivot(['before','after'])
->latest('pivot_updated_at']);
}
2016年12月11日 星期日
Laravel 5 Dynamically create Eloquent Models
php

namespace App\Models;

use Illuminate\Database\Eloquent\Model;
use Sofa\Revisionable\Laravel\RevisionableTrait;
use Sofa\Revisionable\Revisionable;

class Dynamic extends Model implements Revisionable
{
    use RevisionableTrait;

    /**
     * @param $table
     */
    public function __construct($attributes = [])
    {
        parent::__construct($attributes);
    }

    /**
     * Dynamically set a model's table.
     *
     * @param  $table
     * @return void
     */
    public function setTable($table)
    {
        $this->table = $table;

        return $this;
    }
}
from : http://stackoverflow.com/questions/34700373/laravel-5-dynamically-create-eloquent-models
Use Schema::hasTable outside laravel
use Illuminate\Database\Capsule\Manager as Capsule;
use Illuminate\Database\Schema\Blueprint;
Capsule::schema()->hasTable
2016年12月5日 星期一
PHPUnit note
phpunit --filter [test_method]
Given(setup the world) -- When(What I do) -- Then(What I expected)
Given(setup the world) -- When(What I do) -- Then(What I expected)
2016年12月1日 星期四
Multiple authentication guard drivers (including API) in Laravel 5.2
Let's get back to Laravel 5.2 features, shall we? 5.2 introduced a significant boost to the power of the entire authentication system, including making it much simpler to have multiple "guards" running at once.
Why should you care? #
The default authentication guard in Laravel prior to 5.2 (now named the
web guard) is your traditional web-based application authentication layer: username and password post to a controller, which checks the credentials and redirects if they are invalid; if valid, the user information gets saved to the session. Not all of those pieces are absolutely necessary but that's the general mindset.
But what if you want to have an API running in the same app, and it uses JSON web tokens (or some other stateless, non-session authentication mechanism)? In the past you'd have to jump through a lot of hoops to have multiple authentication drivers running at the same time.
Laravel 5.2's default auth guards #
In 5.2, not only is it simple to have multiple auth drivers running, it actually already works that way out of the box.
If you check
config/auth.php, you'll see two guards set out of the box: web, which is the classic Laravel authentication layer, and api, which is a stateless (no session memory) token-based driver.
Both, as you can see, connect to the same "provider".
Auth providers are also customizable. They're the definition of how the system should store and retrieve information about your users. Each is defined by an instance ofIlluminate\Contracts\Auth\UserProvider.
    'guards' => [
        'web' => [
            'driver' => 'session',
            'provider' => 'users',
        ],

        'api' => [
            'driver' => 'token',
            'provider' => 'users',
        ],
    ],
If you look up higher in
config/auth.php, you can see that the default Auth guard will be "web". That means any time you use Auth functions, middleware, or façades inside your application, they will default to the web guard unless you explicitly specify otherwise.Introducing the token auth driver #
So, if
web uses the classic session driver, what's this new token driver we're seeing powering the apiguard?
Jacob Bennett has written a fantastic post on that already: API Token Authentication in Laravel 5.2.
Check out his post to learn more about how it works, but here's the short of it:
- Add an
api_tokencolumn to youruserstable. 60-character string, unique. - Instead of using the
authmiddleware in your route definition, use theauth:apimiddleware. - In your API routes, use
Auth::guard('api')->user()to get your user instead ofAuth::user().
As you can see, we need to store an
api_token for each user, and every incoming request that's guarded by the token-driven api guard will require a query parameter named api_token with a valid API token set to authenticate that user. And since it's stateless, every request will need to have this API token set; one successful request won't affect the next request.If you're not familiar with token-based authentication, the consuming application (e.g. an iOS application) will have gotten, and saved, the token for the authenticating user prior to this request, so it will be creating its API calls using that known token as a part of the URL. For example, an iOS app might want to get a list of its user's friends; when the user first authenticated the application with your web site/API the app received a token and stored it. Now, it will generate requests using URLs like this:http://yourapp.com/api/friends?api_token=STORED_TOKEN_HERE
Using non-default drivers #
As you can see in the token example above, there are two primary places we're going to be using drivers other than the default: in the auth guard middleware, and when we're using convenience features like
Auth::check() and Auth::user() in our code.
You can choose which guard you're using to protect your routes by adding a colon and the guard name after
auth in the middleware key (e.g. Route::get('whatever', ['middleware' => 'auth:api'])).
You can choose which guard you're calling manually in your code by making
guard('guardname') the first call of a fluent chain every time you use the Auth façade (e.g. Auth::guard('api')->check()).Creating your own guards and drivers #
Creating your own guard is simple, beause each guard is just a key (
web, api) that points to a specific configuration of a driver (session, token) and a provider (users). They're configured, as mentioned above, in config/auth.php: 'guards' => [
'web' => [
'driver' => 'session',
'provider' => 'users',
],
'api' => [
'driver' => 'token',
'provider' => 'users',
],
'matts-fancy-api-guard' => [
'driver' => 'token',
'provider' => 'users',
],
],
But as you can tell, that doesn't really do much unless you're changing the driver or the provider.
Creating your own driver is not quite as simple as creating your own guard. The docs have a spot about Creating your own auth driver, and you're essentially going to be creating your own implementation of
Illuminate\Contracts\Auth\Guard and then registering it as a driver in a service provider somewhere.
The docs also cover how to create your own user provider.
Concludinal #
That's it. Enjoy.
from : https://mattstauffer.co/blog/multiple-authentication-guard-drivers-including-api-in-laravel-5-2
2016年11月26日 星期六
The auth scaffold in Laravel 5.2
If you're like me, many of the applications you build in Laravel have a similar Saas-type framework: user signup, user login, password reset, public sales page, logged-in dashboard, logout route, and a base Bootstrap style for when you're just getting started.
Laravel used to have a scaffold for this out of the box. It disappeared recently, to my great chagrin, but it's now back as an Artisan command:
make:auth.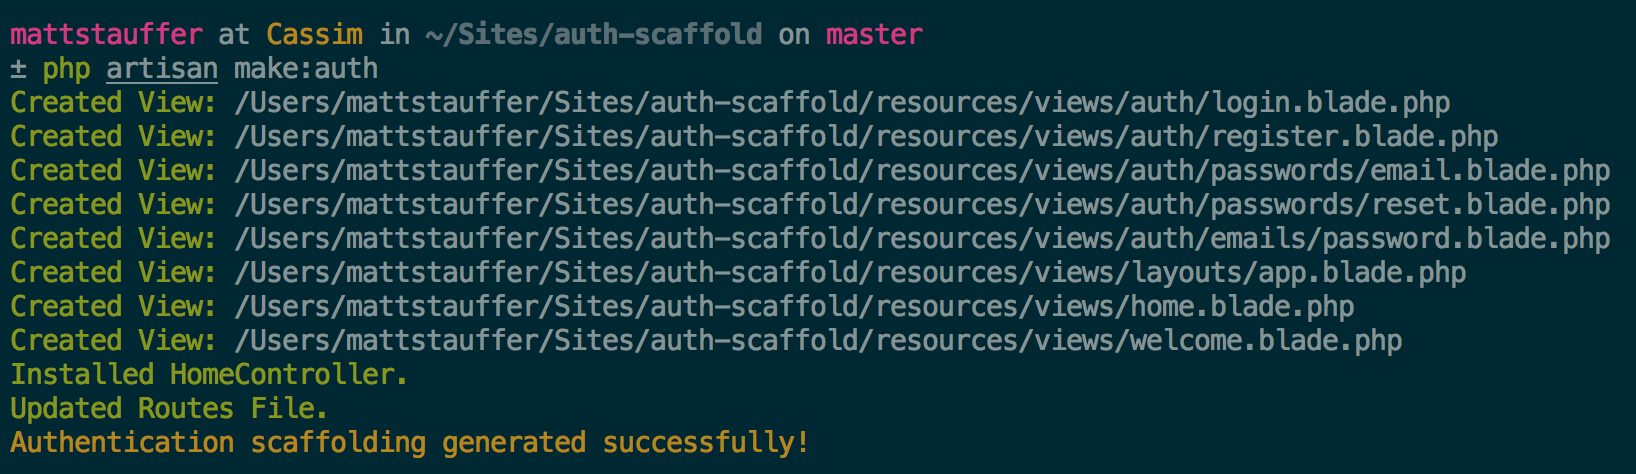
What does it provide? Let's dig in.
What changed? #
We have a layout (
resources/views/layouts/app.blade.php) that is the core of this scaffold, and then a series of views that extend it:- welcome.blade.php - the public welcome page
- home.blade.php - the dashboard for logged-in users
- auth/login.blade.php - the login page
- auth/register.blade.php - the register/signup page
- auth/passwords/email.blade.php - the password reset confirmation page
- auth/passwords/reset.blade.php - the password reset prompt page
- auth/emails/password.blade.php - the password reset email
Our public page is still routed via
routes.php:Route::get('/', function () {
return view('welcome');
});
And we now have a
HomeController, which routes our dashboard:class HomeController extends Controller
{
/**
* Show the application dashboard.
*
* @return Response
*/
public function index()
{
return view('home');
}
}
This is of course routed in
routes.php in the web group. And notice that there's something else new there: The Route::auth() method:Route::group(['middleware' => 'web'], function () {
Route::auth();
Route::get('/home', 'HomeController@index');
});Route::auth() #
The
auth() method is a shortcut to defining the following routes:// Authentication Routes...
$this->get('login', 'Auth\AuthController@showLoginForm');
$this->post('login', 'Auth\AuthController@login');
$this->get('logout', 'Auth\AuthController@logout');
// Registration Routes...
$this->get('register', 'Auth\AuthController@showRegistrationForm');
$this->post('register', 'Auth\AuthController@register');
// Password Reset Routes...
$this->get('password/reset/{token?}', 'Auth\PasswordController@showResetForm');
$this->post('password/email', 'Auth\PasswordController@sendResetLinkEmail');
$this->post('password/reset', 'Auth\PasswordController@reset');The frontend #
Now let's take a look at what we get in the browser:
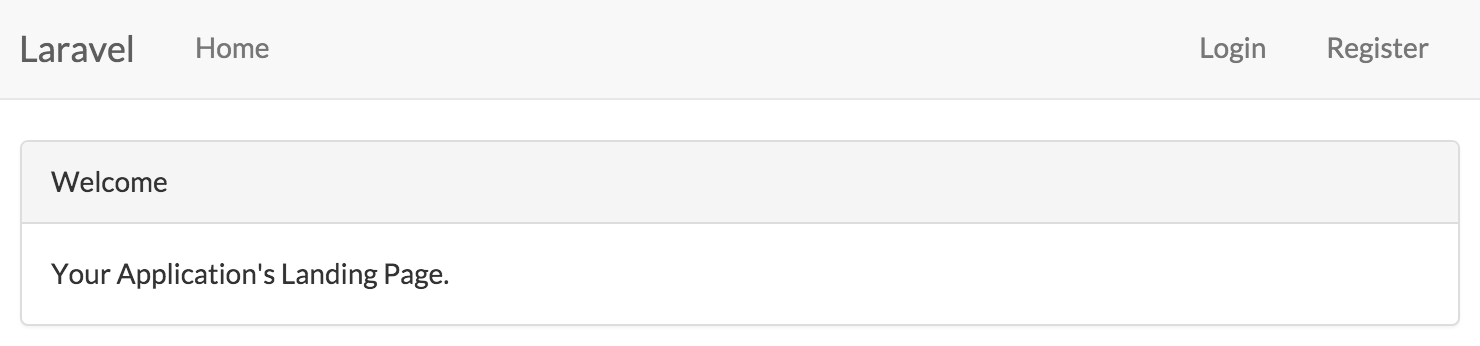
As you can see we have Bootstrap CSS, a basic Bootstrap app layout, and helpful to our basic auth actions.
App.blade.php #
So what does this master layout look like?
We get FontAwesome, the Lato font, Bootstrap CSS, a basic hamburger-on-mobile responsive layout, jQuery, Bootstrap JS, and placeholders that are commented out for the default output CSS and JS files if you choose to use Elixir.
We also have a top nav that links us home, and links guests to either login or register, and links authenticated users to log out.
Conclusion #
That's it! It's not anything complex, but it's 30-60 minutes of typing that you just saved on every app that needs it.
from : https://mattstauffer.co/blog/the-auth-scaffold-in-laravel-5-2
訂閱:
文章 (Atom)


