Uninstall all those broken versions of MySQL and re-install it with Brew on Mac Mavericks
Remove MySQL completely per The Tech Labps -ax | grep mysql
stop and kill any MySQL processes
brew remove mysql
brew cleanup
sudo rm /usr/local/mysql
sudo rm -rf /usr/local/var/mysql
sudo rm -rf /usr/local/mysql*
sudo rm ~/Library/LaunchAgents/homebrew.mxcl.mysql.plist
sudo rm -rf /Library/StartupItems/MySQLCOM
sudo rm -rf /Library/PreferencePanes/My*
launchctl unload -w ~/Library/LaunchAgents/homebrew.mxcl.mysql.plist
edit /etc/hostconfig and remove the line MYSQLCOM=-YES-
rm -rf ~/Library/PreferencePanes/My*
sudo rm -rf /Library/Receipts/mysql*
sudo rm -rf /Library/Receipts/MySQL*
sudo rm -rf /private/var/db/receipts/*mysql*
restart your computer just to ensure any MySQL processes are killed
try to run mysql, it shouldn't work
Brew install MySQL per user Sedorner from this StackOverflow answer
brew doctor and fix any errors
brew update
brew install mysql
unset TMPDIR
mysql_install_db --verbose --user=`whoami` --basedir="$(brew --prefix mysql)" --datadir=/usr/local/var/mysql --tmpdir=/tmp
mysql.server start
run the commands Brew suggests, add MySQL to launchctl so it automatically launches at startup
mysql should now work and be running all the time as expected
Godspeed.
reference : https://coderwall.com/p/os6woq/uninstall-all-those-broken-versions-of-mysql-and-re-install-it-with-brew-on-mac-mavericks
Installing phpMyAdmin on Mac OSX 10.9 Mavericks & 10.8, 10.7, 10.6
To interact with MySQL by instead of using the command line, phpMyAdmin comes to the rescue, to get it running as part of your local development set up on OS X, a couple of steps need to be done. phpMyAdmin is a browser application that interacts with the underlying mysql data.
These steps will work on Mac OS X 10.9 Mavericks, OSX 10.8 Mountain Lion, 10.7 and 10.6 Snow Leopard.
Preparing for phpMyAdmin
Download the latest version now at version 4.something phpMyAdmin, the english.zipshould be sufficient, after the file is downloaded unzip it and move it to your personal web sharing folder, this will either be “/Users/username/Sites” directory or other web root folder such as “/Library/WebServer/Documents/“.
Rename the folder from “phpMyAdmin-4.0.0-english” to “phpmyadmin“.
The rest of the tutorial assumes that you have already mysql set up with a mysql root user and password enabled if not then please follow that process first.
The rest of the tutorial assumes that you have already mysql set up with a mysql root user and password enabled if not then please follow that process first.
The login address for phpMyAdmin is going to behttp://localhost/~username/phpmyadmin/ or http://localhost/phpmyadmin/depending on your web root directory, but before this will work correctly a few steps need to be done namely addressing the MySQL socket error and configuration file set up:
a) Launch /Applications/Utilities/Terminal to fix the mysql 2002 socket error by entering the following commands:
sudo mkdir /var/mysql
sudo ln -s /tmp/mysql.sock /var/mysql/mysql.sock
Basically this is making an alias to where phpmyadmin thinks the mysql.sock is and where it actually is.
b) In the phpmyadmin folder in your web root make a new directory named “config”.
mkdir ~/Sites/phpmyadmin/config
c) Give Others “write“permissions to the “/phpmyadmin/config” folder either through Get Info or a ‘chmod o+w‘ in Terminal.
chmod o+w ~/Sites/phpmyadmin/config
Installing phpMyAdmin
Older Safari browser currently has issues with the installation, blank screens?? Upgrade to Safari 6 or use either Chrome or Firefox.
Now we are ready to run the set up in the browser by going to:
http://localhost/~username/phpmyadmin/setup/
or
http://localhost/phpmyadmin/setup/
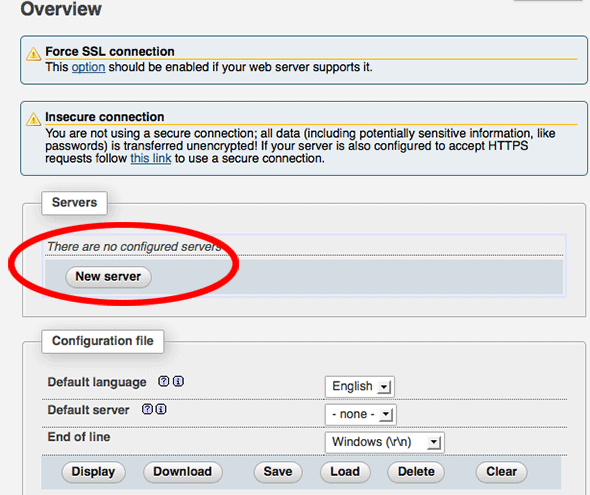
The new server to be configured is the localhost, click new server and then the only other configurations are the local mysql root user and the password in the Authentication tab.
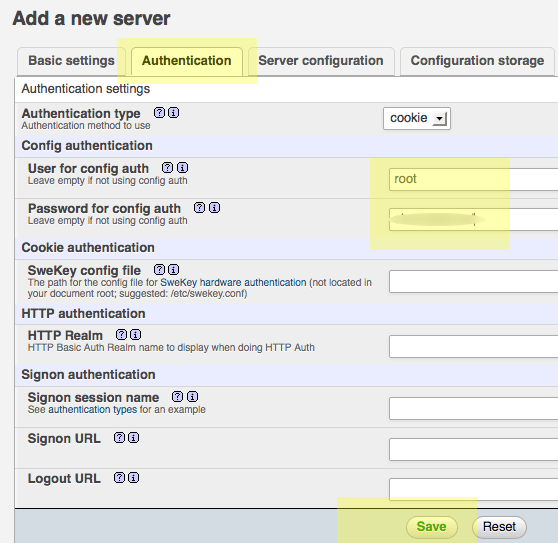
Add in the username, by default “root” is assumed, add in the mysql root password (this is the password for mysql not for the OSX admin account) , click on save and you are returned to the previous screen.

Make sure you click on save, then a config.inc.php is now in the /config directory, move this file to the root level of /phpmyadmin and then remove the now empty /configdirectory.
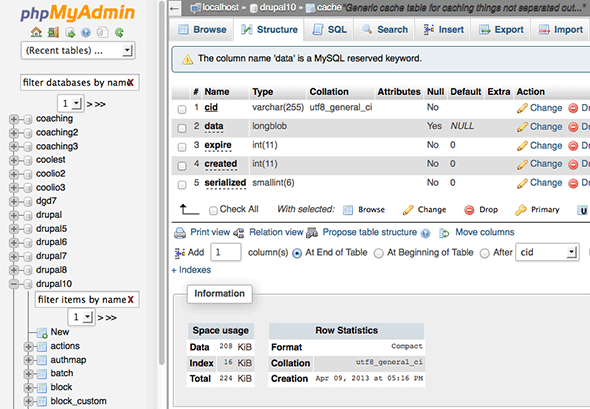
Now going to http://localhost/~username/phpmyadmin/ or http://localhost/phpmyadmin/will now allow you to interact with your MySQL databases.
Mcrypt missing extension – If your applications don’t require the mcrypt extension there is no need to worry about it missing as reported in phpMyAdmin, if you do need to install it follow the guide here on mcrypt extension in Mavericks.
Upgrading phpMyAdmin is an easy task just grab the latest version from the phpmyadmin website and replace your older phpMyAdmin directory in your web shared folder apart from the “config.inc.php” file – make sure the config.inc.php is kept and put it back in the new directory.
Troubleshooting
phpmyadmin #1045 Cannot log in to the MySQL server. after installing mysql command line client
In case MySQL Server is up but you are still getting the error:
For anyone who still have this issue, I followed awesome tutorialhttp://coolestguidesontheplanet.com/get-apache-mysql-php-phpmyadmin-working-osx-10-9-mavericks/
However i still got #1045 error. What really did the trick was to change
localhost to 127.0.0.1 at your config.inc.php. Why was it failing if locahost points to 127.0.0.1? I don't know. But it worked.
===== EDIT =====
Long story short, it is because of permissions in mysql. It may be set to accept connections from 127.0.0.1 but not from localhost.
The actual answer for why this isn't responding is here: http://serverfault.com/a/297310
reference : http://stackoverflow.com/questions/20887507/phpmyadmin-1045-cannot-log-in-to-the-mysql-server-after-installing-mysql-comma


沒有留言:
張貼留言